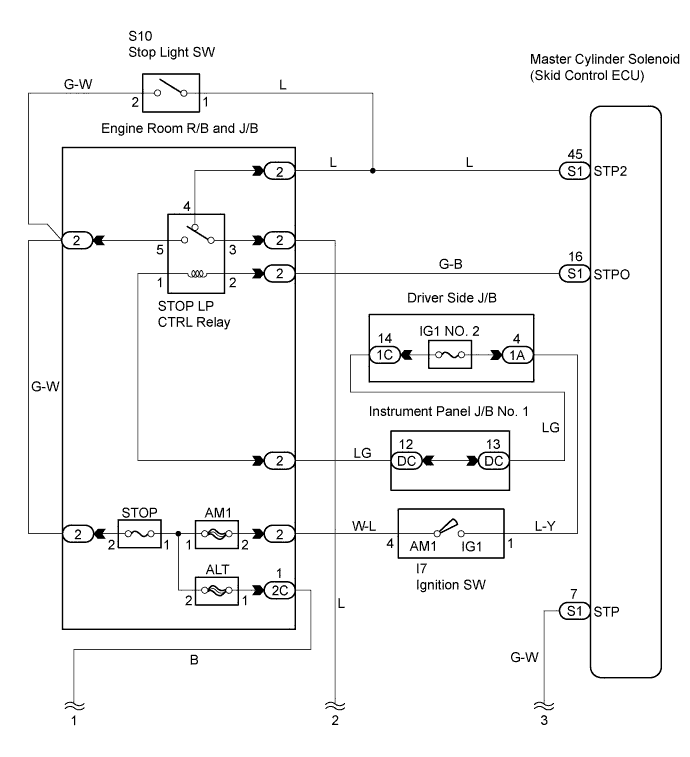
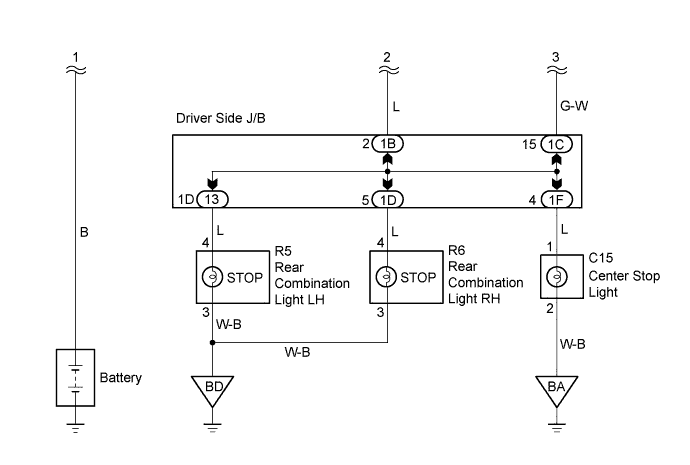
DTC C1380/64 Stop Light Control Relay Malfunction |
| DTC No. | DTC Detecting Conditions | Trouble Areas |
| C1380/64 | Either of following conditions met when IG1 terminal voltage between 10 V and 14 V:
|
|
| 1.CHECK STOP LIGHT SWITCH OPERATION |
Check that the stop lights come on when the brake pedal is depressed and go off when the brake pedal is released.
| Pedal Condition | Illumination Condition |
| Brake pedal depressed | ON |
| Brake pedal released | OFF |
|
| ||||
| OK | |
 |
| 2.INSPECT SKID CONTROL ECU (STP TERMINAL VOLTAGE) |
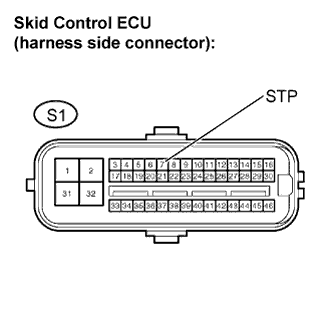 |
Disconnect the skid control ECU connector.
Measure the voltage.
| Tester Connection | Switch condition | Specified Condition |
| S1-7 (STP) - Body ground | Brake pedal depressed | 8 to 16 V |
| S1-7 (STP) - Body ground | Brake pedal released | Below 1.5 V |
Reconnect the skid control ECU connector.
|
| ||||
| OK | |
|
| 3.INSPECT SKID CONTROL ECU (STP2 TERMINAL VOLTAGE) |
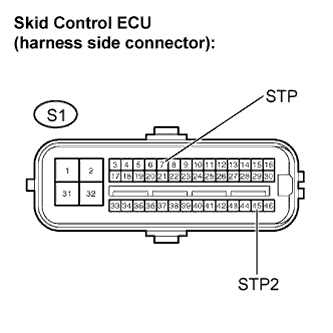 |
Disconnect the skid control ECU connector.
Measure the resistance.
| Tester Connection | Specified Condition |
| S1-7 (STP) - S1-45 (STP2) | Below 1 Ω |
Reconnect the skid control ECU connector.
|
| ||||
| OK | |
|
| 4.PERFORM ACTIVE TEST BY INTELLIGENT TESTER (STOP LIGHT RELAY) |
Connect the intelligent tester to the DLC3.
Turn the ignition switch to the ON position.
Turn the intelligent tester ON.
Select the ACTIVE TEST mode on the intelligent tester.
| Item | Vehicle Condition / Test Details | Diagnostic Note |
| STP LIGHT RELAY | Turns stop light relay ON / OFF | Observe stop lights |
Check that the stop lights turn on and off on the rear combination light when using the intelligent tester.
|
| ||||
| OK | |
|
| 5.RECONFIRM DTC |
Clear the DTCs (Click here).
Check if the same DTCs are recorded.
| Result | Proceed to |
| DTC output | A |
| DTC not output | B |
|
| ||||
| A | ||
 | ||
| ||
| 6.CHECK STOP LIGHT CONTROL RELAY |
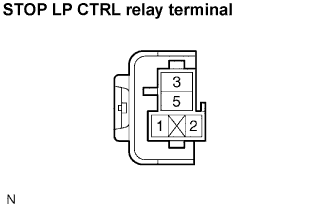 |
Disconnect the STOP LP CTRL relay.
Turn the ignition switch to the ON position.
Measure the voltage.
| Tester Connection | Condition | Specified Condition |
| Terminal 5 - Body ground | Always | 8 to 16 V |
| Terminal 1 - Body ground | Always | 8 to 16 V |
Turn the ignition switch to OFF.
Reconnect the STOP LP CTRL relay.
|
| ||||
| OK | |
|
| 7.INSPECT STOP LIGHT CONTROL RELAY |
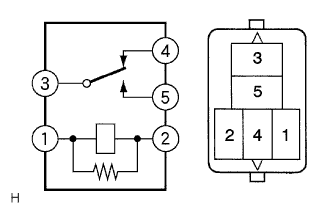 |
Remove the STOP LP CTRL relay from the engine room R/B and J/B.
Measure the resistance.
| Tester Connection | Specified Condition |
| 3 - 4 | Below 1 Ω |
| 3 - 5 | 10 kΩ or higher |
Apply the battery voltage between terminals 1 (+) and 2 (-).
Measure the resistance.
| Tester Connection | Specified Condition |
| 3 - 4 | 10 kΩ or higher |
| 3 - 5 | Below 1 Ω |
Reinstall the STOP LP CTRL relay.
|
| ||||
| OK | |
|
| 8.INSPECT MASTER CYLINDER SOLENOID (STPO TERMINAL VOLTAGE) |
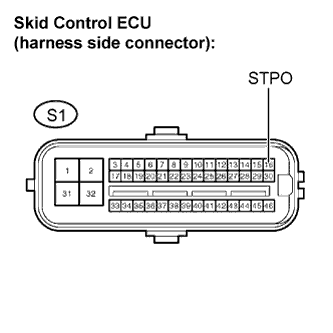 |
Disconnect the skid control ECU connector.
Turn the ignition switch to the ON position.
Measure the voltage.
| Tester Connection | Condition | Specified Condition |
| S1-16 (STPO) - Body ground | Brake pedal depressed | 10 to 14 V |
Turn the ignition switch to OFF.
Reconnect the skid control ECU connector.
|
| ||||
| OK | |
|
| 9.RECONFIRM DTC |
Clear the DTCs (Click here).
Check if the same DTCs are recorded.
| Result | Proceed to |
| DTC output | A |
| DTC not output | B |
|
| ||||
| A | ||
| ||
| ||
| 10.CHECK STOP LIGHT SWITCH ASSEMBLY (STOP LIGHT SWITCH POWER SOURCE TERMINAL VOLTAGE) |
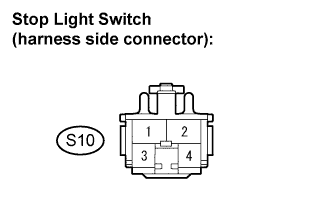 |
Disconnect the stop light switch connector.
Turn the ignition switch to the ON position.
Measure the voltage.
| Tester Connection | Specified Condition |
| S10-2 Body ground | 10 to 14 V |
Turn the ignition switch to OFF.
Reconnect the stop light switch connector.
|
| ||||
| OK | |
|
| 11.INSPECT STOP LIGHT SWITCH ASSEMBLY |
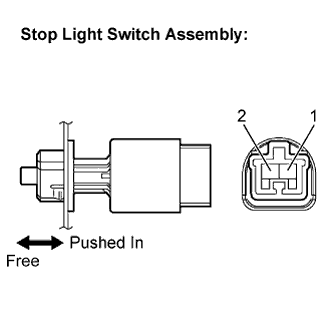 |
Disconnect the stop light switch connector.
Measure the resistance.
| Switch condition | Tester connection | Specified condition |
| Switch pin free | 1 - 2 | Below 1 Ω |
| Switch pin pushed in | 1 - 2 | 10 kΩ or higher |
Reconnect the stop light switch connector.
|
| ||||
| OK | |
|
| 12.CHECK HARNESS AND CONNECTOR (STOP LIGHT SWITCH - STOP LP CTRL RELAY) |
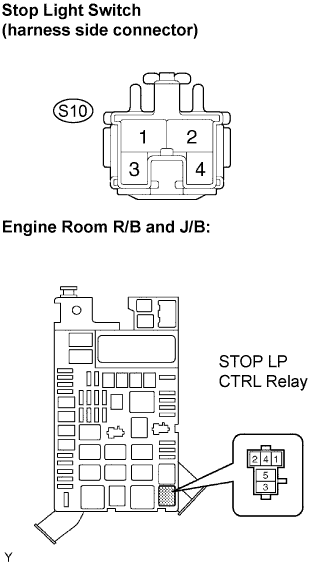 |
Remove the STOP LP CTRL relay.
Measure the resistance.
| Tester Connection | Specified Condition |
| S10-2 - STOP LP CTRL relay (5) | Below 1 Ω |
| S10-2 - Body ground | 10 kΩ or higher |
Reinstall the STOP LP CTRL relay.
|
| ||||
| OK | |
|
| 13.INSPECT STOP LIGHT CONTROL RELAY |
|
Remove the STOP LP CTRL relay from the engine room R/B and J/B.
Measure the resistance.
| Tester Connection | Specified Condition |
| 3 - 4 | Below 1 Ω |
| 3 - 5 | 10 kΩ or higher |
Apply the battery voltage between terminals 1 (+) and 2 (-).
Measure the resistance.
| Tester Connection | Specified Condition |
| 3 - 4 | 10 kΩ or higher |
| 3 - 5 | Below 1 Ω |
Reinstall the STOP LP CTRL relay.
|
| ||||
| OK | |
|
| 14.CHECK HARNESS AND CONNECTOR (REAR COMBINATION LIGHT - STOP LP CTRL RELAY) |
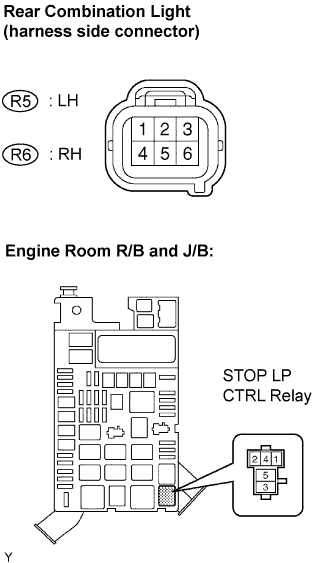 |
Disconnect the rear combination light connector.
Remove the STOP LP CTRL relay.
Measure the resistance.
| Tester Connection | Specified Condition |
| R5-1 - STOP LP CTRL (4) | Below 1 Ω |
| R5-1 - Body ground | 10 kΩ or higher |
| R5-6 - Body ground | Below 1 Ω |
| Tester Connection | Specified Condition |
| R6-1 - STOP LP CTRL (4) | Below 1 Ω |
| R6-1 - Body ground | 10 kΩ or higher |
| R6-6 - Body ground | Below 1 Ω |
Reinstall the STOP LP CTRL relay.
Reconnect the rear combination light connector.
|
| ||||
| OK | ||
| ||
| ||

