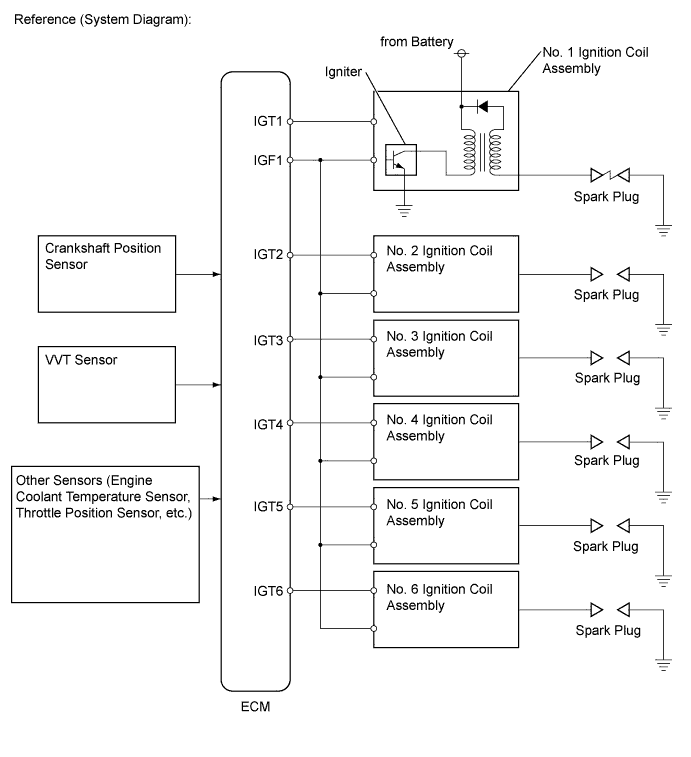
DTC P0351 Ignition Coil "A" Primary / Secondary Circuit |
DTC P0352 Ignition Coil "B" Primary / Secondary Circuit |
DTC P0353 Ignition Coil "C" Primary / Secondary Circuit |
DTC P0354 Ignition Coil "D" Primary / Secondary Circuit |
DTC P0355 Ignition Coil "E" Primary / Secondary Circuit |
DTC P0356 Ignition Coil "F" Primary / Secondary Circuit |
| DTC No. | DTC Detection Condition | Trouble Area |
| P0351 P0352 P0353 P0354 P0355 P0356 | No IGF signal to ECM while engine running (1 trip detection logic) |
|
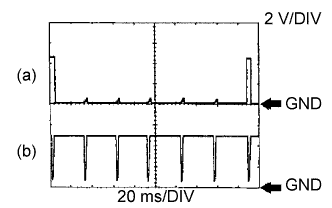
| Item | Content |
| Terminal | (a) Between IGT (1 to 6) and E1 (b) Between IGF1 and E1 |
| Equipment Setting | 2 V/DIV, 20 ms/DIV |
| Condition | Idling |
| Related DTCs | P0351: Igniter (Cylinder 1) malfunction P0352: Igniter (Cylinder 2) malfunction P0353: Igniter (Cylinder 3) malfunction P0354: Igniter (Cylinder 4) malfunction P0355: Igniter (Cylinder 5) malfunction P0356: Igniter (Cylinder 6) malfunction |
| Required Sensors/Components (Main) | Igniter (Cylinder 1 to 6) |
| Required Sensors/Components (Related) | Crankshaft position sensor |
| Frequency of Operation | Continuous |
| Duration | - |
| MIL Operation | Immediate |
| Sequence of Operation | None |
| Monitor runs whenever following DTCs not stored | None |
| All of the following conditions are met | - |
| Spark cut | Not operating |
| Either of the following conditions is met | A or B |
| A. Starter | OFF |
| B. Engine speed | 1500 rpm or less |
| Either of the following conditions is met | C or D |
| C. Both of the following conditions are met | - |
| Engine speed | 500 rpm or less |
| Battery voltage | 6 V or more |
| D. All of the following conditions are met | - |
| Engine speed | More than 500 rpm |
| Battery voltage | 10 V or more |
| Number of sparks after CPU is reset | 5 sparks or more |
| All of the following conditions are met | A, B, C and D |
| A. Ignition signal fail counter | More than 2 times |
| B. Time after condition A is met | 0.256 seconds or more |
| C. Ignition signal fail counter after condition B is met | 2 times or more |
| D. Ignition switch | ON |
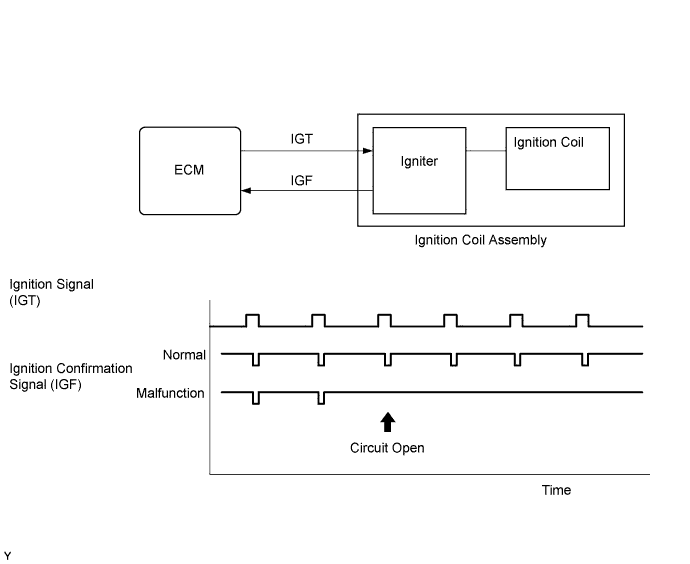
| IGF signal | Igniter transmits IGF signal when it receives IGT signal from ECM |
| Techstream Display | Description |
| NORMAL |
|
| ABNORMAL |
|
| INCOMPLETE |
|
| N/A |
|
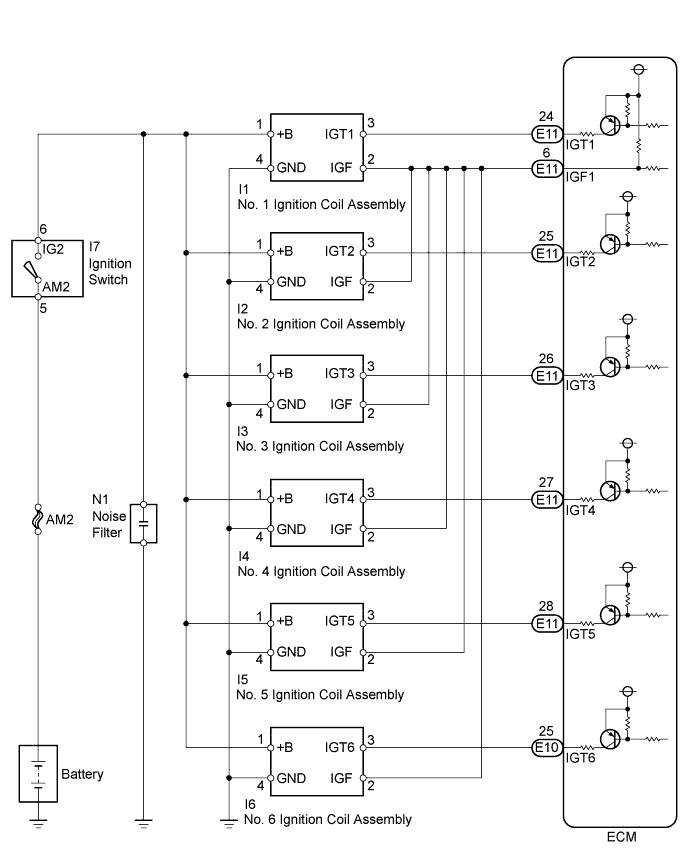
| 1.CHECK SPARK PLUG AND SPARK OF MISFIRING CYLINDER |
Check the spark plug and sparks of the misfiring cylinder (Click here).
|
| ||||
| OK | |
 |
| 2.CHECK HARNESS AND CONNECTOR (IGNITION COIL ASSEMBLY - ECM (IGF1 SIGNAL TERMINAL)) |
Disconnect the ignition coil assembly connector.
Disconnect the ECM connector.
Measure the resistance according to the value(s) in the table below.
| Tester Connection | Condition | Specified Condition |
| I1-2 (IGF) - E11-6 (IGF1) | Always | Below 1 Ω |
| I2-2 (IGF) - E11-6 (IGF1) | Always | Below 1 Ω |
| I3-2 (IGF) - E11-6 (IGF1) | Always | Below 1 Ω |
| I4-2 (IGF) - E11-6 (IGF1) | Always | Below 1 Ω |
| I5-2 (IGF) - E11-6 (IGF1) | Always | Below 1 Ω |
| I6-2 (IGF) - E11-6 (IGF1) | Always | Below 1 Ω |
| I1-2 (IGF) or E11-6 (IGF1) - Body ground | Always | 10 kΩ or higher |
| I2-2 (IGF) or E11-6 (IGF1) - Body ground | Always | 10 kΩ or higher |
| I3-2 (IGF) or E11-6 (IGF1) - Body ground | Always | 10 kΩ or higher |
| I4-2 (IGF) or E11-6 (IGF1) - Body ground | Always | 10 kΩ or higher |
| I5-2 (IGF) or E11-6 (IGF1) - Body ground | Always | 10 kΩ or higher |
| I6-2 (IGF) or E11-6 (IGF1) - Body ground | Always | 10 kΩ or higher |
|
| ||||
| OK | |
|
| 3.INSPECT ECM (IGF1 VOLTAGE) |
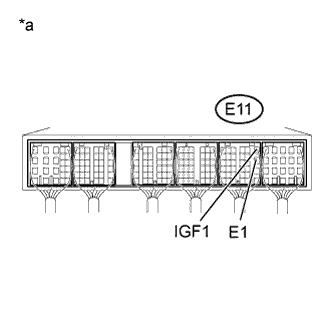 |
Disconnect the ignition coil assembly connector.
Turn the ignition switch to ON.
Measure the voltage according to the value(s) in the table below.
| Tester Connection | Switch Condition | Specified Condition |
| E11-6 (IGF1) - E11-12 (E1) | Ignition switch ON | 4.5 to 5.5 V |
| *a | Component with harness connected (ECM) |
|
| ||||
| OK | ||
 | ||
| ||
| 4.CHECK HARNESS AND CONNECTOR (IGNITION COIL ASSEMBLY - ECM (IGT SIGNAL TERMINAL)) |
Disconnect the ignition coil assembly connector.
Disconnect the ECM connector.
Measure the resistance according to the value(s) in the table below.
| Tester Connection | Condition | Specified Condition |
| I1-3 (IGT1) - E11-24 (IGT1) | Always | Below 1 Ω |
| I2-3 (IGT2) - E11-25 (IGT2) | Always | Below 1 Ω |
| I3-3 (IGT3) - E11-26 (IGT3) | Always | Below 1 Ω |
| I4-3 (IGT4) - E11-27 (IGT4) | Always | Below 1 Ω |
| I5-3 (IGT5) - E11-28 (IGT5) | Always | Below 1 Ω |
| I6-3 (IGT6) - E10-25 (IGT6) | Always | Below 1 Ω |
| I1-3 (IGT1) or E11-24 (IGT1) - Body ground | Always | 10 kΩ or higher |
| I2-3 (IGT2) or E11-25 (IGT2) - Body ground | Always | 10 kΩ or higher |
| I3-3 (IGT3) or E11-26 (IGT3) - Body ground | Always | 10 kΩ or higher |
| I4-3 (IGT4) or E11-27 (IGT4) - Body ground | Always | 10 kΩ or higher |
| I5-3 (IGT5) or E11-28 (IGT5) - Body ground | Always | 10 kΩ or higher |
| I6-3 (IGT6) or E10-25 (IGT6) - Body ground | Always | 10 kΩ or higher |
|
| ||||
| OK | |
|
| 5.INSPECT ECM (IGT1, IGT2, IGT3, IGT4, IGT5, OR IGT6 VOLTAGE) |
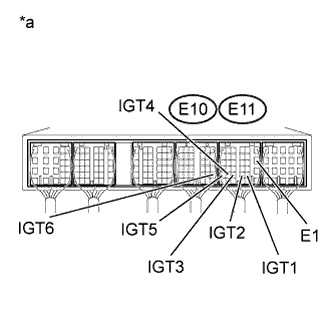 |
Measure the voltage according to the value(s) in the table below, when the engine is cranked.
| Tester Connection | Condition | Specified Condition |
| E11-24 (IGT1) - E11-12 (E1) | Cranking | 0.1 to 4.5 V |
| E11-25 (IGT2) - E11-12 (E1) | Cranking | 0.1 to 4.5 V |
| E11-26 (IGT3) - E11-12 (E1) | Cranking | 0.1 to 4.5 V |
| E11-27 (IGT4) - E11-12 (E1) | Cranking | 0.1 to 4.5 V |
| E11-28 (IGT5) - E11-12 (E1) | Cranking | 0.1 to 4.5 V |
| E10-25 (IGT6) - E11-12 (E1) | Cranking | 0.1 to 4.5 V |
| *a | Component with harness connected (ECM) |
|
| ||||
| OK | |
|
| 6.CHECK HARNESS AND CONNECTOR (IGNITION COIL ASSEMBLY - ECM) |
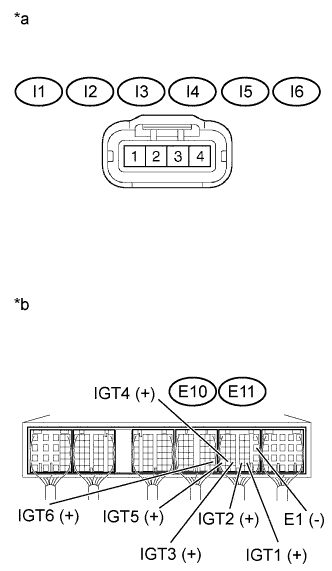 |
Disconnect the ignition coil assembly connector.
Measure the voltage according to the value(s) in the table below, when the engine is cranked.
| Tester Connections | Condition | Specified Conditions |
| E11-24 (IGT1) - E11-12 (E1) | Cranking | 4.5 V or more |
| E11-25 (IGT2) - E11-12 (E1) | Cranking | 4.5 V or more |
| E11-26 (IGT3) - E11-12 (E1) | Cranking | 4.5 V or more |
| E11-27 (IGT4) - E11-12 (E1) | Cranking | 4.5 V or more |
| E11-28 (IGT5) - E11-12 (E1) | Cranking | 4.5 V or more |
| E10-25 (IGT6) - E11-12 (E1) | Cranking | 4.5 V or more |
| *a | Front view of wire harness connector (to Ignition Coil Assembly) |
| *b | Component with harness connected (ECM) |
|
| ||||
| OK | |
|
| 7.INSPECT IGNITION COIL ASSEMBLY (POWER SOURCE) |
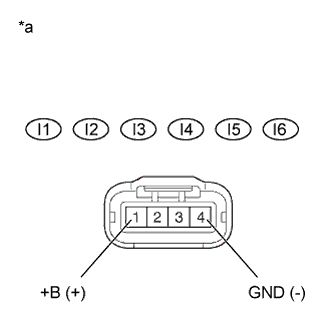 |
Disconnect the ignition coil assembly connector.
Measure the resistance according to the value(s) in the table below.
| Tester Connection | Condition | Specified Condition |
| I1-4 (GND) - Body ground | Always | Below 1 Ω |
| I2-4 (GND) - Body ground | Always | Below 1 Ω |
| I3-4 (GND) - Body ground | Always | Below 1 Ω |
| I4-4 (GND) - Body ground | Always | Below 1 Ω |
| I5-4 (GND) - Body ground | Always | Below 1 Ω |
| I6-4 (GND) - Body ground | Always | Below 1 Ω |
Turn the ignition switch to ON.
Measure the voltage according to the value(s) in the table below.
| Tester Connection | Switch Condition | Specified Condition |
| I1-1 (+B) - I1-4 (GND) | Ignition switch ON | 11 to 14 V |
| I2-1 (+B) - I2-4 (GND) | Ignition switch ON | 11 to 14 V |
| I3-1 (+B) - I3-4 (GND) | Ignition switch ON | 11 to 14 V |
| I4-1 (+B) - I4-4 (GND) | Ignition switch ON | 11 to 14 V |
| I5-1 (+B) - I5-4 (GND) | Ignition switch ON | 11 to 14 V |
| I6-1 (+B) - I6-4 (GND) | Ignition switch ON | 11 to 14 V |
| *a | Front view of wire harness connector (to Ignition Coil Assembly) |
|
| ||||
| OK | ||
| ||
| ||
| 8.CHECK HARNESS AND CONNECTOR (IGNITION COIL ASSEMBLY - IGNITION SWITCH) |
Disconnect the ignition coil assembly connector.
Disconnect the ignition switch connector.
Measure the resistance according to the value(s) in the table below.
| Tester Connection | Condition | Specified Condition |
| I1-1 (+B) - I7-6 (IG2) | Always | Below 1 Ω |
| I2-1 (+B) - I7-6 (IG2) | Always | Below 1 Ω |
| I3-1 (+B) - I7-6 (IG2) | Always | Below 1 Ω |
| I4-1 (+B) - I7-6 (IG2) | Always | Below 1 Ω |
| I5-1 (+B) - I7-6 (IG2) | Always | Below 1 Ω |
| I6-1 (+B) - I7-6 (IG2) | Always | Below 1 Ω |
| I1-1 (+B) or I7-6 (IG2) - Body ground | Always | 10 kΩ or higher |
| I2-1 (+B) or I7-6 (IG2) - Body ground | Always | 10 kΩ or higher |
| I3-1 (+B) or I7-6 (IG2) - Body ground | Always | 10 kΩ or higher |
| I4-1 (+B) or I7-6 (IG2) - Body ground | Always | 10 kΩ or higher |
| I5-1 (+B) or I7-6 (IG2) - Body ground | Always | 10 kΩ or higher |
| I6-1 (+B) or I7-6 (IG2) - Body ground | Always | 10 kΩ or higher |
|
| ||||
| OK | ||
| ||
| ||

