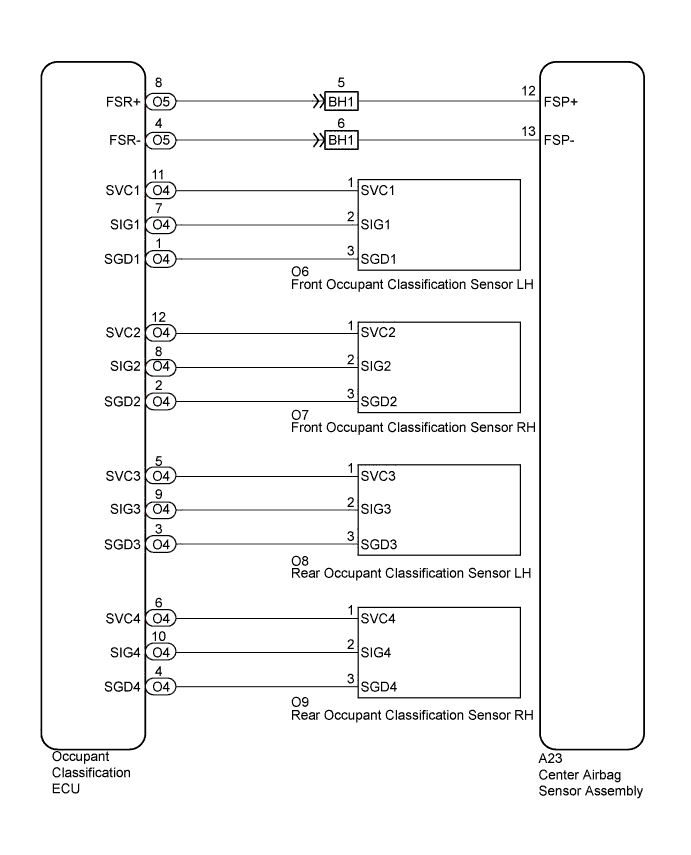
OCCUPANT CLASSIFICATION SYSTEM (for Separate Seat Type) > Trouble in Passenger Airbag ON/OFF Indicator |
| 1.CHECK PASSENGER AIRBAG ON/OFF INDICATOR OPERATION |
Turn the ignition switch to the ON position.
The passenger airbag ON/OFF indicator (ON and OFF) comes on for approximately 4 seconds, then turns off for approximately 2 seconds.
Approximately 6 seconds after the ignition switch is turned to the ON position, the passenger airbag ON/OFF indicator indicates ON/OFF according to the condition listed below.
| Front Seat Passenger | ON Indicator | OFF Indicator | SRS Warning Light |
| Adult seated | ON | OFF | OFF |
| Child seated / Child restrain system set | OFF | ON | OFF |
| Vacant | OFF | OFF | OFF |
|
| ||||
| NG | |
 |
| 2.CHECK DTC |
Turn the ignition switch to the ON position, and wait for at least 60 seconds.
Check for DTCs (Click here).
|
| ||||
| OK | |
|
| 3.CHECK PASSENGER AIRBAG ON/OFF INDICATOR OPERATION |
Turn the ignition switch to the ON position.
The passenger airbag ON/OFF indicator (ON and OFF) comes on for approximately 4 seconds, then turns off for approximately 2 seconds.
Approximately 6 seconds after the ignition switch is turned to the ON position, the passenger airbag ON/OFF indicator indicates ON/OFF according to the condition listed below.
| Front Seat Passenger | ON Indicator | OFF Indicator | SRS Warning Light |
| Adult seated | ON | OFF | OFF |
| Child seated / Child restrain system set | OFF | ON | OFF |
| Vacant | OFF | OFF | OFF |
|
| ||||
| NG | |
|
| 4.CHECK CONNECTION OF CONNECTORS |
Turn the ignition switch to the LOCK position.
Disconnect the negative (-) terminal cable from the battery, and wait for at least 90 seconds.
Check that the connectors are properly connected to the center airbag sensor assembly, occupant classification ECU, and 4 occupant classification sensors.
|
| ||||
| OK | |
|
| 5.CHECK CONNECTORS |
Check that the connectors (on the center airbag sensor assembly side, occupant classification ECU side and 4 occupant classification sensors side) are not damaged (Click here).
|
| ||||
| OK | |
|
| 6.PERFORM ZERO POINT CALIBRATION |
Connect the negative (-) terminal cable to the battery.
Connect the Techstream to the DLC3.
Turn the ignition switch to the ON position.
Using the Techstream, perform the zero point calibration (Click here).
|
| ||||
| OK | |
|
| 7.PERFORM SENSITIVITY CHECK |
Using the Techstream, perform the sensitivity check (Click here).
|
| ||||
| OK | |
|
| 8.CHECK PASSENGER AIRBAG ON/OFF INDICATOR OPERATION |
Turn the ignition switch to the ON position.
The passenger airbag ON/OFF indicator (ON and OFF) comes on for approximately 4 seconds, then turns off for approximately 2 seconds.
Approximately 6 seconds after the ignition switch is turned to the ON position, the passenger airbag ON/OFF indicator indicates ON/OFF according to the condition listed below.
| Front Seat Passenger | ON Indicator | OFF Indicator | SRS Warning Light |
| Adult seated | ON | OFF | OFF |
| Child seated / Child restrain system set | OFF | ON | OFF |
| Vacant | OFF | OFF | OFF |
|
| ||||
| NG | |
|
| 9.REPAIR FRONT SEAT ASSEMBLY (PASSENGER SEAT) |
Loosen the 4 installation bolts fixing the front passenger seat, and then re-tighten them to the specified torque.
| NEXT | |
|
| 10.PERFORM ZERO POINT CALIBRATION |
Connect the negative (-) terminal cable to the battery.
Connect the Techstream to the DLC3.
Turn the ignition switch to the ON position.
Using the Techstream, perform the zero point calibration (Click here).
|
| ||||
| OK | |
|
| 11.PERFORM SENSITIVITY CHECK |
Using the Techstream, perform the sensitivity check (Click here).
|
| ||||
| OK | |
|
| 12.PASSENGER AIRBAG ON/OFF INDICATOR OPERATION |
Turn the ignition switch to the ON position.
The passenger airbag ON/OFF indicator (ON and OFF) comes on for approximately 4 seconds, then turns off for approximately 2 seconds.
Approximately 6 seconds after the ignition switch is turned to the ON position, the passenger airbag ON/OFF indicator indicates ON/OFF according to the condition listed below.
| Front Seat Passenger | ON Indicator | OFF Indicator | SRS Warning Light |
| Adult seated | ON | OFF | OFF |
| Child seated / Child restrain system set | OFF | ON | OFF |
| Vacant | OFF | OFF | OFF |
|
| ||||
| OK | ||
 | ||
| ||
| 13.CHECK NO. 1 SEAT WIRE (OCCUPANT CLASSIFICATION SENSOR FRONT LH CIRCUIT) |
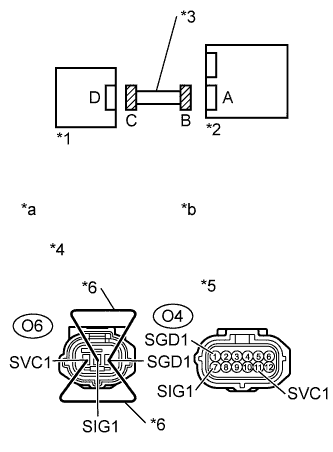  |
Disconnect the connectors from the occupant classification ECU and the occupant classification sensor front LH.
Using service wires, connect O6-1 (SVC1) and O6-3 (SGD1), and connect O6-2 (SIG1) and O6-3 (SGD1) of connector C.
Measure the resistance according to the value(s) in the table below.
| Tester Connection | Condition | Specified Condition |
| O4-7 (SIG1) - O4-1 (SGD1) | Always | Below 1 Ω |
| O4-11 (SVC1) - O4-1 (SGD1) | Always | Below 1 Ω |
| *1 | Front Occupant Classification Sensor LH |
| *2 | Occupant Classification ECU |
| *3 | No. 1 Seat Wire |
| *4 | Connector C |
| *5 | Connector B |
| *6 | Service Wire |
| *a | Front view of wire harness connector (to Front Occupant Classification Sensor LH) |
| *b | Front view of wire harness connector (to Occupant Classification ECU) |
Disconnect the service wires from connector C.
Measure the resistance according to the value(s) in the table below.
| Tester Connection | Condition | Specified Condition |
| O4-7 (SIG1) - O4-1 (SGD1)) | Always | 1MΩ or Higher |
| O4-11 (SVC1) - O4-1 (SGD1) | Always | 1MΩ or Higher |
| O4-7 (SIG1) - O4-11 (SVC1) | Always | 1MΩ or Higher |
| O4-1 (SGD1) - Body ground | Always | 1MΩ or Higher |
| O4-7 (SIG1) - Body ground) | Always | 1MΩ or Higher |
| O4-11 (SVC1) - Body ground | Always | 1MΩ or Higher |
Connect the negative (-) terminal cable to the battery.
Turn the ignition switch to the ON position.
Measure the voltage according to the value(s) in the table below.
| Tester Connection | Condition | Specified Condition |
| O4-1 (SGD1) - Body ground | Ignition switch ON | Below 1 V |
| O4-7 (SIG1) - Body ground | Ignition switch ON | Below 1 V |
| O4-11 (SVC1) - Body ground | Ignition switch ON | Below 1 V |
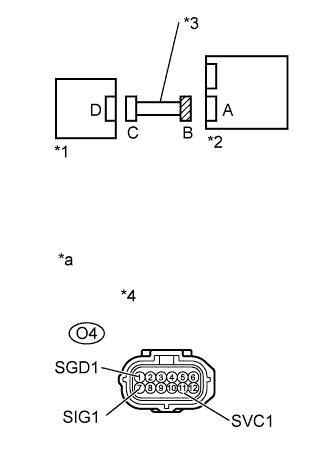
| *1 | Front Occupant Classification Sensor LH |
| *2 | Occupant Classification ECU |
| *3 | No. 1 Seat Wire |
| *4 | Connector B |
| *a | Front view of wire harness connector (to Occupant Classification ECU) |
|
| ||||
| OK | |
|
| 14.CHECK NO. 1 SEAT WIRE (OCCUPANT CLASSIFICATION SENSOR FRONT RH CIRCUIT) |
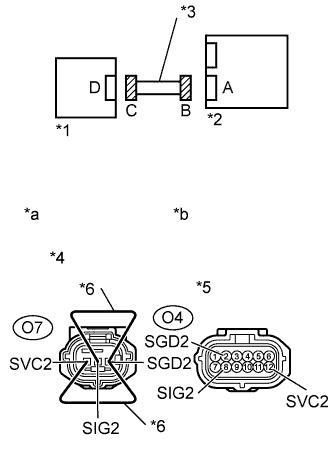 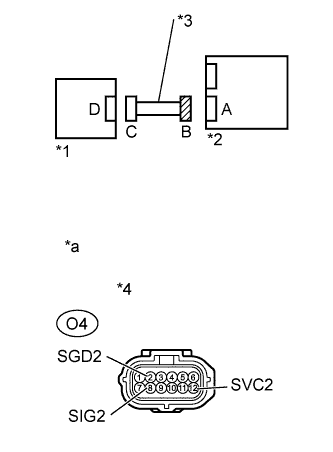 |
Turn the ignition switch to the LOCK position.
Disconnect the negative (-) terminal cable from the battery, and wait for at least 90 seconds.
Disconnect the connectors from the occupant classification ECU and the occupant classification sensor front RH.
Using service wires, connect O7-1 (SVC2) and O7-3 (SGD2), and connect O7-2 (SIG2) and O7-3 (SGD2) of connector C.
Measure the resistance according to the value(s) in the table below.
| Tester Connection | Condition | Specified Condition |
| O4-8 (SIG2) - O4-2 (SGD2) | Always | Below 1 Ω |
| O4-12 (SVC2) - O4-2 (SGD2) | Always | Below 1 Ω |
| *1 | Front Occupant Classification Sensor RH |
| *2 | Occupant Classification ECU |
| *3 | No. 1 Seat Wire |
| *4 | Connector C |
| *5 | Connector B |
| *6 | Service Wire |
| *a | Front view of wire harness connector (to Front Occupant Classification Sensor RH) |
| *b | Front view of wire harness connector (to Occupant Classification ECU) |
Disconnect the service wires from connector C.
Measure the resistance according to the value(s) in the table below.
| Tester Connection | Condition | Specified Condition |
| O4-8 (SIG2) - O4-2 (SGD2) | Always | 1MΩ or Higher |
| O4-12 (SVC2) - O4-2 (SGD2) | Always | 1MΩ or Higher |
| O4-8 (SIG2) - O4-12 (SVC2) | Always | 1MΩ or Higher |
| O4-2 (SGD2) - Body ground | Always | 1MΩ or Higher |
| O4-8 (SIG2) - Body ground | Always | 1MΩ or Higher |
| O4-12 (SVC2) - Body ground | Always | 1MΩ or Higher |
Connect the negative (-) terminal cable to the battery.
Turn the ignition switch to the ON position.
Measure the voltage according to the value(s) in the table below.
| Tester Connection | Condition | Specified Condition |
| O4-2 (SGD2) - Body ground | Ignition switch ON | Below 1 V |
| O4-8 (SIG2) - Body ground | Ignition switch ON | Below 1 V |
| O4-12 (SVC2) - Body ground | Ignition switch ON | Below 1 V |
| *1 | Front Occupant Classification Sensor RH |
| *2 | Occupant Classification ECU |
| *3 | No. 1 Seat Wire |
| *4 | Connector B |
| *a | Front view of wire harness connector (to Occupant Classification ECU) |
|
| ||||
| OK | |
|
| 15.CHECK NO. 1 SEAT WIRE (OCCUPANT CLASSIFICATION SENSOR REAR LH CIRCUIT) |
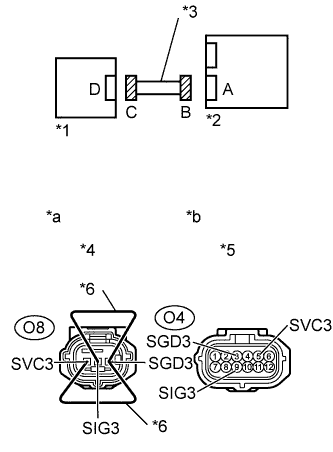 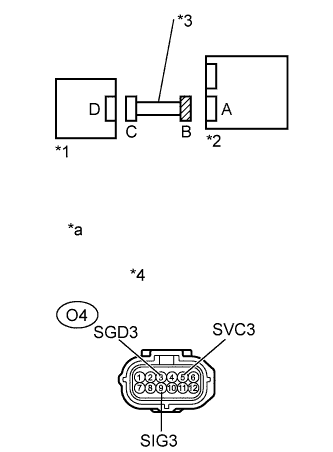 |
Turn the ignition switch to the LOCK position.
Disconnect the negative (-) terminal cable from the battery, and wait for at least 90 seconds.
Disconnect the connectors from the occupant classification ECU and the occupant classification sensor rear LH.
Using service wires, connect O8-1 (SVC3) and O8-3 (SGD3), and connect O8-2 (SIG3) and O8-3 (SGD3) of connector C.
Measure the resistance according to the value(s) in the table below.
| Tester Connection | Condition | Specified Condition |
| O4-5 (SVC3) - O4-3 (SGD3) | Always | Below 1 Ω |
| O4-9 (SIG3) - O4-3 (SGD3) | Always | Below 1 Ω |
| *1 | Rear Occupant Classification Sensor LH |
| *2 | Occupant Classification ECU |
| *3 | No. 1 Seat Wire |
| *4 | Connector C |
| *5 | Connector B |
| *6 | Service Wire |
| *a | Front view of wire harness connector (to Rear Occupant Classification Sensor LH) |
| *b | Front view of wire harness connector (to Occupant Classification ECU) |
Disconnect the service wires from connector C.
Measure the resistance according to the value(s) in the table below.
| Tester Connection | Condition | Specified Condition |
| O4-5 (SVC3) - O4-3 (SGD3) | Always | 1MΩ or Higher |
| O4-9 (SIG3) - O4-3 (SGD3) | Always | 1MΩ or Higher |
| O4-5 (SVC3) - O4-9 (SIG3) | Always | 1MΩ or Higher |
| O4-3 (SGD3) - Body ground | Always | 1MΩ or Higher |
| O4-5 (SVC3) - Body ground | Always | 1MΩ or Higher |
| O4-9 (SIG3) - Body ground | Always | 1MΩ or Higher |
Connect the negative (-) terminal cable to the battery.
Turn the ignition switch to the ON position.
Measure the voltage according to the value(s) in the table below.
| Tester Connection | Condition | Specified Condition |
| O4-3 (SGD3) - Body ground | Ignition switch ON | Below 1 V |
| O4-5 (SVC3) - Body ground | Ignition switch ON | Below 1 V |
| O4-9 (SIG3) - Body ground | Ignition switch ON | Below 1 V |
| *1 | Rear Occupant Classification Sensor LH |
| *2 | Occupant Classification ECU |
| *3 | No. 1 Seat Wire |
| *4 | Connector B |
| *a | Front view of wire harness connector (to Occupant Classification ECU) |
|
| ||||
| OK | |
|
| 16.CHECK NO. 1 SEAT WIRE (OCCUPANT CLASSIFICATION SENSOR REAR RH CIRCUIT) |
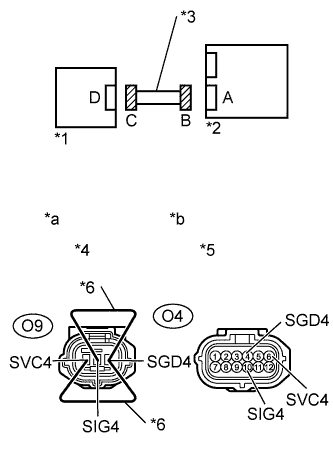 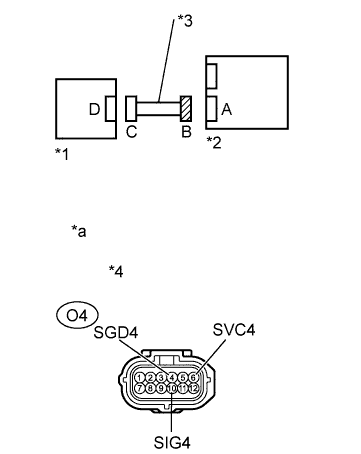 |
Turn the ignition switch to the LOCK position.
Disconnect the negative (-) terminal cable from the battery, and wait for at least 90 seconds.
Disconnect the connectors from the occupant classification ECU and the occupant classification sensor rear LH.
Using service wires, connect O9-1 (SVC4) and O9-3 (SGD4), and connect O9-2 (SIG4) and O9-3 (SGD4) of connector C.
Measure the resistance according to the value(s) in the table below.
| Tester Connection | Condition | Specified Condition |
| O4-6 (SVC4) - O4-4 (SGD4) | Always | Below 1 Ω |
| O4-10 (SIG4) - O4-4 (SGD4) | Always | Below 1 Ω |
| *1 | Rear Occupant Classification Sensor RH |
| *2 | Occupant Classification ECU |
| *3 | No. 1 Seat Wire |
| *4 | Connector C |
| *5 | Connector B |
| *6 | Service Wire |
| *a | Front view of wire harness connector (to Rear Occupant Classification Sensor RH) |
| *b | Front view of wire harness connector (to Occupant Classification ECU) |
Disconnect the service wires from connector C.
Measure the resistance according to the value(s) in the table below.
| Tester Connection | Condition | Specified Condition |
| O4-6 (SVC4) - O4-4 (SGD4) | Always | 1MΩ or Higher |
| O4-10 (SIG4) - O4-4 (SGD4) | Always | 1MΩ or Higher |
| O4-6 (SVC4) - O4-10 (SIG4) | Always | 1MΩ or Higher |
| O4-4 (SGD4) - Body ground | Always | 1MΩ or Higher |
| O4-6 (SVC4) - Body ground | Always | 1MΩ or Higher |
| O4-10 (SIG4) - Body ground | Always | 1MΩ or Higher |
Connect the negative (-) terminal cable to the battery.
Turn the ignition switch to the ON position.
Measure the voltage according to the value(s) in the table below.
| Tester Connection | Condition | Specified Condition |
| O4-4 (SGD4) - Body ground | Ignition switch ON | Below 1 V |
| O4-6 (SVC4) - Body ground | Ignition switch ON | Below 1 V |
| O4-10 (SIG4) - Body ground | Ignition switch ON | Below 1 V |
| *1 | Rear Occupant Classification Sensor RH |
| *2 | Occupant Classification ECU |
| *3 | No. 1 Seat Wire |
| *4 | Connector B |
| *a | Front view of wire harness connector (to Occupant Classification ECU) |
|
| ||||
| OK | |
|
| 17.PERFORM ZERO POINT CALIBRATION |
Connect the negative (-) terminal cable to the battery.
Connect the Techstream to the DLC3.
Turn the ignition switch to the ON position.
Using the Techstream, perform the zero point calibration (Click here).
| NEXT | |
|
| 18.PERFORM SENSITIVITY CHECK |
Using the Techstream, perform the sensitivity check (Click here).
| NEXT | |
|
| 19.CHECK CENTER AIRBAG SENSOR ASSEMBLY |
Turn the ignition switch to the LOCK position.
Disconnect the negative (-) terminal cable from the battery, and wait for at least 90 seconds.
Replace the center airbag sensor assembly (Click here).
Connect the connectors to the center airbag sensor assembly.
Connect the negative (-) terminal cable to the battery, and wait for at least 2 seconds.
Turn the ignition switch to the ON position.
The passenger airbag ON/OFF indicator (ON and OFF) comes on for approximately 4 seconds, then turns off for approximately 2 seconds.
Approximately 6 seconds after the ignition switch is turned to the ON position, the passenger airbag ON/OFF indicator indicates ON/OFF according to the condition listed below.
| Front Seat Passenger | ON Indicator | OFF Indicator | SRS Warning Light |
| Adult seated | ON | OFF | OFF |
| Child seated / Child restrain system set | OFF | ON | OFF |
| Vacant | OFF | OFF | OFF |
|
| ||||
| NG | |
|
| 20.REPLACE OCCUPANT DETECTION ECU |
Turn the ignition switch to the LOCK position.
Disconnect the negative (-) terminal cable from the battery, and wait for at least 90 seconds.
Replace the occupant classification ECU (Click here).
| NEXT | |
|
| 21.PERFORM ZERO POINT CALIBRATION |
Connect the negative (-) terminal cable to the battery.
Connect the Techstream to the DLC3.
Turn the ignition switch to the ON position.
Using the Techstream, perform the zero point calibration (Click here).
|
| ||||
| OK | |
|
| 22.PERFORM SENSITIVITY CHECK |
Using the Techstream, perform the sensitivity check (Click here).
|
| ||||
| NG | |
|
| 23.REPLACE FRONT SEAT WITH ADJUSTER FRAME ASSEMBLY RH |
Turn the ignition switch to the LOCK position.
Disconnect the negative (-) terminal cable from the battery, and wait for at least 90 seconds.
Replace the front seat with adjuster frame assembly RH (Click here).
| NEXT | |
|
| 24.PERFORM ZERO POINT CALIBRATION |
Connect the negative (-) terminal cable to the battery.
Connect the Techstream to the DLC3.
Turn the ignition switch to the ON position.
Using the Techstream, perform the zero point calibration (Click here).
| NEXT | |
|
| 25.PERFORM SENSITIVITY CHECK |
Using the Techstream, perform the sensitivity check (Click here).
| NEXT | ||
| ||
| ||

