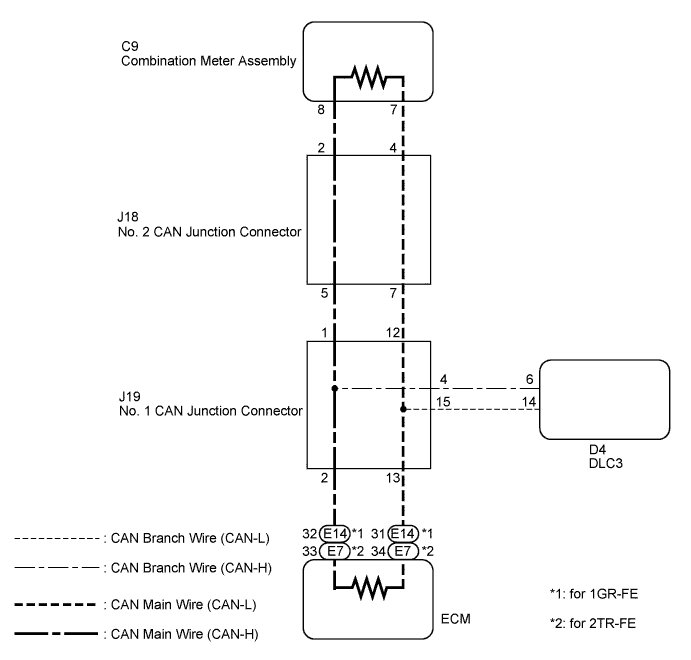
CAN COMMUNICATION SYSTEM > Open in CAN Main Bus Line |
| Symptom | Trouble Area |
| Resistance between terminals 6 (CANH) and 14 (CANL) of DLC3 is 70 Ω or higher. |
|
| 1.PRECAUTION |
| NEXT | |
 |
| 2.DISCONNECT CABLE FROM NEGATIVE BATTERY TERMINAL |
Disconnect the cable from the negative (-) battery terminal before measuring the resistances of the main wire and the branch wire.
| NEXT | |
|
| 3.CHECK DLC3 |
Disconnect the J19 No. 1 CAN junction connector connector.
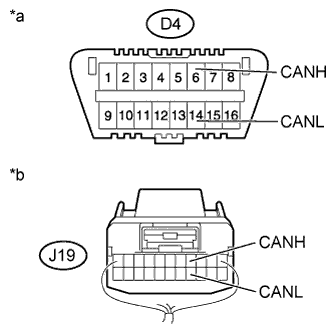 |
Measure the resistance according to the value(s) in the table below.
| Tester Connection | Switch Condition | Specified Condition |
| D4-6 (CANH) - J19-4 (CANH) | Ignition switch off | Below 1 Ω |
| D4-14 (CANL) - J19-15 (CANL) | Ignition switch off | Below 1 Ω |
| *a | DLC3 |
| *b | Rear view of wire harness connector (to No. 1 CAN Junction Connector) |
|
| ||||
| OK | |
|
| 4.CHECK FOR OPEN IN CAN BUS MAIN WIRE (NO. 2 CAN JUNCTION CONNECTOR - COMBINATION METER ASSEMBLY) |
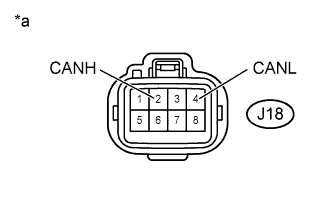 |
Disconnect the J18 No. 2 CAN junction connector connector.
Measure the resistance according to the value(s) in the table below.
| Tester Connection | Switch Condition | Specified Condition |
| J18-2 (CANH) - J18-4 (CANL) | Ignition switch off | 108 to 132 Ω |
| *a | Front view of wire harness connector (to No. 2 CAN Junction Connector) |
|
| ||||
| OK | |
|
| 5.CHECK FOR OPEN IN CAN BUS MAIN WIRE (NO. 2 CAN JUNCTION CONNECTOR - ECM) |
Reconnect the J19 No. 1 CAN junction connector connector.
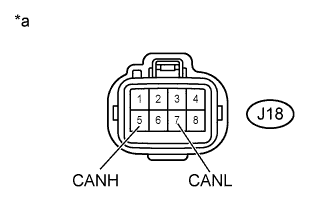 |
Measure the resistance according to the value(s) in the table below.
| Tester Connection | Switch Condition | Specified Condition |
| J18-5 (CANH) - J18-7 (CANL) | Ignition switch off | 108 to 132 Ω |
| *a | Front view of wire harness connector (to No. 2 CAN Junction Connector) |
|
| ||||
| OK | ||
 | ||
| ||
| 6.CONNECT CONNECTOR |
Reconnect the J18 No. 2 CAN junction connector connector.
| NEXT | |
|
| 7.CHECK FOR OPEN IN CAN BUS MAIN WIRE (COMBINATION METER ASSEMBLY - NO. 2 CAN JUNCTION CONNECTOR) |
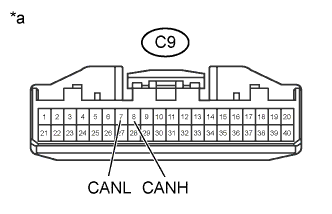 |
Disconnect the C9 combination meter assembly connector.
Measure the resistance according to the value(s) in the table below.
| Tester Connection | Switch Condition | Specified Condition |
| C9-8 (CANH) - C9-7 (CANL) | Ignition switch off | 108 to 132 Ω |
| *a | Front view of wire harness connector (to Combination Meter Assembly (Combination Meter ECU)) |
|
| ||||
| OK | ||
| ||
| ||
| 8.CONNECT CONNECTOR |
Reconnect the J18 No. 2 CAN junction connector connector.
| NEXT | |
|
| 9.CHECK FOR OPEN IN CAN BUS MAIN WIRE (NO. 1 CAN JUNCTION CONNECTOR - ECM) |
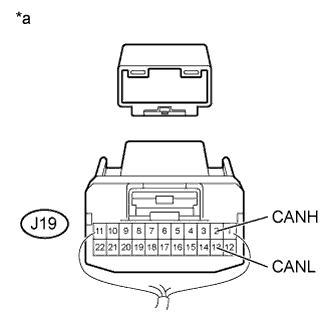 |
Disconnect the J19 No. 1 CAN junction connector connector.
Measure the resistance according to the value(s) in the table below.
| Tester Connection | Switch Condition | Specified Condition |
| J19-2 (CANH) - J19-13 (CANL) | Ignition switch off | 108 to 132 Ω |
| *a | Rear view of wire harness connector (to No. 1 CAN Junction Connector) |
|
| ||||
| OK | |
|
| 10.CHECK FOR OPEN IN CAN BUS MAIN WIRE (NO. 1 CAN JUNCTION CONNECTOR - NO. 2 CAN JUNCTION CONNECTOR) |
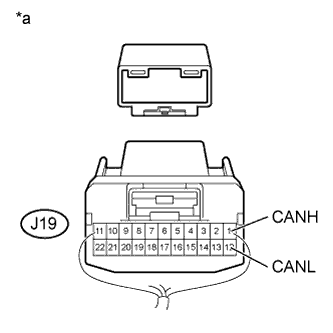 |
Measure the resistance according to the value(s) in the table below.
| Tester Connection | Switch Condition | Specified Condition |
| J19-1 (CANH) - J19-12 (CANL) | Ignition switch off | 108 to 132 Ω |
| *a | Rear view of wire harness connector (to No. 1 CAN Junction Connector) |
|
| ||||
| OK | ||
| ||
| ||
| 11.CONNECT CONNECTOR |
Reconnect the J19 No. 1 CAN junction connector connector.
| NEXT | |
|
| 12.SYSTEM CHECK |
Check the vehicle specifications.
| Result | Proceed to |
| for 1GR-FE | A |
| for 2TR-FE | B |
|
| ||||
| A | |
|
| 13.CHECK FOR OPEN IN CAN BUS MAIN WIRE (ECM - NO. 1 CAN JUNCTION CONNECTOR) |
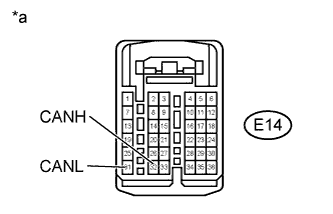 |
Disconnect the E14 ECM connector.
Measure the resistance according to the value(s) in the table below.
| Tester Connection | Switch Condition | Specified Condition |
| E14-32 (CANH) - E14-31 (CANL) | Ignition switch off | 108 to 132 Ω |
| *a | Front view of wire harness connector (to ECM) |
|
| ||||
| OK | ||
| ||
| ||
| 14.CHECK FOR OPEN IN CAN BUS MAIN WIRE (ECM - NO. 1 CAN JUNCTION CONNECTOR) |
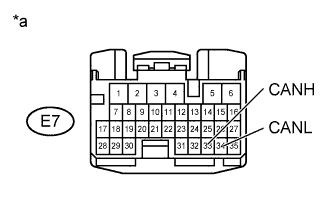 |
Disconnect the E7 ECM connector.
Measure the resistance according to the value(s) in the table below.
| Tester Connection | Switch Condition | Specified Condition |
| E7-33 (CANH) - E7-34 (CANL) | Ignition switch off | 108 to 132 Ω |
| *a | Front view of wire harness connector (to ECM) |
|
| ||||
| OK | ||
| ||
| ||

