 |
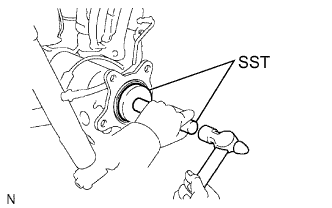
Using SST and a hammer, tap in a new oil seal.
- SST
- 09950-60020
(09951-00770)
09950-70010 (09951-07150)
REAR AXLE SHAFT > INSTALLATION |
| 1. INSTALL REAR AXLE SHAFT OIL SEAL |
|
Using SST and a hammer, tap in a new oil seal.
Apply MP grease to the lip of the oil seal.
| 2. INSTALL REAR AXLE SHAFT |
Apply MP grease to a new O-ring.
Install the O-ring to the axle shaft.
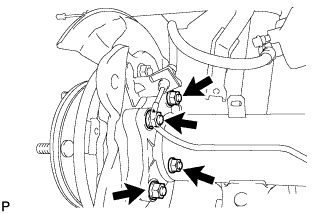 |
Install the rear axle shaft and parking brake plate with the 4 nuts.
| 3. CONNECT REAR SPEED SENSOR LH |
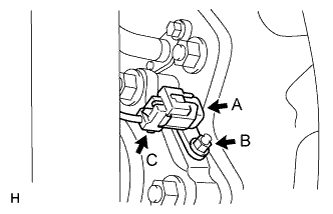 |
Install the speed sensor (labeled A) with the nut (labeled B).
Connect the speed sensor connector (labeled C).
| 4. CONNECT NO. 3 PARKING BRAKE CABLE ASSEMBLY |
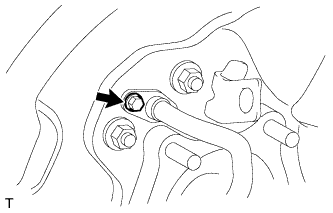 |
Connect the No. 3 parking brake cable with the bolt.
| 5. INSTALL PARKING BRAKE SHOE LEVER SUB-ASSEMBLY LH |
Apply high temperature grease to the parking brake shoe lever.
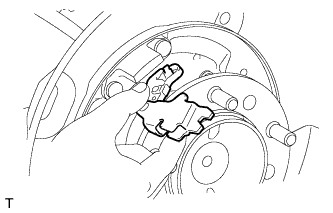 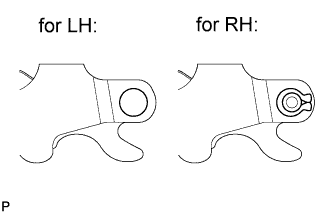 |
Install the parking brake shoe lever to the No. 3 parking brake cable.
| 6. INSTALL NO. 2 PARKING BRAKE SHOE ASSEMBLY LH |
Apply high temperature grease to the areas of the backing plate that contact the shoe.
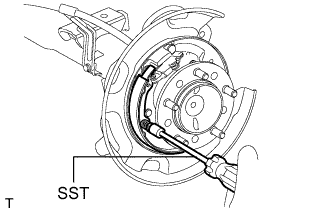 |
Using SST, install the No. 2 parking brake shoe with the shoe hold down spring pin, compression spring and shoe hold down spring cup.
| 7. INSTALL NO. 1 PARKING BRAKE SHOE ASSEMBLY LH |
Apply high temperature grease to the areas of the backing plate that contact the shoe.
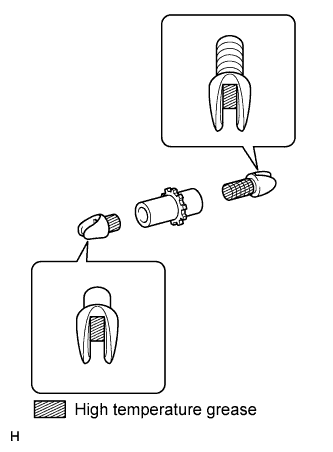 |
Apply the high temperature grease to the areas of the shoe adjusting screw set shown in the illustration.
Set the parking brake shoe and shoe adjuster screw set in place.
Connect the tension spring.
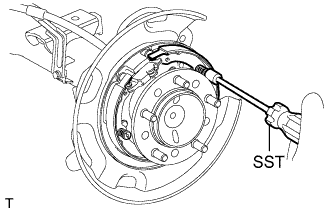 |
Using SST, install the No. 1 parking brake shoe with the shoe hold down spring pin, compression spring and shoe hold down spring cup.
| 8. INSTALL PARKING BRAKE SHOE RETURN TENSION SPRING LH |
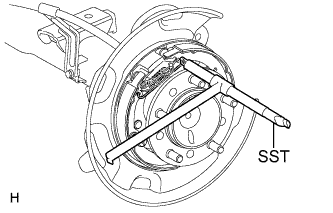 |
Using SST, install the shoe return spring.
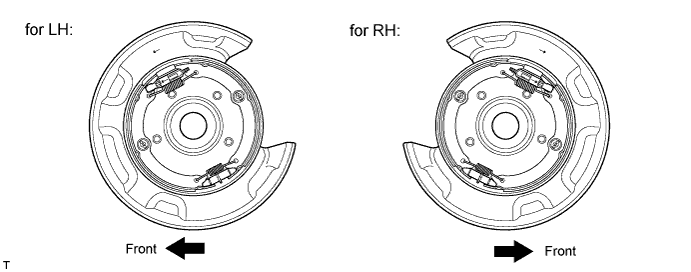
| 9. CHECK PARKING BRAKE INSTALLATION |
Check that each part is installed properly.
| 10. INSTALL REAR DISC LH |
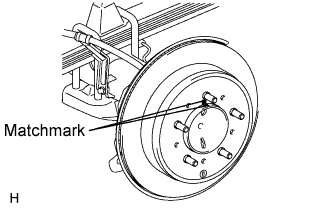 |
Align the matchmarks and install the rear disc.
| 11. ADJUST PARKING BRAKE SHOE CLEARANCE |
Temporarily install the hub nuts.
Remove the hole plug.
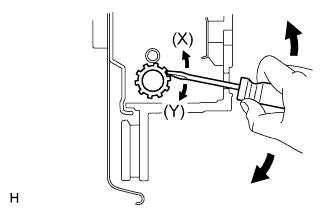 |
Insert an adjustment tool into the adjustment hole of the disc. Rotate the adjustment wheel in the "X" direction until the shoes are locked. Then rotate the adjustment wheel in the "Y" direction 8 notches.
Check that the disc can be rotated smoothly. If not, rotate the adjustment wheel in the "Y" direction and check again.
Install the hole plug.
Remove the hub nuts.
| 12. CONNECT REAR DISC BRAKE CYLINDER ASSEMBLY LH |
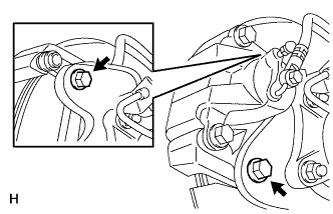 |
Connect the rear disc brake cylinder and install 2 new bolts.
| 13. CONNECT REAR BRAKE FLEXIBLE HOSE |
Set the flexible hose to the connecting point with the brake tube, and then install a new clip.
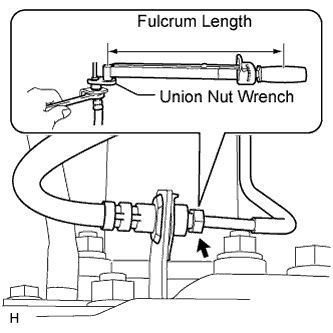 |
Using union nut wrench, connect the flexible hose to the brake tube while holding the flexible hose with a wrench.
| 14. CONNECT CABLE TO NEGATIVE BATTERY TERMINAL |
| 15. FILL RESERVOIR WITH BRAKE FLUID |
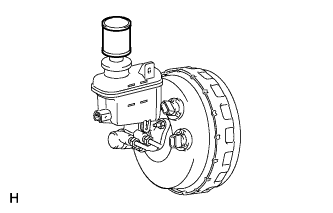 |
Set the brake fluid can upside down on the reservoir.
| 16. BLEED AIR FROM BRAKE MASTER CYLINDER |
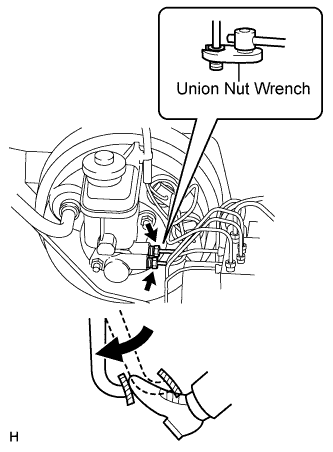 |
Using a union nut wrench, disconnect the 2 brake lines from the master cylinder.
Slowly depress and hold the brake pedal.
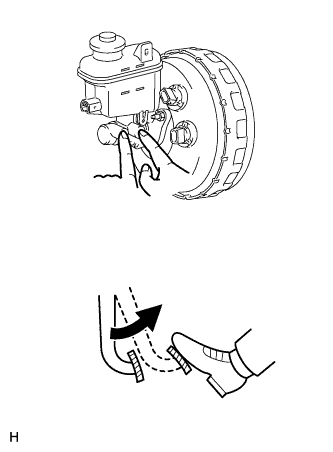 |
Block the outer holes with your fingers, and release the pedal.
Repeat the 2 previous steps 3 or 4 times.
Using a union nut wrench, connect the 2 brake lines to the master cylinder.
| 17. BLEED AIR FROM BRAKE LINE |
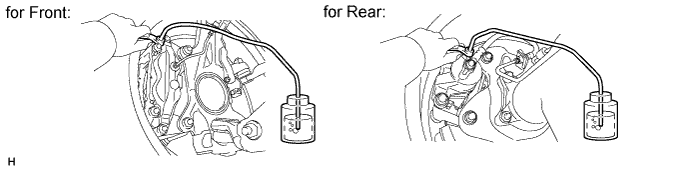
Remove the bleeder plug cap.
Connect the vinyl tube to the bleeder plug.
Depress the brake pedal several times, and then loosen the bleeder plug with the pedal depressed.
When fluid stops coming out, immediately tighten the bleeder plug. Then release the pedal.
Repeat the 2 previous steps until all the air in the brake fluid is gone.
Tighten the bleeder plug.
Install the cap.
Bleed air from the brake line for each wheel by repeating the above procedures.
| 18. BLEED AIR FROM ABS AND TRACTION ACTUATOR ASSEMBLY |
Depress the brake pedal more than 20 times with the engine off.
Connect the Techstream to the DLC3, and turn the ignition switch ON.
Select AIR BLEEDING on the Techstream.
Bleed the air out of the suction line.
Connect a vinyl tube to the bleeder plug at the right front wheel or the right rear wheel.
Loosen the bleeder plug.
Operate the brake actuator to bleed the air using the Techstream.
Check if the operation has stopped by referring to the Techstream display.
Temporarily tighten the bleeder plug.
Repeat the 4 previous steps until all air in the fluid is completely bled out.
Tighten the bleeder plug.
Repeat all of the above procedures for the other wheel to bleed the air out of the suction line.
Bleed the air out of the pressure reduction line.
Connect a vinyl tube to one of the bleeder plugs.
Loosen the bleeder plug.
Using the Techstream operate the brake actuator, completely depress the brake pedal and hold it there.
Tighten the bleeder plug, then release the brake pedal.
Repeat the 3 previous steps until all air in the fluid is completely bled out.
Tighten the bleeder plug.
Repeat all of the above procedures for the other wheels to bleed the air out of the pressure reduction line.
| 19. CHECK BRAKE FLUID LEVEL IN RESERVOIR |
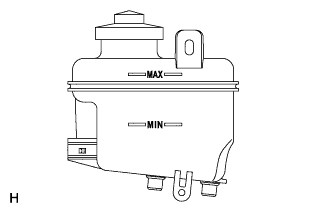 |
Check the fluid level and add fluid if necessary.
| 20. CHECK FOR BRAKE FLUID LEAKS |
| 21. INSTALL REAR WHEEL LH |
| 22. INSPECT DIFFERENTIAL OIL |
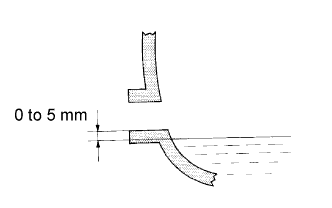 |
Add differential oil so that the oil level is between 0 to 5 mm (0 to 0.197 in.) from the bottom lip of the differential filler plug hole.
| Item | Oil type and viscosity |
| Front differential | Toyota Genuine Differential gear oil LT 75W-85 GL-5 or equivalent. |
| Rear differential |
| Specified Condition | |
| 2.05 to 2.15 liters (2.2 to 2.3 US qts., 1.8 to 1.9 Imp. qts.) |
| Engine type | Wheelbase type | Cab type | Drive type | Specified Condition |
| 3UR-FE. 3UR-FBE | 3220 mm (10 ft. 6.8 in.) | Regular | 2WD | 3.40 to 3.50 liters (3.6 to 3.7 US qts., 3.0 to 3.1 Imp. qts.) |
| 4WD | ||||
| 3700 mm (12 ft. 1.7 in.) | Regular | 2WD | 3.55 to 3.65 liters (3.8 to 3.9 US qts., 3.1 to 3.2 Imp. qts.) | |
| 4WD | ||||
| Double | 2WD | |||
| 4WD | ||||
| CrewMax | 2WD | 3.70 to 3.80 liters (3.9 to 4.0 US qts., 3.2 to 3.3 Imp. qts.) | ||
| 4WD | 3.55 to 3.65 liters (3.8 to 3.9 US qts., 3.1 to 3.2 Imp. qts.) | |||
| 4180 mm (13 ft. 8.6 in.) | Double | 2WD | 3.70 to 3.80 liters (3.9 to 4.0 US qts., 3.2 to 3.3 Imp. qts.) | |
| 4WD | ||||
| 1GR-FE and 2UZ-FE | 3220 mm (10 ft. 6.8 in.) | Regular | 2WD | 4.00 to 4.10 liters (4.2 to 4.3 US qts., 3.5 to 3.6 Imp. qts.) |
| 4WD | ||||
| 3700 mm (12 ft. 1.7 in.) | ALL | 2WD | 4.55 to 4.65 liters (4.8 to 4.9 US qts., 4.0 to 4.1 Imp. qts.) | |
| 4WD | ||||
| 4180 mm (13 ft. 8.6 in.) | 2WD | |||
| 4WD |
for Rear Differential:
Install a new gasket and the filler plug.
for Front Differential:
Using a 10 mm hexagon wrench, install a new gasket and the filler plug.
| 23. INSPECT FOR DIFFERENTIAL OIL LEAK |
| 24. CHECK PARKING BRAKE PEDAL TRAVEL |
Firmly depress the parking brake pedal.
Release the parking brake.
Slowly depress the parking brake pedal with a force of approximately 300 N (31 kgf, 67.4 lbf) and count the number of clicks.
| 25. ADJUST PARKING BRAKE PEDAL TRAVEL |
Depress the parking brake pedal.
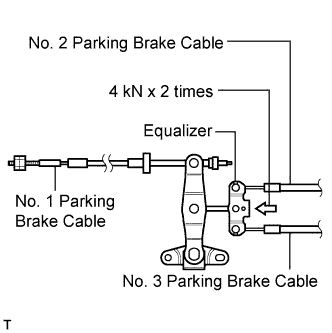 |
Apply load equivalent to 4 kN (408 kgf, 899.2 lbf) on equalizer twice to pull No. 2 and No. 3 parking brake cable to remove initial elongation.
Release the parking brake pedal to the original position.
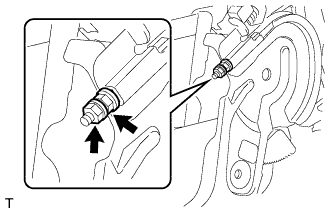 |
Loosen the pedal side No. 1 parking brake cable lock nut.
Turn the pedal side No. 1 parking brake cable adjustment nut until the parking brake pedal travel is correct.
| Pedal Load | Click Number |
| 300 N (31 kgf, 67.4 lbf) | 6 to 9 |
Using a wrench or equivalent to hold the adjustment nut, tighten the lock nut.
Additionally, excessive pedal travel can be adjusted on the No. 1 parking brake cable underbody side as follows.
Release the parking brake pedal to the original position.
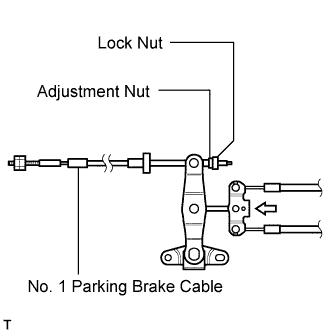 |
Loosen the underbody side No. 1 parking brake cable lock nut.
Turn the underbody side No. 1 parking brake cable adjustment nut until the parking brake pedal travel is correct.
| Pedal Load | Click Number |
| 300 N (31 kgf, 67.4 lbf) | 6 to 9 |
Tighten the No. 1 parking brake cable underbody lock nut.
Depress and release the parking brake pedal 3 or 4 times. Then check the number of clicks when depressing the pedal.
Check whether the parking brake drags or not.
If the parking brake drags, adjust the shoe clearance.
When operating the parking brake pedal, check that the parking brake pedal indicator light comes on at the first notch.
If not, adjust the parking brake switch installation position.
| 26. CHECK SRS WARNING LIGHT |
Check the SRS warning light (Click here).
| 27. CHECK SPEED SENSOR SIGNAL |
Check the speed sensor signal (Click here).