 |
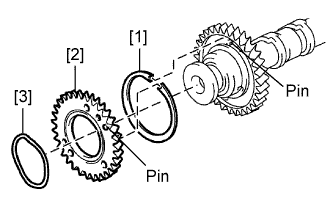
Install the gear spring [1], sub-gear [2] and wave washer [3].
- HINT:
- Attach the pins on the gears to the gear spring ends.
CAMSHAFT (for Bank 1) > INSTALLATION |
| 1. INSTALL CAMSHAFT SUB-GEAR |
|
Install the gear spring [1], sub-gear [2] and wave washer [3].
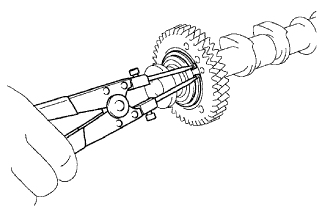 |
Using snap ring pliers, install the snap ring.
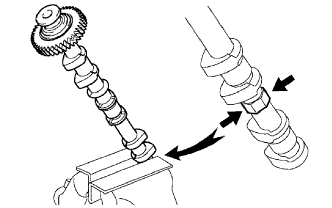 |
Mount the hexagonal portion of the camshaft in a vise.
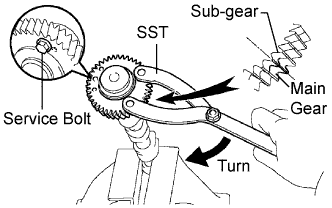 |
Using SST, align the holes of the driven main gear and sub-gear by turning the sub-gear clockwise, and temporarily install a service bolt.
| Thread Diameter | Thread Pitch | Bolt Length |
| 6 mm | 1.0 mm | 16 to 20 mm (0.630 to 0.787 in.) |
Align the gear teeth of the driven main gear and sub-gear, and tighten the service bolt.
| 2. INSTALL CAMSHAFT SETTING OIL SEAL |
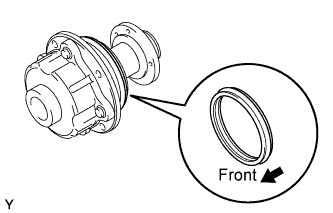 |
Insert 2 new oil seals into the camshaft timing tube until they reach the stopper.
| 3. INSTALL CAMSHAFT TIMING TUBE ASSEMBLY |
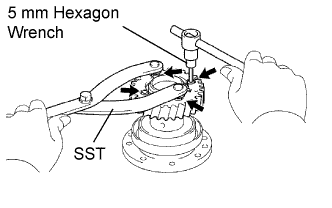 |
Align the timing tube knock pin with the knock pin groove of the drive gear, and temporarily install the drive gear with the 4 bolts.
Using SST and a 5 mm hexagon wrench, uniformly tighten the 4 bolts in several steps.
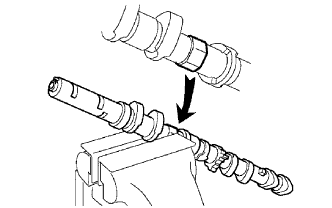 |
Mount the hexagonal portion of the camshaft in a vise.
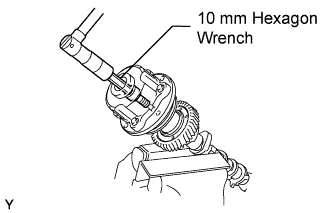 |
Align the camshaft knock pin with the knock pin groove of the timing tube, and push the timing tube by hand until it touches the bottom.
Using a 10 mm hexagon wrench, install the bolt.
Install the seal washer and screw plug.
| 4. INSTALL CAMSHAFT SUB-ASSEMBLY LH |
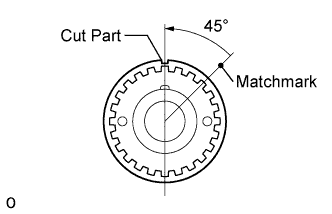 |
Apply a light coat of engine oil to the cam lobe and gear of the camshaft and also the journal of the cylinder head.
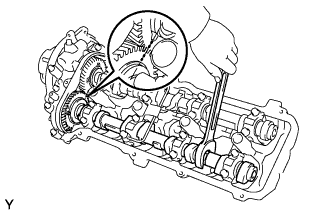 |
Using a wrench, align the timing marks (2 dot marks each) of the camshaft drive and driven main gears, and set the No. 3 and No. 4 camshafts in place.
Install the bearing cap.
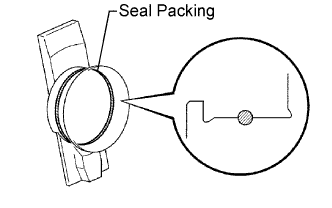 |
Apply seal packing to the camshaft housing plug groove.
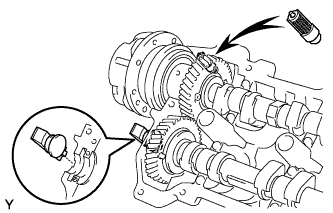 |
Install the camshaft housing plug and oil control valve filter to the cylinder head as shown in the illustration.
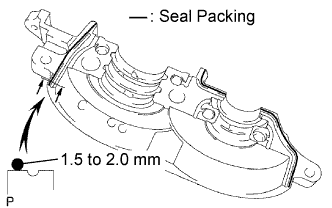 |
Apply seal packing to the No. 1 bearing cap as shown in the illustration.
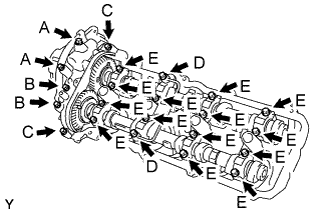 |
Install 4 new seal washers to the bearing cap bolts (A and B).
Apply a light coat of engine oil to the threads and under the heads of the bearing cap bolts (C to E).
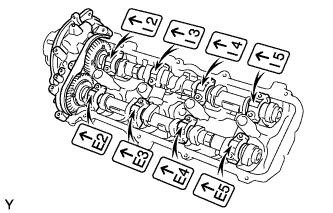 |
Temporarily install the oil feed pipe and bearing caps with the 22 bolts, as shown in the illustration.
| Item | Length |
| Bolt A with seal washer | 94 mm (3.70 in.) |
| Bolt B with seal washer | 72 mm (2.84 in.) |
| Bolt C | 25 mm (0.984 in.) |
| Bolt D | 55 mm (2.17 in.) |
| Bolt E | 40 mm (1.58 in.) |
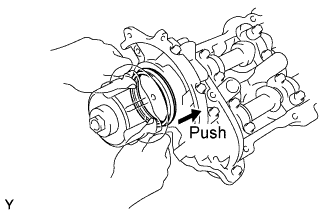 |
Push in the camshaft setting oil seal.
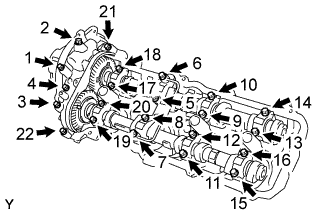 |
Uniformly tighten the 22 bearing cap bolts in several steps, in the sequence shown in the illustration.
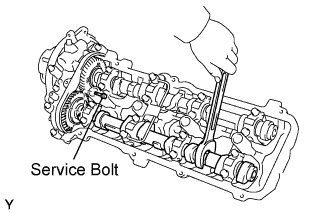 |
Bring the service bolt installed in the driven sub-gear upward by turning the hexagonal portion of the camshaft with a wrench.
Remove the service bolt.
| 5. INSTALL CAMSHAFT TIMING PULLEY LH |
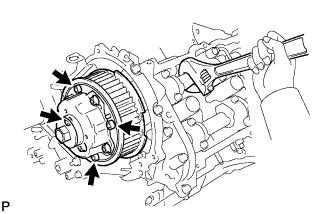 |
Align the camshaft timing tube knock pin with the knock pin groove of the timing pulley.
Temporarily install the 4 bolts of the camshaft timing pulley.
Hold the hexagonal portion of the camshaft with a wrench.
Using a 5 mm hexagon wrench, tighten the 4 bolts.
| 6. INSTALL CAMSHAFT POSITION SENSOR ASSEMBLY |
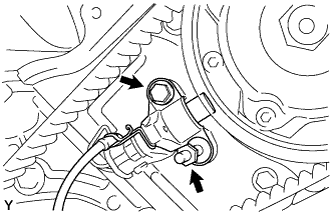 |
Install the camshaft position sensor with the bolt and stud bolt.
| 7. INSTALL TIMING BELT |
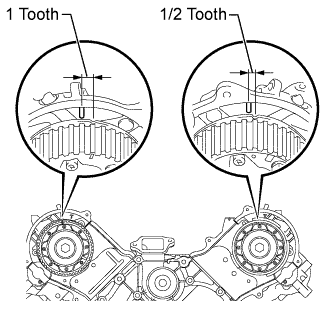 |
Set the No. 1 cylinder to TDC/compression.
Turn the hexagonal portion of the camshaft to align the timing marks of the camshaft timing pulleys and timing belt plates.
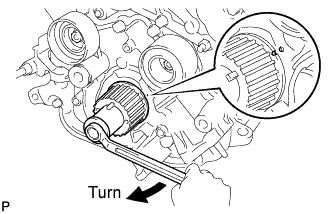 |
Using the pulley set bolt, turn the crankshaft to align the timing marks of the crankshaft timing pulley and oil pump body.
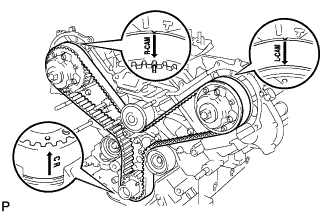 |
Install the timing belt.
Remove any oil or water from each pulley, and keep them clean.
Face the front mark (arrow) on the timing belt forward.
Set the timing belt on the crankshaft timing pulley.
Set the timing belt on the No. 2 timing belt idler.
Set the timing belt on the camshaft timing pulley (for bank 1).
Set the timing belt on the water pump pulley.
Set the timing belt on the camshaft timing pulley (for bank 2).
Set the timing belt on the No. 1 timing belt idler.
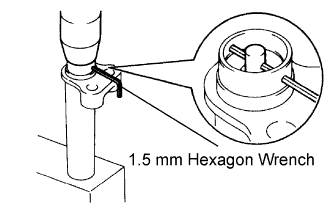 |
Install the belt tensioner.
Using a press, slowly press in the push rod using 981 to 9807 N (100 to 1000 kgf, 220.5 to 2204.7 lbf) of force.
Align the holes of the push rod and housing, and pass a 1.5 mm hexagon wrench through the holes to keep the setting position of the push rod.
Release the press.
Install the dust boot to the belt tensioner.
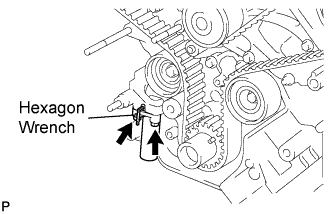 |
Temporarily install the belt tensioner with the 2 bolts.
Tighten the 2 bolts.
Using pliers, remove the 1.5 mm hexagon wrench from the timing belt tensioner.
| 8. CHECK NO. 1 CYLINDER TO TDC / COMPRESSION |
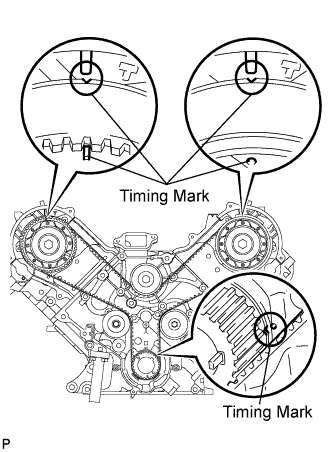 |
Using the pulley set bolt, slowly turn the crankshaft pulley 2 revolutions from the TDC to TDC.
Check that each pulley is aligned with each timing mark as shown in the illustration.
If the timing marks are not aligned, remove the timing belt and reinstall it.
Remove the pulley set bolt.
| 9. INSPECT VALVE CLEARANCE |
Inspect the valve clearance .
If the result is not as specified, adjust the valve clearance .
| 10. INSTALL CYLINDER HEAD COVER SUB-ASSEMBLY LH |
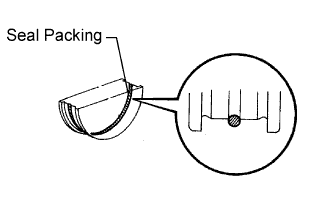 |
Apply seal packing to the semicircular plug grooves.
Install the 2 semicircular plugs to the cylinder heads.
Install the gasket to the cylinder head cover.
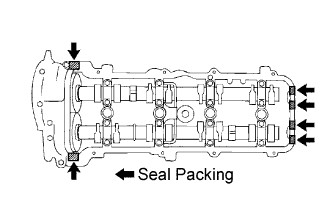 |
Apply seal packing to the cylinder head as shown in the illustration.
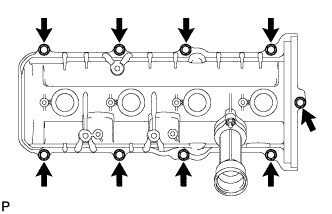 |
Install the cylinder head cover with the 9 bolts. Uniformly tighten the bolts in several steps.
| 11. INSTALL IGNITION COIL ASSEMBLY |
Install the 4 ignition coils with the 4 bolts.
Connect the 4 ignition coil connectors.
| 12. INSTALL AIR SWITCHING VALVE ASSEMBLY (for Bank 1) |
Install the air switching valve (Click here).
| 13. INSTALL TIMING BELT COVER |
Install the timing belt cover (Click here).