 |
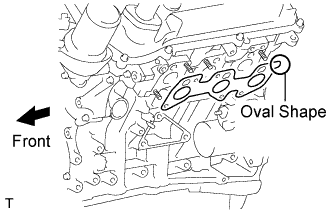
Set a new gasket to the cylinder head LH with the oval shape facing backward.
- NOTICE:
- Be careful of the installation direction.
EXHAUST MANIFOLD > INSTALLATION |
| 1. INSTALL EXHAUST MANIFOLD LH |
|
Set a new gasket to the cylinder head LH with the oval shape facing backward.
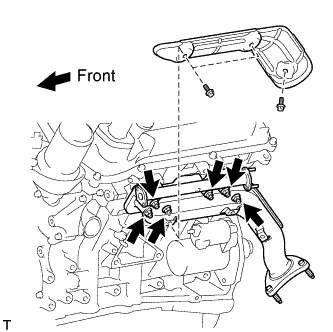 |
Install the exhaust manifold with 6 new nuts.
| 2. INSTALL NO. 2 EXHAUST MANIFOLD HEAT INSULATOR |
Install the heat insulator with the 3 bolts.
| 3. INSTALL EXHAUST MANIFOLD RH |
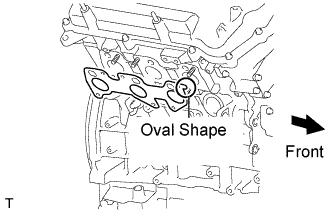 |
Set a new gasket to the cylinder head RH with the oval shape facing forward.
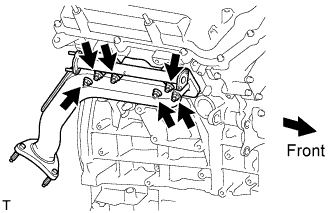 |
Install the exhaust manifold with 6 new nuts.
| 4. INSTALL FRONT EXHAUST PIPE ASSEMBLY |
Install a new gasket and the front exhaust pipe to the exhaust manifold RH with 3 new nuts.
Connect the air fuel ratio sensor connector.
Connect the heated oxygen sensor connector.
Attach the 2 heated oxygen sensor wire clamps.
| 5. INSTALL FRONT NO. 2 EXHAUST PIPE ASSEMBLY (for Regular Cab Standard Deck) |
Install a new gasket and the front No. 2 exhaust pipe to the exhaust manifold LH with 3 new nuts.
Connect the air fuel ratio sensor connector.
Connect the heated oxygen sensor connector.
| 6. INSTALL FRONT NO. 2 EXHAUST PIPE ASSEMBLY (except Regular Cab Standard Deck) |
Connect the front No. 2 exhaust pipe to the exhaust pipe support.
Install a new gasket and the front No. 2 exhaust pipe to the exhaust manifold LH with 3 new nuts.
Connect the air fuel ratio sensor connector.
Connect the heated oxygen sensor connector.
| 7. INSTALL AIR SWITCHING VALVE ASSEMBLY |
Install the air switching valve (Click here).
| 8. CONNECT CABLE TO NEGATIVE BATTERY TERMINAL |