BACK WINDOW GLASS (for Regular Cab and Double Cab) > REMOVAL |
| 1. REMOVE FRONT SEAT ASSEMBLY (for Manual Seat) |
Remove the front seat (Click here).
| 2. REMOVE FRONT SEAT ASSEMBLY (for Power Seat) |
Remove the front seat (Click here).
| 3. REMOVE FRONT SEAT ASSEMBLY (for Center Seat) |
Remove the front seat (Click here).
| 4. REMOVE REAR SEAT ASSEMBLY (for Double Cab) |
Remove the rear seat (Click here).
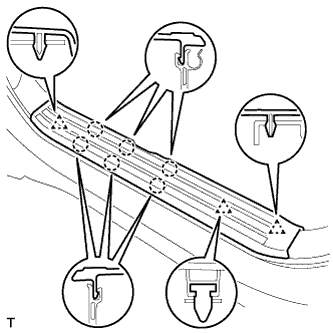
| 5. REMOVE FRONT DOOR SCUFF PLATE LH |
|
Detach the 6 claws and 3 clips, and remove the scuff plate.
| 6. REMOVE FRONT DOOR SCUFF PLATE RH |
| 7. REMOVE REAR DOOR SCUFF PLATE LH (for Double Cab) |
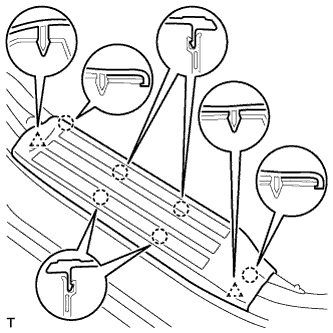 |
Detach the 6 claws and 2 clips, and remove the scuff plate.
| 8. REMOVE REAR DOOR SCUFF PLATE RH (for Double Cab) |
| 9. REMOVE FRONT DOOR OPENING TRIM WEATHERSTRIP LH (for Regular Cab) |
Partially remove the front door opening trim weatherstrip LH so that the quarter trim panel front LH and quarter trim panel lower LH can be removed .
| 10. REMOVE FRONT DOOR OPENING TRIM WEATHERSTRIP RH (for Regular Cab) |
| 11. REMOVE REAR DOOR OPENING TRIM WEATHERSTRIP LH (for Double Cab) |
Partially remove the front door opening trim weatherstrip LH so that the quarter trim panel front LH and quarter trim panel lower LH can be removed .
| 12. REMOVE REAR DOOR OPENING TRIM WEATHERSTRIP RH (for Double Cab) |
| 13. REMOVE UPPER BACK PANEL GARNISH (for Regular Cab) |
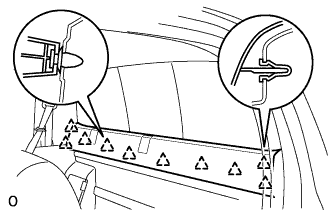 |
Detach the 10 clips and remove the back panel garnish.
| 14. REMOVE LUGGAGE COMPARTMENT BOX LH (for Regular Cab) |
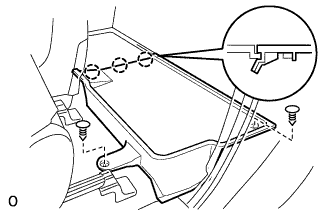 |
Remove the 2 clips.
Detach the 3 claws and remove the luggage compartment box.
| 15. REMOVE LUGGAGE COMPARTMENT BOX RH (for Regular Cab) |
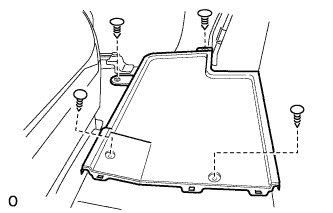 |
Remove the 4 clips and luggage compartment box.
| 16. REMOVE LOWER QUARTER TRIM PANEL ASSEMBLY LH |
for Regular Cab:
Remove the quarter trim panel .
for Double Cab:
Remove the quarter trim panel .
| 17. REMOVE LOWER QUARTER TRIM PANEL ASSEMBLY RH |
for Regular Cab:
Remove the quarter trim panel .
for Double Cab:
Remove the quarter trim panel .
| 18. REMOVE FRONT QUARTER TRIM PANEL ASSEMBLY LH |
for Regular Cab:
Remove the quarter trim panel .
for Double Cab:
Remove the quarter trim panel .
| 19. REMOVE FRONT QUARTER TRIM PANEL ASSEMBLY RH |
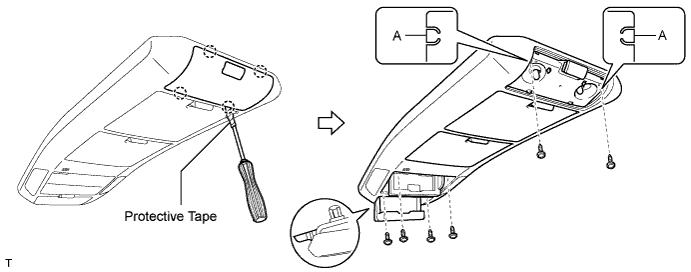
| 20. REMOVE ROOF CONSOLE BOX ASSEMBLY (w/ Long Type Roof Console Box) |
Using a screwdriver, detach the 4 claws and remove the lens.
Bend up part A shown in the illustration, and remove the 2 screws.
Remove the 4 screws.
Disconnect the connector and then remove the roof console box.
| 21. REMOVE ROOM LIGHT ASSEMBLY (w/ Short Type Roof Console Box) |
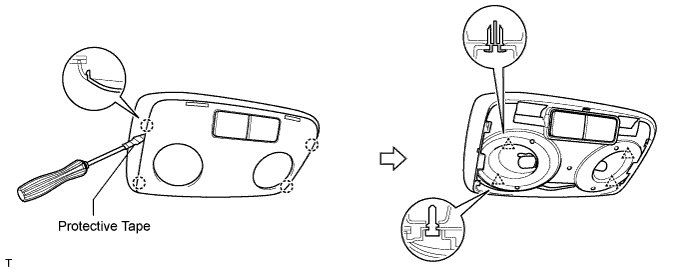
Using a screwdriver, detach the 4 claws and remove the lens.
Detach the 4 clips.
Disconnect the connector and then remove the room light.
| 22. REMOVE COAT HOOK |
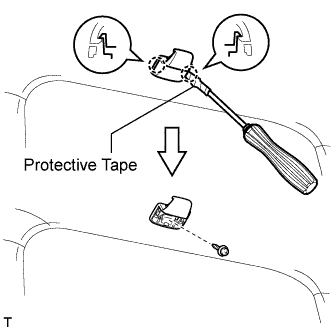 |
Using a screwdriver, detach the 2 claws and remove the coat hook cap.
Remove the screw and coat hook.
| 23. TEMPORARILY REMOVE ROOF HEADLINING ASSEMBLY |
for Regular Cab:
It is not necessary to completely remove the roof headlining. Slightly lower the rear section of the roof headlining so that the back window glass can be removed in a later step.
for Double Cab:
It is not necessary to completely remove the roof headlining. Slightly lower the rear section of the roof headlining so that the back window glass can be removed in a later step.
| 24. REMOVE REAR ROOF DRIP SIDE FINISH MOULDING LH |
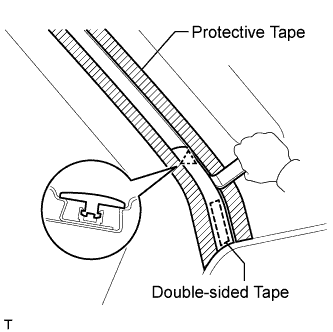 |
Put protective tape around the moulding.
Using a heat light, heat the moulding.
Using a moulding remover, detach the clip and remove the moulding.
| 25. REMOVE REAR ROOF DRIP SIDE FINISH MOULDING RH |
| 26. REMOVE BACK WINDOW ASSEMBLY |
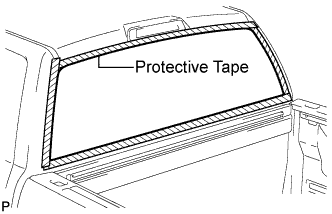 |
Apply protective tape to the outer surface of the vehicle body to prevent scratches.
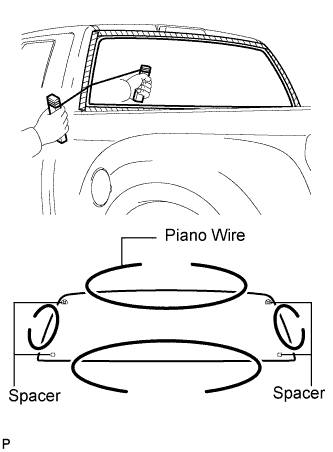 |
From the interior, insert a piano wire between the vehicle body and back window as shown in the illustration.
Tie objects that can serve as handles (for example, wooden blocks) to both wire ends.
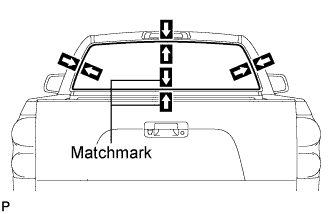 |
Place matchmarks over the window and vehicle body on the locations indicated in the illustration.
Cut through the adhesive by pulling the piano wire around the back window.
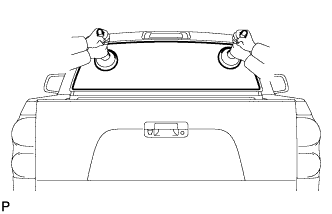 |
Using suction cups, remove the back window glass.
| 27. REMOVE UPPER OUTSIDE BACK WINDOW MOULDING (for Slide Type) |
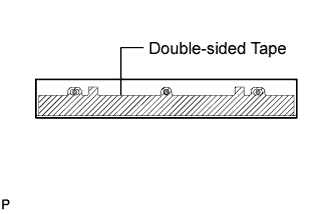 |
Using a moulding remover, detach the 3 clips and remove the back window moulding.
| 28. REMOVE LOWER OUTSIDE BACK WINDOW MOULDING (for Slide Type) |
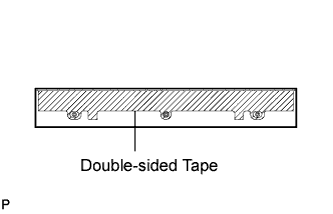 |
Using a moulding remover, detach the 3 clips and remove the back window moulding.
| 29. CLEAN BACK WINDOW ASSEMBLY |
Using a scraper, remove the damaged spacers and adhesive sticking to the glass.
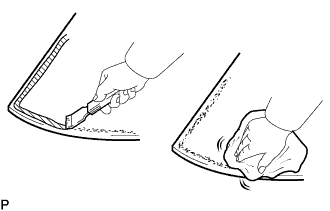 |
Clean the outer edge of the back window with a non-residue solvent.
| 30. CLEAN VEHICLE BODY |
 |
Using a scraper, remove the moulding and adhesive from the vehicle body.
Clean and shape the contact surface of the vehicle body.
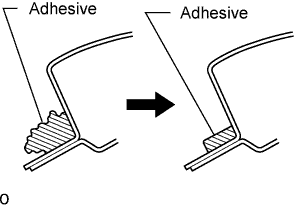
On the contact surface of the vehicle body, use a knife to cut away excess adhesive as shown in the illustration.
Clean the contact surface of the vehicle body with cleaner.