TOUCH SELECT 2-4 AND HIGH-LOW SYSTEM > ON-VEHICLE INSPECTION |
| 1. INSPECT INDICATOR LIGHT |
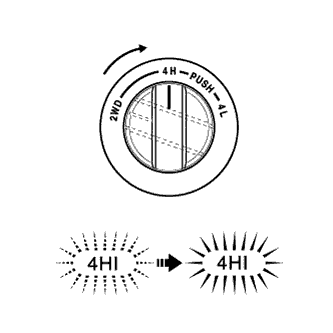
4HI Indicator Light:
Turn the ignition switch ON.
Change the 4WD control switch from 2WD to 4H.
![]() |
Check the 4HI indicator light.
| Switch Condition | Specified Condition |
| 2WD to 4H | 4HI indicator light comes on or 4HI indicator light comes on after it is blinking |
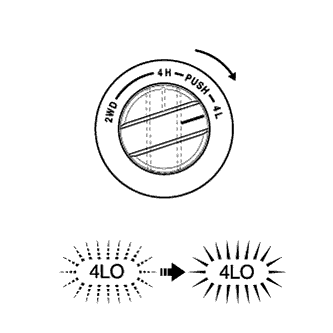
4LO Indicator Light:
Turn the ignition switch ON.
Change the 4WD control switch from 2WD to 4H. Then change it from 4H to 4L after the 4HI indicator light illuminates (after 4H switch completion).
![]() |
Check the 4LO indicator light.
| Switch Condition | Specified Condition |
| After 2WD to 4WD HIGH switch completion, 4H to 4L | 4LO indicator light comes on or 4LO indicator light comes on after it is blinking |
| 2. INSPECT FUSE (4WD) |
Remove the 4WD fuse from the main body ECU.
Measure the resistance according to the value(s) in the table below.
| Tester Connection | Condition | Specified Condition |
| 4WD fuse | Always | Below 1 Ω |
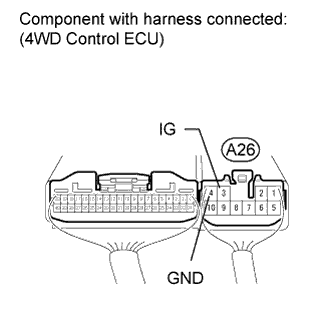
| 3. INSPECT 4WD CONTROL ECU (POWER SUPPLY) |
![]() |
Measure the voltage according to the value(s) in the table below.
| Tester Connection | Switch Condition | Specified Condition |
| A26-3 (IG) - Body ground | Ignition switch ON | 11 to 14 V |
Measure the resistance according to the value(s) in the table below.
| Tester Connection | Condition | Specified Condition |
| A26-4 (GND) - Body ground | Always | Below 1 Ω |
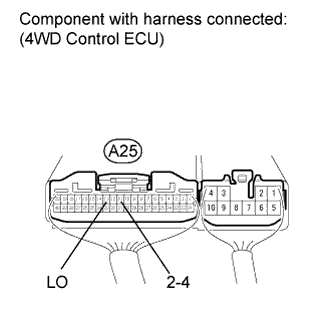
| 4. INSPECT 4WD CONTROL ECU (4WD CONTROL SWITCH) |
![]() |
Measure the voltage according to the value(s) in the table below.
| Tester Connection | Switch Condition | Specified Condition |
| A25-11 (2-4) - Body ground | Ignition switch ON 4WD control switch 2WD position | Below 1.5 V |
| Ignition switch ON 4WD control switch 4H position | Below 1.5 V | |
| Ignition switch ON 4WD control switch 4L position | 10.5 to 14 V | |
| A25-13 (LO) - Body ground | Ignition switch ON 4WD control switch 2WD position | 10.5 to 14 V |
| Ignition switch ON 4WD control switch 4H position | Below 1.5 V | |
| Ignition switch ON 4WD control switch 4L position | Below 1.5 V |
| 5. INSPECT 2WD-4WD TRANSFER SHIFT ACTUATOR |
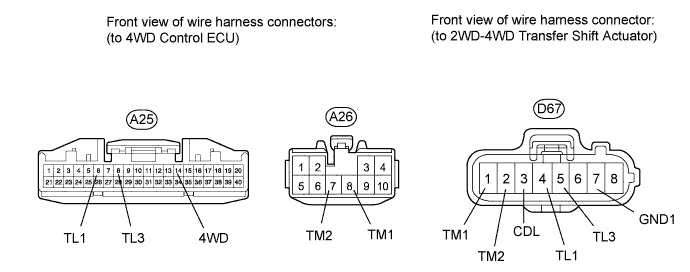
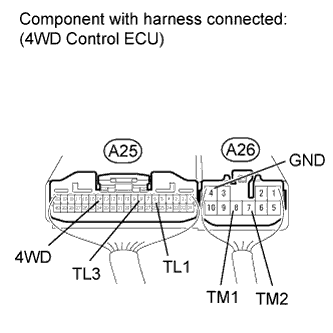
Check the harness and connector (ECU - 2WD-4WD transfer shift actuator).
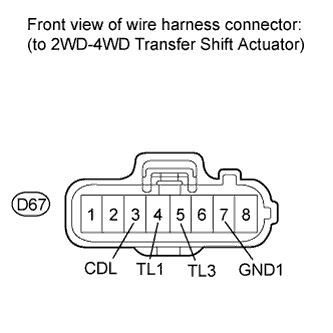
Disconnect the D67 actuator connector.
Disconnect the A25 and A26 ECU connectors.
Measure the resistance according to the value(s) in the table below.

| Tester Connection | Condition | Specified Condition |
| A25-6 (TL1) - D67-4 (TL1) | Always | Below 1 Ω |
| A25-6 (TL1) - Body ground | Always | 10 kΩ or higher |
| A25-8 (TL3) - D67-5 (TL3) | Always | Below 1 Ω |
| A25-8 (TL3) - Body ground | Always | 10 kΩ or higher |
| A25-14 (4WD) - D67-3 (CDL) | Always | Below 1 Ω |
| A25-14 (4WD) - Body ground | Always | 10 kΩ or higher |
| A26-7 (TM2) - D67-2 (TM2) | Always | Below 1 Ω |
| A26-7 (TM2) - Body ground | Always | 10 kΩ or higher |
| A26-8 (TM1) - D67-1 (TM1) | Always | Below 1 Ω |
| A26-8 (TM1) - Body ground | Always | 10 kΩ or higher |
| D67-7 (GND1) - Body ground | Always | Below 1 Ω |
Check the 4WD control ECU (2WD-4WD transfer shift actuator).
Connect the A25 and A26 ECU connectors.
Connect the D67 actuator connector.
![]() |
Measure the voltage according to the value(s) in the table below.
| Tester Connection | Switch Condition | Specified Condition |
| A26-8 (TM1) - A26-4 (GND) | Ignition switch ON 4WD control switch 2WD → 4H position (during transfer shift actuator 2WD to 4WD HIGH switching operation) | 10 to 14 V |
| Ignition switch ON 4WD control switch 2WD → 4H position (transfer shift actuator 2WD to 4WD HIGH switching operation stopped) | Below 1.5 V | |
| A26-7 (TM2) - A26-4 (GND) | Ignition switch ON 4WD control switch 4H → 2WD position (during transfer shift actuator 4WD HIGH to 2WD switching operation) | 10 to 14 V |
| Ignition switch ON 4WD control switch 4H → 2WD position (transfer shift actuator 4WD HIGH to 2WD switching operation stopped) | Below 1.5 V | |
| A25-6 (TL1) - A26-4 (GND) | Ignition switch ON 4WD control switch 2WD position | Below 1.5 V |
| Ignition switch ON 4WD control switch 2WD → 4H position | 10.5 to 14 V | |
| A25-8 (TL3) - A26-4 (GND) | Ignition switch ON 4WD control switch 2WD position | 11 to 14 V |
| Ignition switch ON 4WD control switch 2WD → 4H position | Below 1.5 V | |
| A25-14 (4WD) - A26-4 (GND) | Ignition switch ON 4WD control switch 2WD position | 9.5 to 14 V |
| Ignition switch ON 4WD control switch 2WD → 4H position | Below 1.5 V |
Check the 4WD control ECU.
Disconnect the D67 actuator connector.
Connect the A25 and A26 ECU connectors.
![]() |
Measure the voltage according to the value(s) in the table below.
| Tester Connection | Switch Condition | Specified Condition |
| D67-3 (CDL) - D67-7 (GND1) | Ignition switch ON | 9.5 to 14 V |
| D67-4 (TL1) - D67-7 (GND1) | Ignition switch ON | 10.5 to 14 V |
| D67-5 (TL3) - D67-7 (GND1) | Ignition switch ON | 10.5 to 14 V |
Inspect the 2WD-4WD transfer shift actuator.
Remove the transfer shift actuator (Click here).
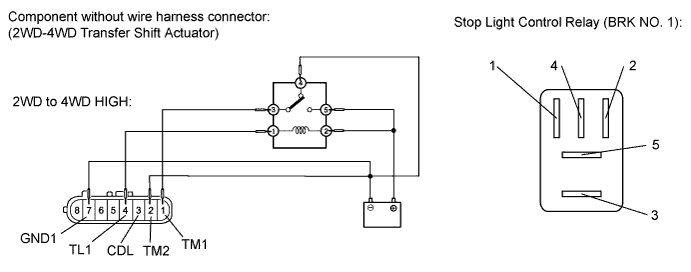
Check the 2WD to 4WD HIGH switch.
Connect lines via a relay as shown in the illustration, then check that the actuator fork moves from the 2WD to 4WD HIGH position.

| Tester Connection | Condition | Specified Condition |
| 3 (CDL) - 7 (GND1) | After 2WD to 4WD HIGH switch is complete | Below 1 Ω |
| 4 (TL1) - 7 (GND1) | After 2WD to 4WD HIGH switch is complete | 100 kΩ or higher |
| 5 (TL3) - 7 (GND1) | After 2WD to 4WD HIGH switch is complete | Below 1 Ω |
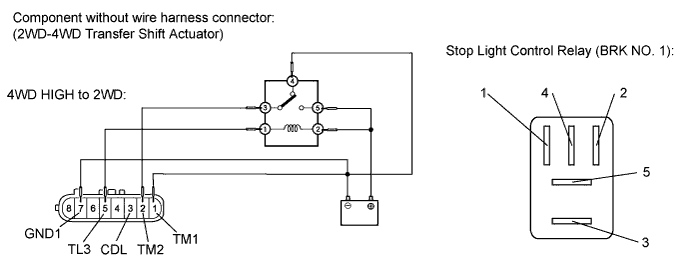
Check the 4WD HIGH to 2WD switch.
Connect lines via a relay as shown in the illustration, then check that the actuator fork moves from the 4WD HIGH to 2WD position.

| Tester Connection | Condition | Specified Condition |
| 3 (CDL) - 7 (GND1) | After 4WD HIGH to 2WD switch is complete | 100 kΩ or higher |
| 4 (TL1) - 7 (GND1) | After 4WD HIGH to 2WD switch is complete | Below 1 Ω |
| 5 (TL3) - 7 (GND1) | After 4WD HIGH to 2WD switch is complete | 100 kΩ or higher |
| 6. INSPECT A.D.D. ACTUATOR |
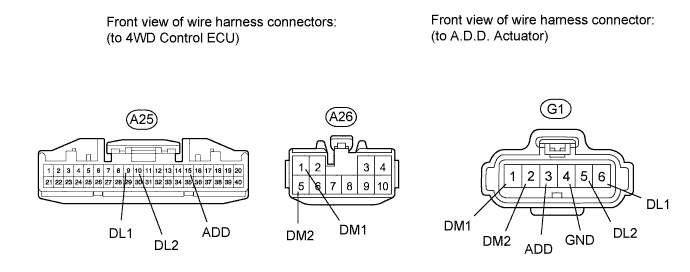
Check the harness and connector (ECU - A.D.D. actuator).
Disconnect the A25 and A26 ECU connectors.
Disconnect the G1 actuator connector.
Measure the resistance according to the value(s) in the table below.

| Tester Connection | Condition | Specified Condition |
| A25-9 (DL1) - G1-6 (DL1) | Always | Below 1 Ω |
| A25-9 (DL1) - Body ground | Always | 100 kΩ or higher |
| A25-10 (DL2) - G1-5 (DL2) | Always | Below 1 Ω |
| A25-10 (DL2) - Body ground | Always | 100 kΩ or higher |
| A25-15 (ADD) - G1-3 (ADD) | Always | Below 1 Ω |
| A25-15 (ADD) - Body ground | Always | 100 kΩ or higher |
| A26-1 (DM1) - G1-1 (DM1) | Always | Below 1 Ω |
| A26-1 (DM1) - Body ground | Always | 100 kΩ or higher |
| A26-5 (DM2) - G1-2 (DM2) | Always | Below 1 Ω |
| A26-5 (DM2) - Body ground | Always | 100 kΩ or higher |
| G1-4 (GND) - Body ground | Always | Below 1 Ω |
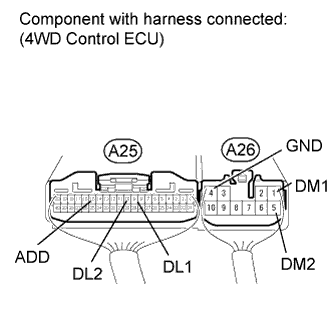
Check the 4WD control ECU (A.D.D. actuator).
Connect the A25 and A26 ECU connectors.
Connect the G1 actuator connector.
![]() |
Measure the voltage according to the value(s) in the table below.
| Tester Connection | Switch Condition | Specified Condition |
| A26-5 (DM2) - A26-4 (GND) | Ignition switch ON 4WD control switch 2WD → 4H position (during A.D.D. actuator Free to Lock operation) | 10 to 14 V |
| Ignition switch ON 4WD control switch 2WD → 4H position (A.D.D. actuator Free to Lock operation stopped) | Below 1.5 V | |
| A26-1 (DM1) - A26-4 (GND) | Ignition switch ON 4WD control switch 4H → 2WD position (during A.D.D. actuator Lock to Free operation) | 10 to 14 V |
| Ignition switch ON 4WD control switch 4H → 2WD position (A.D.D. actuator Lock to Free operation stopped) | Below 1.5 V | |
| A25-9 (DL1) - A26-4 (GND) | Ignition switch ON 4WD control switch 2WD position (A.D.D. actuator Free) | 10.5 to 14 V |
| Ignition switch ON 4WD control switch 2WD → 4H position (A.D.D. actuator Lock) | Below 1.5 V | |
| A25-10 (DL2) - A26-4 (GND) | Ignition switch ON 4WD control switch 2WD position (A.D.D. actuator Free) | Below 1.5 V |
| Ignition switch ON 4WD control switch 2WD → 4H position (A.D.D. actuator Lock) | 10.5 to 14 V | |
| A25-15 (ADD) - A26-4 (GND) | Ignition switch ON 4WD control switch 2WD position | 10 to 14 V |
| Ignition switch ON 4WD control switch 2WD → 4H position | Below 1.5 V |
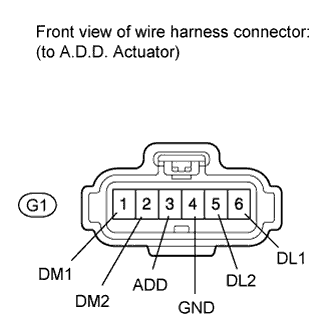
Check the 4WD control ECU.
Connect the A25 and A26 ECU connectors.
Disconnect the G1 actuator connector.
![]() |
Measure the voltage according to the value(s) in the table below.
| Tester Connection | Switch Condition | Specified Condition |
| G1-3 (ADD) - G1-4 (GND) | Ignition switch ON | 10 to 14 V |
| G1-5 (DL2) - G1-4 (GND) | Ignition switch ON | 10.5 to 14 V |
| G1-6 (DL1) - G1-4 (GND) | Ignition switch ON | 10.5 to 14 V |
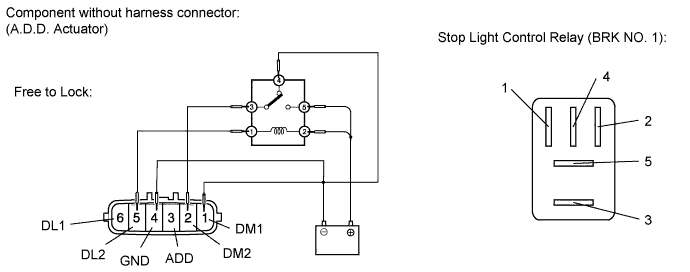
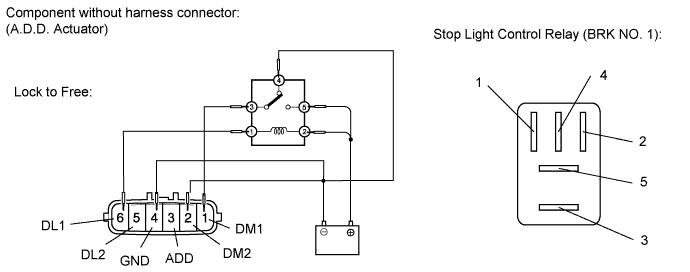
Inspect the A.D.D. actuator.
Remove the A.D.D. actuator (Click here).
Check the Free to Lock switch.
Connect lines via a relay as shown in the illustration, then check that the actuator fork moves from the Free to Lock position.

| Tester Connection | Condition | Specified Condition |
| 3 (ADD) - 4 (GND) | After Free to Lock switch is complete | Below 1 Ω |
| 5 (DL2) - 4 (GND) | After Free to Lock switch is complete | 100 kΩ or higher |
| 6 (DL1) - 4 (GND) | After Free to Lock switch is complete | Below 1 Ω |
Check the Lock to Free switch.
Connect lines via a relay as shown in the illustration, then check that the actuator fork moves from the Lock to Free position.

| Tester Connection | Condition | Specified Condition |
| 3 (ADD) - 4 (GND) | After Lock to Free switch is complete | 100 kΩ or higher |
| 5 (DL2) - 4 (GND) | After Lock to Free switch is complete | Below 1 Ω |
| 6 (DL1) - 4 (GND) | After Lock to Free switch is complete | 100 kΩ or higher |
| 7. INSPECT HIGH-LOW TRANSFER SHIFT ACTUATOR |
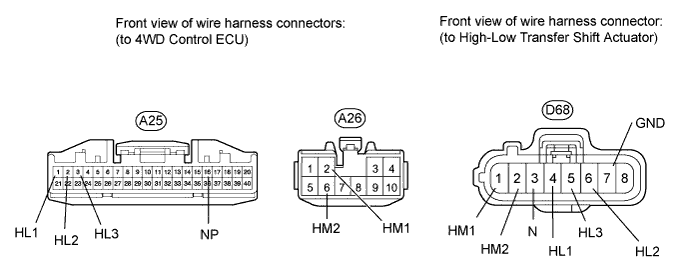
Check the harness and connector (ECU - actuator).
Disconnect the D68 high-low transfer shift actuator connector.
Disconnect the A25 and A26 ECU connector.
Measure the resistance according to the value(s) in the table below.

| Tester Connection | Condition | Specified Condition |
| A25-1 (HL1) - D68-4 (HL1) | Always | Below 1 Ω |
| A25-1 (HL1) - Body ground | Always | 100 kΩ or higher |
| A25-2 (HL2) - D68-6 (HL2) | Always | Below 1 Ω |
| A25-2 (HL2) - Body ground | Always | 100 kΩ or higher |
| A25-3 (HL3) - D68-5 (HL3) | Always | Below 1 Ω |
| A25-3 (HL3) - Body ground | Always | 100 kΩ or higher |
| A25-16 (NP) - D68-3 (N) | Always | Below 1 Ω |
| A25-16 (NP) - Body ground | Always | 100 kΩ or higher |
| A26-2 (HM1) - D68-1 (HM1) | Always | Below 1 Ω |
| A26-2 (HM1) - Body ground | Always | 100 kΩ or higher |
| A26-6 (HM2) - D68-2 (HM2) | Always | Below 1 Ω |
| A26-6 (HM2) - Body ground | Always | 100 kΩ or higher |
| D68-7 (GND) - Body ground | Always | Below 1 Ω |
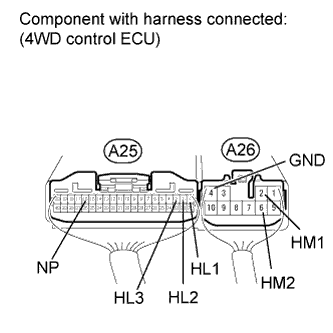
Check the 4WD control ECU (high-low transfer shift actuator).
Connect the A25 and A26 ECU connectors.
Connect the D68 actuator connector.
![]() |
Measure the voltage according to the value(s) in the table below.
| Tester Connection | Switch Condition | Specified Condition |
| A26-6 (HM2) - A26-4 (GND) | Ignition switch ON 4WD control switch 4H → 4L position (during transfer shift actuator 4WD HIGH to 4WD LOW operation) | 10 to 14 V |
| Ignition switch ON 4WD control switch 4H → 4L position (transfer shift actuator 4WD HIGH to 4WD LOW operation stopped) | Below 1.5 V | |
| A26-2 (HM1) - A26-4 (GND) | Ignition switch ON 4WD control switch 4L → 4H (during transfer shift actuator 4WD LOW to 4WD HIGH operation) | 10 to 14 V |
| Ignition switch ON 4WD control switch 4L → 4H position (transfer shift actuator 4WD LOW to 4WD HIGH operation stopped) | Below 1.5 V | |
| A25-1 (HL1) - A26-4 (GND) | Ignition switch ON 4WD control switch 4H position | Below 1.5 V |
| Ignition switch ON 4WD control switch 4H → 4L position | 10.5 to 14 V | |
| A25-2 (HL2) - A26-4 (GND) | Ignition switch ON 4WD control switch 4H position | 10.5 to 14 V |
| Ignition switch ON 4WD control switch 4H → 4L position | Below 1.5 V | |
| A25-3 (HL3) - A26-4 (GND) | Ignition switch ON 4WD control switch 4H position | 10.5 to 14 V |
| Ignition switch ON 1.5 seconds or less after 4WD control switch is changed from 4H to 4L | Below 1.5 V | |
| Ignition switch ON Over 1.5 seconds after 4WD control switch is changed from 4H to 4L | 10.5 to 14 V | |
| A25-16 (NP) - A26-4 (GND) | Ignition switch ON 1.5 seconds or less after 4WD control switch is changed from 4H to 4L | Below 1.5 V |
| Ignition switch ON Over 1.5 seconds after 4WD control switch is changed from 4H to 4L | 10 to 14 V |
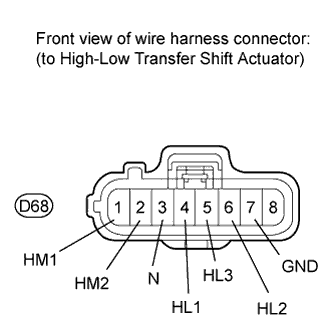
Check the 4WD control ECU.
Connect the A25 and A26 ECU connectors.
Disconnect the D68 actuator connector.
![]() |
Measure the voltage according to the value(s) in the table below.
| Tester Connection | Switch Condition | Specified Condition |
| D68-3 (N) - D68-7 (GND) | Ignition switch ON | 10 to 14 V |
| D68-4 (HL1) - D68-7 (GND) | Ignition switch ON | 10.5 to 14 V |
| D68-5 (HL3) - D68-7 (GND) | Ignition switch ON | 10.5 to 14 V |
| D68-6 (HL2) - D68-7 (GND) | Ignition switch ON | 10.5 to 14 V |
Inspect the high-low transfer shift actuator.
Remove the transfer shift actuator (Click here).
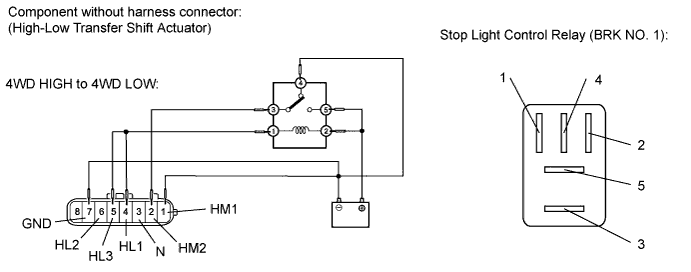
Check the 4WD HIGH to 4WD LOW switch.
Connect lines via a relay as shown in the illustration, then check that the actuator fork moves from the 4WD HIGH to 4WD LOW position.

| Tester Connection | Condition | Specified Condition |
| 3 (N) - 7 (GND) | After 4WD HIGH to 4WD LOW switch is complete | 100 kΩ or higher |
| 4 (HL1) - 7 (GND) | After 4WD HIGH to 4WD LOW switch is complete | 100 kΩ or higher |
| 5 (HL3) - 7 (GND) | After 4WD HIGH to 4WD LOW switch is complete | 100 kΩ or higher |
| 6 (HL2) - 7 (GND) | After 4WD HIGH to 4WD LOW switch is complete | Below 1 Ω |
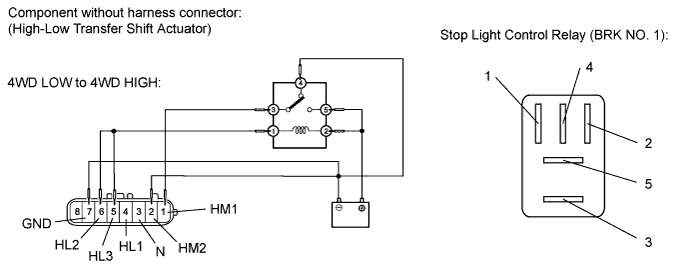
Check the 4WD LOW to 4WD HIGH switch.
Connect lines via a relay as shown in the illustration, then check that the actuator fork moves from the 4WD LOW to 4WD HIGH position.

| Tester Connection | Condition | Specified Condition |
| 3 (N) - 7 (GND) | After 4WD LOW to 4WD HIGH switch is complete | 100 kΩ or higher |
| 4 (HL1) - 7 (GND) | After 4WD LOW to 4WD HIGH switch is complete | Below 1 Ω |
| 5 (HL3) - 7 (GND) | After 4WD LOW to 4WD HIGH switch is complete | 100 kΩ or higher |
| 6 (HL2) - 7 (GND) | After 4WD LOW to 4WD HIGH switch is complete | 100 kΩ or higher |