 |
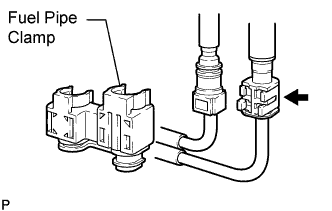
Remove the fuel pipe clamp from the fuel tube connector.
FUEL SYSTEM > ON-VEHICLE INSPECTION |
| 1. CHECK FUEL PUMP OPERATION AND FOR FUEL LEAK |
Connect the Techstream to the DLC3.
Turn the ignition switch to ON.
Turn the Techstream main switch on.
Enter the following menus: Powertrain / Engine and ECT / Active Test / Control the Fuel Pump / Speed.
Check the fuel pump operation.
Check for pressure in the fuel inlet tube from the fuel line. Check that the sound of fuel flowing in the fuel tank can be heard.
If there is no sound, check the integration relay, fuel pump, ECM and wiring connector.
Check for fuel leaks.
Check that there are no fuel leaks after performing maintenance anywhere on the system.
If there are fuel leaks, repair or replace parts as necessary.
| 2. CHECK FUEL PRESSURE |
Check that the battery voltage is 11 to 14 V.
Perform the "DISCHARGE FUEL SYSTEM PRESSURE" procedures (Click here).
Disconnect the cable from the negative (-) battery terminal.
|
Remove the fuel pipe clamp from the fuel tube connector.
Disconnect the No. 1 fuel pipe sub-assembly (for quick type B) (Click here).
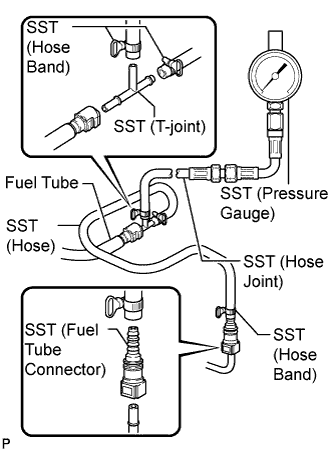 |
Install SST (pressure gauge) as shown in the illustration.
Wipe off any gasoline.
Reconnect the cable to the negative (-) battery terminal.
Operate the fuel pump.
Connect the Techstream to the DLC3.
Start the engine.
Turn the Techstream main switch on.
Enter the following menus: Powertrain / Engine and ECT / Active Test / Activate the Fuel Pressure Switching Valve / High.
Measure the fuel pressure.
Enter the following menus: Powertrain / Engine and ECT / Active Test / Activate the Fuel Pressure Switching Valve / Low.
Measure the fuel pressure.
Stop the engine.
Check that the fuel pressure remains as specified for 5 minutes after the engine has stopped.
After checking the fuel pressure, disconnect the cable from the negative (-) battery terminal and carefully remove SST and the fuel tube connector to prevent gasoline from spraying.
Reconnect the No. 1 fuel pipe sub-assembly (for quick type B) (Click here).
Check for fuel leaks.
Check that there are no fuel leaks after performing maintenance anywhere on the system.
If there are fuel leaks, repair or replace parts as necessary.
| 3. INSPECT FUEL PRESSURE SWITCHING VALVE OPERATION |
Connect the Techstream to the DLC3.
Start the engine and warm it up.
Turn the Techstream main switch on.
Check the "Short FT" value in the Data List before and after activating the fuel pressure switching valve by performing the Active Test.
| 4. MEASURE ALCOHOL CONCENTRATION |
Discharge fuel system pressure (Click here).
Measure the alcohol concentration.
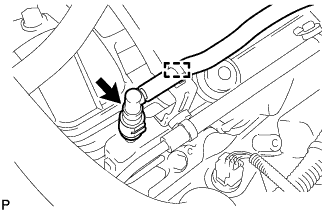 |
Detach the clamp.
Disconnect the No. 1 fuel pipe sub-assembly from the fuel delivery pipe LH (for quick type B) (Click here).
Connect the Techstream to the DLC3.
Turn the ignition switch to ON.
Turn the Techstream on.
Enter the following menus: Powertrain / Engine and ECT / Active Test / Control the Fuel Pump / Speed.
Add 100 cc (6.1 cu. in.) of fuel to a graduated cylinder and turn the Techstream off.
Connect the No. 1 fuel pipe to the fuel delivery pipe LH (for quick type B) (Click here).
Attach the clamp.
Add 100 cc (6.1 cu. in.) of water to the graduated cylinder, and then mix the mixture using a screwdriver.
Since the alcohol in the fuel blends with the water forming two layers, a E0 gasoline layer and an aqueous alcohol solution layer, determine the alcohol concentration based on the amount of alcohol in 100 cc (6.1 cu. in.) of fuel.
| Boundary Line | Alcohol Concentration |
| 120 cc (7.3 cu. in.) | 20 % |
| 150 cc (9.2 cu. in.) | 50 % |
| 190 cc (11.6 cu. in.) | 90 % |
Inspect for fuel leak .
| 5. FUEL DENSITY LEARNING VALUE RESET |
If the alcohol concentration of the fuel is changed, initialization and learning is required (Click here).