| B |  |
| GO TO AIR SWITCHING VALVE INSPECTION PROCEDURE (P0412 AND P0415) |
| C | |
| GO TO DTC CHART (Click here) |
DTC P2440 Secondary Air Injection System Switching Valve Stuck Open Bank1 |
DTC P2441 Secondary Air Injection System Switching Valve Stuck Close Bank1 |
DTC P2442 Secondary Air Injection System Switching Valve Stuck Open Bank 2 |
DTC P2443 Secondary Air Injection System Switching Valve Stuck Closed Bank 2 |
| DTC No. | DTC Detection Condition | Trouble Area |
| P2440 | Cumulative pressure pulsation is 60 kPa (450 mmHg) or more for 2 seconds (1 trip detection logic). |
|
| The air switching valve (for bank 1) is stuck open for 7 seconds while the engine is running (2 trip detection logic). | ||
| P2441 | The air switching valve (for bank 1) is stuck close for 7 seconds while the engine is running (2 trip detection logic). |
|
| P2442 | Cumulative pressure pulsation is 60 kPa (450 mmHg) or more for 2 seconds (1 trip detection logic). |
|
| The air switching valve (for bank 2) is stuck open for 7 seconds while the engine is running (2 trip detection logic). | ||
| P2443 | The air switching valve (for bank 2) is stuck close for 7 seconds while the engine is running (2 trip detection logic). |
|
| Related DTCs | P2440: Air control valve stuck open P2441: Air control valve stuck closed P2442: Air control valve stuck open P2443: Air control valve stuck closed |
| Required Sensors/Components (Main) | Pressure sensor |
| Required Sensors/Components (Related) | - |
| Frequency of Operation | Once per drive cycle |
| Duration | 2 seconds: P2440 Case 2, P2442 Case 2 7 seconds: Others |
| MIL Operation | 1 driving cycle: P2440, P2442 (AIR valve is stuck open) [Case 2] 2 driving cycles: P2440, P2442 (AIR valve is stuck open) [Case 1], P2441, P2443 (AIR valve is stuck closed) |
| Sequence of Operation | None |
| Monitor runs whenever following DTCs not stored | P0010, P0020 (VVT Oil Control Valve) P0011, P0021 (VVT System - Advance) P0012, P0022 (VVT System - Retard) P0016, P0018 (VVT System - Misalignment) P0013, P0023 (Exhaust VVT Oil Control Valve) P0014, P0024 (Exhaust VVT System - Advance) P0015, P0025 (Exhaust VVT System - Retard) P0017, P0019 (Exhaust VVT System - Misalignment) P0031, P0032, P0051, P0052, P101D, P103D (Air Fuel Ratio Sensor Heater) P014C, P014D, P014E, P014F, P015A, P015B, P015C, P015D, P2195, P2196, P2197, P2198, P2237, P2238, P2239, P2240, P2241, P2242, P2252, P2253, P2255, P2256 (Air Fuel Ratio Sensor) P0102, P0103 (Mass Air Flow Sensor) P0112, P0113 (Intake Air Temperature Sensor) P0115, P0117, P0118 (Engine Coolant Temperature Sensor) P0125 (Insufficient Coolant Temperature for Closed Loop Fuel Control) P0120, P0121, P0122, P0123, P0220, P0222, P0223, P2135 (Throttle Position Sensor) P0171, P0172, P0174, P0175 (Fuel System) P0301 - P0308 (Misfire) P0327, P0328, P0332, P0333, P032C, P032D, P033C, P033D (Knock Sensor) P0335 (Crankshaft Position Sensor) P1340 (Camshaft Position Sensor) P0340, P0342, P0343, P0345, P0347, P0348 (VVT Sensor) P0365, P0367, P0368, P0390, P0392, P0393 (Exhaust VVT Sensor) P0351 - P0358 (Igniter) P0451, P0452, P0453 (EVAP System) P0500, P0722 (Vehicle Speed Sensor) P106B (Evap. emission control system pressure sensor - Air injection system pressure sensor correlation) P2431, P2432, P2433, P2436, P2437, P2438 (Secondary Air Injection System Pressure Sensor) |
| Battery voltage | 11 V or higher |
| Atmospheric pressure | 45 kPa (337.5 mmHg) or more |
| Engine | Running |
| AIR monitor during AIR: ON*1 | Completed |
| AIR monitor during AIR: OFF*2 | Completed |
| Air injection Driver (open/short or out of range) | Not detected |
| AIR pressure sensor (open/short or out of range) | Not detected |
| Time after AIR in operation | 5 seconds or more |
| AIR pump | ON |
| AIR valve | Open |
| Engine speed | 400 to 3550 rpm |
| Intake air amount | Less than 99 gm/sec |
| Time after engine start | 1 second or more |
| Time after AIR in operation | 10 seconds or more |
| AIR pump | OFF |
| AIR valve | Closed |
| Engine speed | Less than 2800 rpm |
| AIR monitor during AIR: ON | Completed |
| Time after engine started | 1 second or more |
| One of the following conditions is met | (a), (b) or (c) |
| (a) Cumulative intake air amount | 100 gm/sec or more |
| (b) Difference between starting temperature and current temperature | 10°C (18°F) or more |
| (c) Starting coolant temperature | 60°C (140°F) or higher |
| AIR pump | OFF |
| AIR valve | Closed |
| Engine speed | 4800 or less |
| Secondary air injection system pressure sensor failure (open/short or out of range) | Not detected |
| Time after engine started | 1 second or more |
| Time after secondary air injection starts operation | 10 seconds or more |
| Air switching valve stuck open (DTC P2440, P2442) | Not stored |
| Secondary air injection system pressure sensor stuck off (DTC P2445, P2447) | Not in operation |
| Engine load | 20% or more |
| Either condition is met | (a) or (b) |
| (a) AIR OFF Condition 1 | Met |
| (b) AIR OFF Condition 2 | Met |
| Cumulative pressure pulsation | 100 kPa (750 mmHg) or higher |
| Either condition is met | (a) or (b) |
| (a) AIR OFF Condition 3 | Met |
| (b) AIR OFF Condition 4 | Met |
| Following conditions are met during AIR ON | - |
| Cumulative pressure pulsation | 10 kPa or higher |
| AIR pressure | 2.4 kPa or higher |
| Following conditions are met during AIR ON | - |
| Cumulative pressure pulsation | 10 kPa or higher |
| AIR pressure | Below 2.4 kPa |
| Following conditions are met during AIR ON | - |
| Cumulative pressure pulsation | Below 10 kPa |
| AIR pressure | 2.4 kPa or higher |
| Following conditions are met during AIR ON | - |
| Cumulative pressure pulsation | Below 10 kPa |
| AIR pressure | Below 2.4 kPa |
| Following conditions are met during AIR OFF | - |
| Cumulative pressure pulsation | 30 kPa or higher |
| AIR pressure | 2.4 kPa or higher |
| Following conditions are met during AIR OFF | - |
| Cumulative pressure pulsation | 30 kPa or higher |
| AIR pressure | Below 2.4 kPa |
| Following conditions are met during AIR OFF | - |
| Cumulative pressure pulsation | Below 30 kPa |
| AIR pressure | 2.4 kPa or higher |
| Following conditions are met during AIR OFF | - |
| Cumulative pressure pulsation | Below 30 kPa |
| AIR pressure | Below 2.4 kPa |
| Tester Display | Description |
| NORMAL |
|
| ABNORMAL |
|
| INCOMPLETE |
|
| N/A |
|
| Air Pump | ON |
| Air Switching Valve | Open |
| Pressure | 2.4 kPa or more |
| Pulsation Detection | Exhaust gas pulsation detected |
| Air Pump | OFF |
| Air Switching Valve | Open |
| Pressure | Less than 2.4 kPa |
| Pulsation Detection | Exhaust gas pulsation detected |
| Air Pump | ON |
| Air Switching Valve | Closed |
| Pressure | 2.4 kPa or more |
| Pulsation Detection | Exhaust gas pulsation not detected |
| Air Pump | OFF |
| Air Switching Valve | Close |
| Pressure | Less than 2.4 kPa |
| Pulsation Detection | Exhaust gas pulsation not detected |
| Air Pump | ON |
| Air Switching Valve | Open |
| Pressure | 2.4 kPa or more |
| Pulsation Detection | Exhaust gas pulsation detected |
| Air Pump | OFF |
| Air Switching Valve | Open |
| Pressure | Less than 2.4 kPa |
| Pulsation Detection | Exhaust gas pulsation detected |
| Air Pump | ON |
| Air Switching Valve | Closed |
| Pressure | 2.4 kPa or more |
| Pulsation Detection | Exhaust gas pulsation not detected |
| Air Pump | OFF |
| Air Switching Valve | Close |
| Pressure | Less than 2.4 kPa |
| Pulsation Detection | Exhaust gas pulsation not detected |
| Detected Conditions while AIR operating: Air pump ON, ASV Open | Detected Conditions while AIR not operating: Air pump OFF, ASV Closed | ECM Determination | DTCs Output |
| Case 1 | Case 8 | Normal | - |
| Case 1 | Case 6 | ASV stuck open | P2440 or P2442 |
| Case 1 | Case 7 | Air pump stuck ON | P2444 or P2446 |
| Case 2 | Case 8 | Air pump stuck OFF | P2445 or P2447 |
| Case 3 | Case 8 | ASV stuck closed | P2441 or P2443 |
| Case 1 | Case 5 | ASV stuck open and air pump stuck ON | P2440 and P2444 or P2442 and P2446 |
| Case 2 | Case 6 | ASV stuck open and air pump stuck OFF | P2440 and P2445 or P2442 and P2447 |
| Case 3 | Case 7 | ASV stuck closed and air pump stuck ON | P2441 and P2444 or P2443 and P2446 |
| Case 4 | Case 8 | ASV stuck closed and air pump stuck OFF | P2441 and P2445 or P2443 and P2447 |
| Operation | AIR PUMP | ASV | PRESSURE*1 | PULSATION*2 |
| AIR PUMP: ON, ASV: OPEN | ON | OPEN | 2.4 kPa or more | 10 kPa or more |
| AIR PUMP: OFF, ASV: CLOSE | OFF | CLOSE | Less than 2.4 kPa | Less than 30 kPa |
| 1.CHECK ANY OTHER DTCS OUTPUT (IN ADDITION TO SECONDARY AIR INJECTION SYSTEM DTCS) |
Connect the Techstream to the DLC3.
Turn the ignition switch to ON and turn the Techstream on.
Enter the following menus: Powertrain / Engine and ECT / Trouble Codes.
Read DTCs.
| Result | Proceed to |
| P2440, P2441, P2442 and/or P2443 are output | A |
| P2440, P2441, P2442 and/or P2443 and P0412 and/or P0415 are output | B |
| P2440, P2441, P2442 and/or P2443 and other DTCs (except P0412 and P0415) are output | C |
|
| ||||
|
| ||||
| A | |
 |
| 2.CHECK FREEZE FRAME DATA (AIR PUMP FREEZE, AIR SWITCHING VALVE FREEZE) |
Connect the Techstream to the DLC3.
Turn the ignition switch to ON and turn the Techstream on.
Read the values of Air Pump Freeze, Air Pump2 Freeze, Air Switching Valve Freeze and Air Switching Valve2 Freeze from the freeze frame data recorded previously.
Referring to the following table, proceed to the appropriate step according to the result of the data reading.
| Result | Proceed to | |||
| Air Pump Freeze | Air Pump2 Freeze | Air Switching Valve Freeze | Air Switching Valve2 Freeze | |
| OFF | OFF | OFF | OFF | B |
| Except above | A | |||
|
| ||||
| A | |
|
| 3.PERFORM ACTIVE TEST USING TECHSTREAM (ACTIVATE THE AIR PUMP HEATER) |
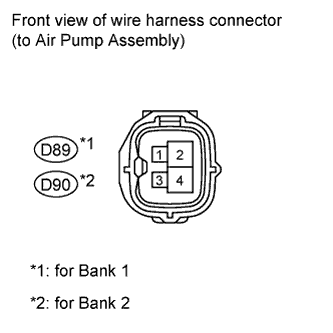 |
Disconnect the air pump connector.
Connect the Techstream to the DLC3.
Turn the ignition switch to ON and turn the Techstream on.
Enter the following menus: Powertrain / Engine and ECT/ Active Test / Activate the Air Pump Heater.
Measure the voltage according to the value(s) in the table below.
| Tester Connection | Condition | Specified Condition |
| D89-1 - Body ground | Activate the Air Pump Heater is ON | 11 to 14 V |
| D90-1 - Body ground | Activate the Air Pump Heater is ON | 11 to 14 V |
| *a | Front view of wire harness connector (to Air Pump) |
|
| ||||
| OK | |
|
| 4.INSPECT AIR PUMP (HEATER RESISTANCE) |
Inspect the air pump (Click here).
|
| ||||
| OK | |
|
| 5.INSPECT AIR PUMP HEATER RELAY (AI-HTR) |
Inspect the air pump heater relay (AI-HTR) (Click here).
|
| ||||
| OK | |
|
| 6.CHECK AIR PUMP HEATER RELAY (AI-HTR) (POWER SOURCE) |
Remove the air pump heater relay (AI-HTR).
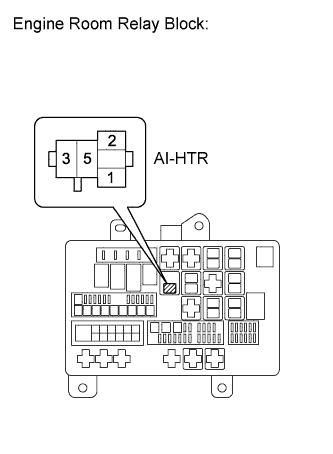 |
Measure the voltage according to the value(s) in the table below.
| Tester Connection | Condition | Specified Condition |
| AI-HTR relay terminal 5 - Body ground | Always | 11 to 14 V |
|
| ||||
| OK | |
|
| 7.CHECK HARNESS AND CONNECTOR (AIR PUMP - AI-HTR RELAY, BODY) |
Remove the air pump heater relay (AI-HTR).
Disconnect the air pump connector.
Measure the resistance according to the value(s) in the table below.
| Tester Connection | Condition | Specified Condition |
| AI-HTR relay terminal 3 - D89-1 (APH+) | Always | Below 1 Ω |
| AI-HTR relay terminal 3 - D90-1 (APH+) | Always | Below 1 Ω |
| D89-3 (APHG) - Body ground | Always | Below 1 Ω |
| D90-3 (APHG) - Body ground | Always | Below 1 Ω |
| AI-HTR relay terminal 3 or D89-1 (APH+) - Body ground | Always | 10 kΩ or higher |
| AI-HTR relay terminal 3 or D90-1 (APH+) - Body ground | Always | 10 kΩ or higher |
|
| ||||
| OK | |
|
| 8.INSPECT AIR PUMP |
Inspect the air pump (Click here).
|
| ||||
| OK | |
|
| 9.PERFORM ACTIVE TEST USING TECHSTREAM |
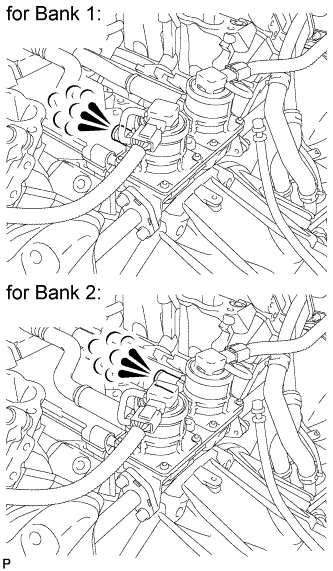 |
Visual check
Start the engine and warm it up.
Turn the ignition switch off.
Disconnect the No. 1 air hose.
Connect the Techstream to the DLC3.
Turn the ignition switch to ON and turn the Techstream on.
Enter the following menus: Powertrain / Engine and ECT / Utility / Secondary Air Injection Check / Manual Mode / AIR PUMP 1: ON, ASV1: OPEN, AIR PUMP 2: ON, ASV2: OPEN.
Start the engine.
Perform the AIR system intrusive operation while the engine is idling.
Place your hand near the air switching valve port and check that the exhaust gas pressure pulsates when the ASV is turned ON.
Enter the following menus: Powertrain / Engine and ECT / Utility / Secondary Air Injection Check / Manual Mode / AIR PUMP 1: ON, ASV1: OPEN, AIR PUMP 2: ON, ASV2: OPEN and AIR PUMP 1: ON, ASV1: CLOSE, AIR PUMP 2: ON, ASV2: CLOSE.
Check that the exhaust gas does not pulsate when the ASV is turned OFF.
Turn the ignition switch off.
| Air Pump Operations | ASV Operations | Exhaust Gas Pulsation |
| ON | OFF | Not detected |
| ON | ON | Detected |
Other inspection method:
The ASV operation can be confirmed by checking the cumulative pressure pulsation* provided in the System Check.
Perform System Check operation under Manual Mode.
*: The exhaust pulsation value is calculated in the ECM. If the calculated value exceeds a certain level, the ECM determines that the exhaust pulsation is in the AIR system.
Start the engine and warm it up.
Turn the ignition switch off.
Connect the Techstream to the DLC3.
Turn the ignition switch to ON and turn the Techstream on.
Enter the following menus: Powertrain / Engine and ECT / Utility / Secondary Air Injection Check / Manual Mode / AIR PUMP 1: ON, ASV1: OPEN, AIR PUMP 2: ON, ASV2: OPEN and AIR PUMP 1: OFF, ASV1: CLOSE, AIR PUMP 2: OFF, ASV2: CLOSE.
Start the engine after the Techstream initialization is finished.
Perform the AIR system intrusive operation while the engine is idling.
Check that the air-fuel ratio and pressure in the secondary air injection system passage (PULSATION) displayed on the Techstream indicate the conditions shown in the table below.
Turn the ignition switch off.
| AIR System Operation | Pulsation Condition (ECM Calculation) | Air-Fuel Ratio (Reference) |
| AIR PUMP: ON, ASV: OPEN | 10 kPa or more | 18 or more |
| AIR PUMP: OFF, ASV: CLOSE | Less than 30 kPa | Approximately 14.5 (around stoichiometric air-fuel ratio) |
| Result | Proceed to |
| NG | A |
| OK | B |
|
| ||||
| A | |
|
| 10.INSPECT AIR TUBE (BLOCKAGES AND LEAKAGES) |
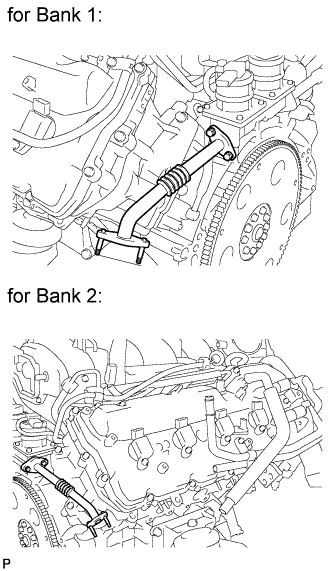 |
Check that the No. 2 and No. 3 air tubes are securely connected to both the exhaust manifold and the ASV.
Inspect the air tube for blockages and damage.
|
| ||||
| OK | |
|
| 11.INSPECT AIR SWITCHING VALVE |
Inspect the air switching valve .
|
| ||||
| OK | |
|
| 12.INSPECT AIR INJECTION CONTROL DRIVER (POWER SOURCE OF AIR INJECTION CONTROL DRIVER) |
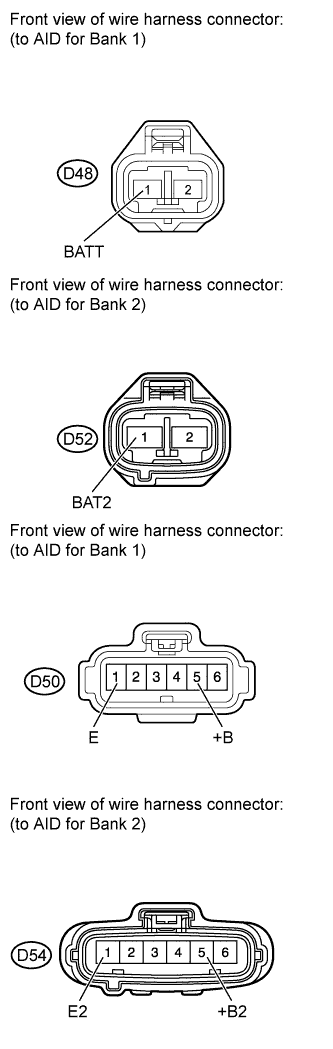 |
Disconnect the D48 and D50 or D52 and D54 AID connectors.
Turn the ignition switch to ON.
Measure the voltage according to the value(s) in the table below.
| Tester Connection | Switch Condition | Specified Condition |
| D48-1 (BATT) - Body ground | Ignition switch ON | 11 to 14 V (near battery voltage) |
| D50-5 (+B) - Body ground | Ignition switch ON | 11 to 14 V (near battery voltage) |
| D52-1 (BAT2) - Body ground | Ignition switch ON | 11 to 14 V (near battery voltage) |
| D54-5 (+B2) - Body ground | Ignition switch ON | 11 to 14 V (near battery voltage) |
Measure the resistance according to the value(s) in the table below.
| Tester Connection | Condition | Specified Condition |
| D50-1 (E) - Body ground | Always | Below 1 Ω |
| D54-1 (E2) - Body ground | Always | Below 1 Ω |
|
| ||||
| OK | |
|
| 13.CHECK HARNESS AND CONNECTOR (ECM - AIR INJECTION CONTROL DRIVER) |
Disconnect the A24 or D74 ECM connector.
Disconnect the D50 or D54 AID connector.
Measure the resistance according to the value(s) in the table below.
| Tester Connection | Condition | Specified Condition |
| D74-28 (AIRV) - D50-3 (SIV) | Always | Below 1 Ω |
| A24-43 (ARV2) - D54-3 (SIV2) | Always | Below 1 Ω |
| D74-28 (AIRV) or D50-3 (SIV) - body ground | Always | 10 kΩ or higher |
| A24-43 (ARV2) or D54-3 (SIV2) - body ground | Always | 10 kΩ or higher |
|
| ||||
| OK | |
|
| 14.PERFORM ACTIVE TEST USING TECHSTREAM |
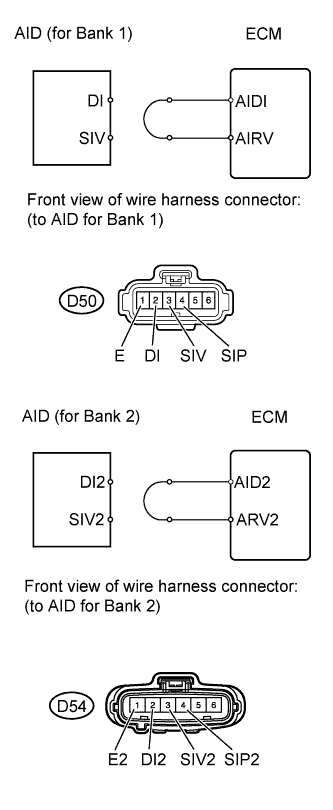 |
Disconnect the D50 or D54 AID connector.
Connect terminals DI and SIV or DI2 and SIV2 of the wire harness connector for the AID.
Connect the Techstream to the DLC3.
Turn the ignition switch to ON and turn the Techstream on.
Enter the following menus: Powertrain / Engine and ECT / Utility / Secondary Air Injection Check / Manual Mode / AIR PUMP 1: ON, ASV 1: OPEN, AIR PUMP 2: ON, ASV 2: OPEN.
Start the engine.
Perform the AIR system forced operation while the engine is idling.
Measure the voltage between the SIV and E or SIV2 and E2 terminals of the ECM connector when the AIR system is ON and OFF.
Turn the ignition switch off.
| Tester Connection | Condition | Specified Condition |
| D50-3 (SIV) - D50-1 (E) | AIR PUMP: ON, ASV: OPEN | 0.5 to 2 V |
| D54-3 (SIV2) - D54-1 (E2) | AIR PUMP: ON, ASV: OPEN | 0.5 to 2 V |
| D50-3 (SIV) - D50-1 (E) | AIR PUMP: OFF, ASV: CLOSE | 11 to 14 V |
| D54-3 (SIV2) - D54-1 (E2) | AIR PUMP: OFF, ASV: CLOSE | 11 to 14 V |
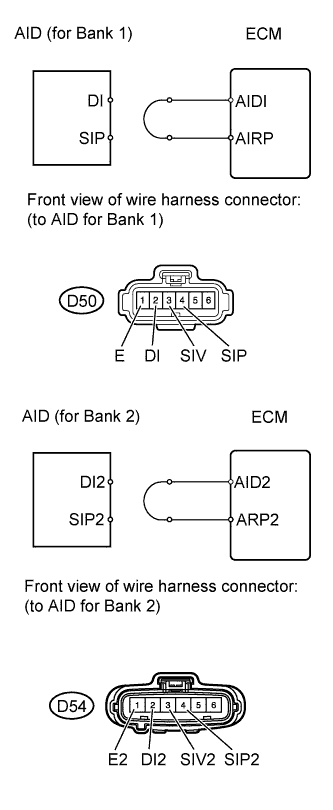 |
Connect terminals DI and SIP or DI2 and SIP2 of the wire harness connector for the AID.
Connect the Techstream to the DLC3.
Turn the ignition switch to ON and turn the Techstream on.
Enter the following menus: Powertrain / Engine and ECT / Utility / Secondary Air Injection Check / Manual Mode / AIR PUMP 1: ON, ASV 1: OPEN, AIR PUMP 2: ON, ASV 2: OPEN.
Start the engine.
Perform the AIR system forced operation while the engine is idling.
Measure the voltage between the SIP and E or SIP2 and E2 terminals of the ECM connector when the AIR system is ON and OFF.
Turn the ignition switch off.
| Tester Connection | Condition | Specified Condition |
| D50-4 (SIP) - D50-1 (E) | AIR PUMP: ON, ASV: OPEN | 0.5 to 2 V |
| D54-4 (SIP2) - D54-1 (E2) | AIR PUMP: ON, ASV: OPEN | 0.5 to 2 V |
| D50-4 (SIP) - D50-1 (E) | AIR PUMP: OFF, ASV: CLOSE | 11 to 14 V |
| D54-4 (SIP2) - D54-1 (E2) | AIR PUMP: OFF, ASV: CLOSE | 11 to 14 V |
|
| ||||
| OK | |
|
| 15.REPLACE AIR INJECTION CONTROL DRIVER |
Replace the air injection control driver (Click here).
| NEXT | |
|
| 16.CHECK WHETHER DTC OUTPUT RECURS (DTC P2440, P2441, P2442 AND/OR P2443) |
Start the engine and warm it up.
Turn the ignition switch off.
Connect the Techstream to the DLC3.
Turn the ignition switch to ON and turn the Techstream on.
Clear DTCs (if output) (Click here).
Enter the following menus: Powertrain / Engine and ECT / Utility / Secondary Air Injection Check / Automatic Mode.
Start the engine after the Techstream initialization is finished.
Perform the System Check operation by pressing Next.
After operating the AIR system, perform the following to confirm the AIR system pending codes: Press the Exit button.
Check pending DTCs.
Turn the ignition switch off.
|
| ||||
| OK | ||
 | ||
| ||
| 17.INSPECT VACUUM HOSES (AIR SWITCHING VALVE - PRESSURE SENSOR) |
|
| ||||
| OK | |
|
| 18.INSPECT AIR SWITCHING VALVE (PRESSURE SENSOR) |
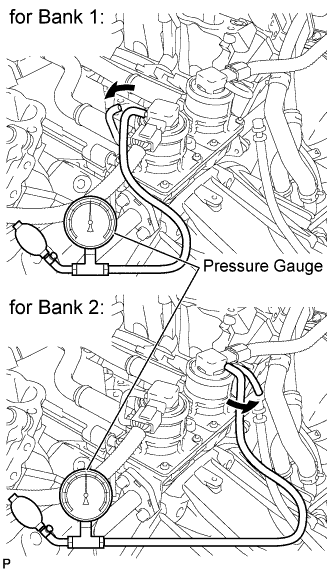 |
Connect a pressure gauge to the air pressure sensor as shown in the illustration.
Connect the Techstream to the DLC3.
Turn the ignition switch to ON and turn the Techstream on.
Enter the following menus: Powertrain / Engine and ECT / Data List / Air pump pressure (Absolute) and Air Pump2 Pressure (Absolute).
Check that the pressure displayed on the Techstream fluctuates when applying the pressure to the pressure sensor with the pressure gauge.
|
| ||||
| OK | ||
| ||
| ||
