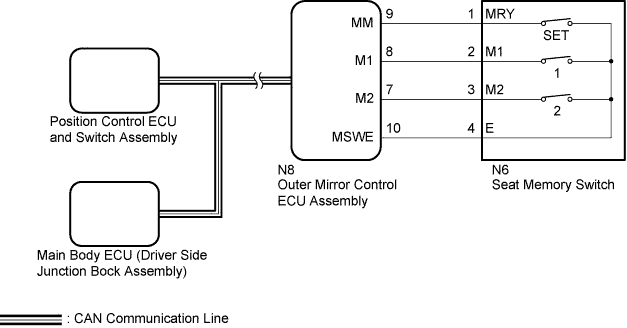
FRONT POWER SEAT CONTROL SYSTEM (w/ Memory) > Power Seat Position is not Memorized |
| 1.CHECK CAN COMMUNICATION SYSTEM |
Use the Techstream to check if the CAN communication system is functioning normally (Click here).
|
| ||||
| OK | |
 |
| 2.CHECK FRONT POWER SEAT OPERATION |
Check that each function of the power seat operates normally by using the power seat switches (Click here).
|
| ||||
| OK | |
|
| 3.READ VALUE USING TECHSTREAM (SEAT MEMORY SWITCH) |
Connect the Techstream to the DLC3.
Turn the ignition switch to ON.
Turn the Techstream on.
Enter the following menus: Body Electrical / Driver Seat / Data List.
Read the Data List according to the display on the Techstream.
| Tester Display | Measurement Item/Range | Normal Condition | Diagnostic Note |
| SET Switch | Seat memory switch SET signal / ON or OFF | ON: Seat memory switch SET on OFF: Seat memory switch SET off | - |
| M1 Switch | Seat memory switch M1 signal / ON or OFF | ON: Seat memory switch M1 on OFF: Seat memory switch M1 off | - |
| M2 Switch | Seat memory switch M2 signal / ON or OFF | ON: Seat memory switch M2 on OFF: Seat memory switch M2 off | - |
|
| ||||
| OK | |
|
| 4.PERFORM ACTIVE TEST USING TECHSTREAM (BUZZER) |
Connect the Techstream to the DLC3.
Turn the ignition switch to ON.
Turn the Techstream on.
Enter the following menus: Body Electrical / Driver Seat / Active Test.
Perform the Active Test according to the display on the Techstream.
| Tester Display | Test Part | Control Range | Diagnostic Note |
| Buzzer | Buzzer operation | ON / OFF | - |
|
| ||||
| OK | |
|
| 5.REPLACE OUTER MIRROR CONTROL ECU ASSEMBLY |
Temporarily replace the outer mirror ECU assembly with a new or normally functioning one (Click here).
| NEXT | |
|
| 6.CHECK SEAT POSITION MEMORY FUNCTION |
Perform a memory operation and check that the buzzer sounds to indicate the completion of the memory operation (Click here).
|
| ||||
| OK | ||
 | ||
| ||
| 7.REPLACE POSITION CONTROL ECU AND SWITCH ASSEMBLY |
Temporarily replace the position control ECU and switch assembly with a new or normally functioning one (Click here).
| NEXT | |
|
| 8.CHECK SEAT POSITION MEMORY FUNCTION |
Perform a memory operation and check that the buzzer sounds to indicate the completion of the memory operation (Click here).
|
| ||||
| OK | ||
| ||
| ||
| 9.INSPECT SEAT MEMORY SWITCH |
Remove the seat memory switch (Click here).
Inspect the seat memory switch (Click here).
|
| ||||
| OK | |
|
| 10.CHECK HARNESS AND CONNECTOR (OUTER MIRROR CONTROL ECU ASSEMBLY - SEAT MEMORY SWITCH) |
Disconnect the N8 outer mirror control ECU assembly connector.
Disconnect the N6 seat memory switch connector.
Measure the resistance according to the value(s) in the table below.
| Tester Connection | Condition | Specified Condition |
| N8-9 (MM) - N6-1 (MRY) | Always | Below 1 Ω |
| N8-8 (M1) - N6-2 (M1) | Always | Below 1 Ω |
| N8-7 (M2) - N6-3 (M2) | Always | Below 1 Ω |
| N8-10 (MSWE) - N6-4 (E) | Always | Below 1 Ω |
| N8-9 (MM) or N6-1 (MRY) - Body ground | Always | 10 kΩ or higher |
| N8-8 (M1) or N6-2 (M1) - Body ground | Always | 10 kΩ or higher |
| N8-7 (M2) or N6-3 (M2) - Body ground | Always | 10 kΩ or higher |
| N8-10 (MSWE) or N6-4 (E) - Body ground | Always | 10 kΩ or higher |
|
| ||||
| OK | ||
| ||
| ||

