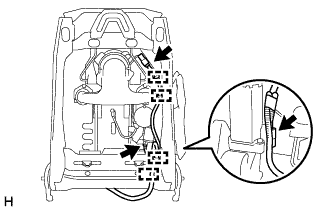
Home › BODY › SEAT › FRONT SEAT ASSEMBLY (for Power Seat)

FRONT SEAT ASSEMBLY (for Power Seat) > REASSEMBLY

for Preparation Click here


CAUTION:
Wear protective gloves. Sharp areas on the parts may injure your hands.

HINT:
  1. Use the same procedure for the RH and LH sides.
  2. The procedure listed below is for the LH side.
  3. A bolt without a torque specification is shown in the standard bolt chart (Click here).


1. INSTALL UPPER NO. 4 SEAT TRACK COVER
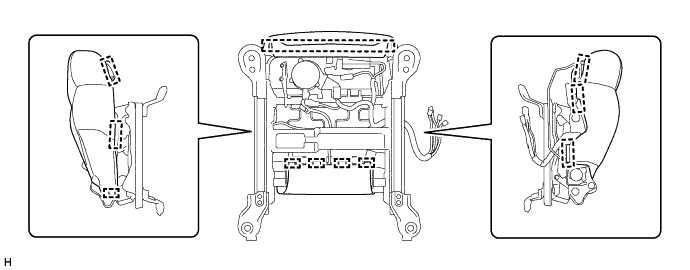
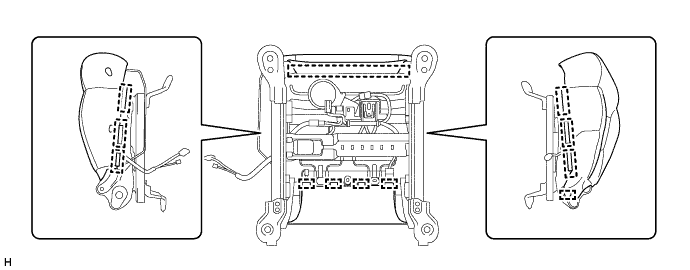
  1. Attach the 2 claws to install the upper No. 4 seat track cover.


2. INSTALL UPPER NO. 3 SEAT TRACK COVER

HINT:
Use the same procedure described for the upper No. 4 seat track cover.


3. INSTALL UPPER SEAT TRACK COVER
  1. Attach the 2 claws to install the upper seat track cover.

    HINT:
    Use the same procedure for all upper seat track covers.


4. INSTALL FRONT LOWER SEAT CUSHION SHIELD LH (for Driver Side)
  1. Attach the claw to install the front lower seat cushion shield LH.

  1. Install the screw and attach the hook.

    Torque:
    3.0 N*m{ 31 kgf*cm , 27 in.*lbf }


5. INSTALL FRONT LOWER SEAT CUSHION SHIELD RH (for Driver Side)

HINT:
Use the same procedure described for the LH side.


6. INSTALL FRONT LOWER SEAT CUSHION SHIELD LH (for Front Passenger Side)
  1. Attach the 2 claws to install the front lower seat cushion shield LH.


7. INSTALL FRONT LOWER SEAT CUSHION SHIELD RH (for Front Passenger Side)

HINT:
Use the same procedure described for the LH side.


8. INSTALL SEPARATE TYPE FRONT SEAT CUSHION SPRING ASSEMBLY
  1. Attach the 4 hooks of the rear side to install the separate type front seat cushion spring assembly.

  1. Attach the hook of the front side.


9. INSTALL FRONT SEAT CUSHION PANEL SUB-ASSEMBLY
  1. Install the front seat cushion panel sub-assembly with the 4 bolts.

    Torque:
    10 N*m{ 102 kgf*cm , 7 ft.*lbf }


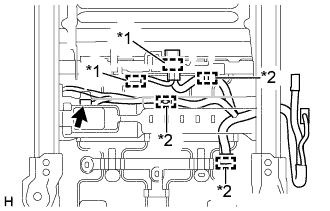
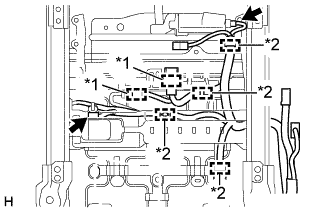
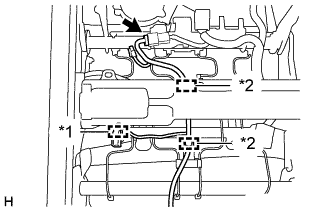
10. INSTALL FRONT SEAT CUSHION WIRE LH (for Driver Side)


  1. for 8 Way Seat Type:


      B354934E01
    1. w/o Seat Heater System:
      Connect the connector and attach the connector clamp and 3 wire harness clamps to install the front seat cushion wire LH.
      Text in Illustration 
      *1
      Connector Clamp
      *2
      Wire Harness Clamp


    2. B354935E01
    3. w/ Seat Heater System:
      Connect the connector and attach the 2 connector clamps and 3 wire harness clamps to install the front seat cushion wire LH.
      Text in Illustration 
      *1
      Connector Clamp
      *2
      Wire Harness Clamp


    B354936E01
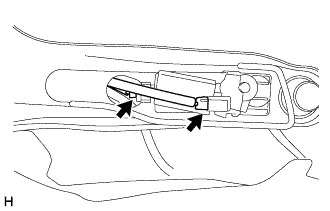
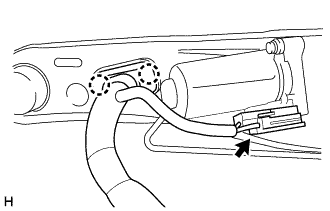
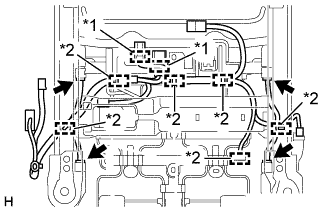
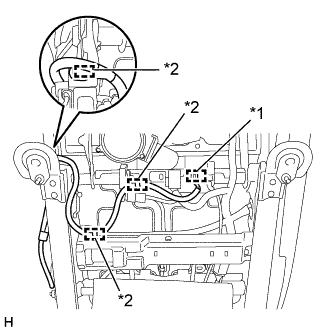
  1. for 10 Way Seat Type:

    1. Connect the 2 connectors and attach the 2 connector clamps and 4 wire harness clamps to install the front seat cushion wire LH.
      Text in Illustration 
      *1
      Connector Clamp
      *2
      Wire Harness Clamp


    B354933
  1. Connect the 2 connectors.


    B354932
  1. Connect the connector and attach the 2 claws.


11. INSTALL FRONT SEAT CUSHION WIRE RH (for Front Passenger Side)


    B354937E01
  1. Connect the 4 connectors and attach the 2 connector clamps and 6 wire harness clamps to install the front seat cushion wire RH.
    Text in Illustration 
    *1
    Connector Clamp
    *2
    Wire Harness Clamp


12. INSTALL SEAT CLIMATE CONTROL BLOWER LH (w/ Climate Control Seat System)
  1. Install the seat climate control blower LH with the 3 nuts.

    Torque:
    8.0 N*m{ 82 kgf*cm , 71 in.*lbf }

  1. Attach the clamp.


13. INSTALL SEAT CUSHION CLIMATE CONTROL DUCT LH (w/ Climate Control Seat System)
  1. Attach the 2 claws to install the seat cushion climate control duct LH.

  1. Attach the 2 clips.


14. INSTALL SEAT HEATER CONTROL SUB-ASSEMBLY LH (w/ Seat Heater System)
  1. Attach the clamp to install the seat heater control sub-assembly LH.

  1. Connect the connector.


15. INSTALL OCCUPANT CLASSIFICATION ECU (for Front Passenger Side)
  1. Check that the ignition switch is OFF.

  1. Check that the cable is disconnected from the battery negative (-) terminal.

    CAUTION:
    Wait at least 90 seconds after disconnecting the cable from the negative (-) battery terminal to prevent airbag and seat belt pretensioner activation.

  1. Attach the claw and install the occupant detection ECU to the front seat assembly RH.

    NOTICE:
    1. If the occupant detection ECU has been dropped, or there are any cracks, dents or other defects in the case, bracket or connector, replace it with a new one.
    2. When installing the occupant detection ECU, be careful that the SRS wiring does not interfere with other parts and that it is not pinched between other parts.

  1. Check that there is no looseness in the installation parts of the occupant classification ECU.


16. INSTALL FRONT SEAT CUSHION HEATER ASSEMBLY LH (w/ Seat Heater System)
  1. Set the front seat cushion heater assembly LH on the separate type front seat cushion cover.


    B354928
  1. Using a tacker, install the front seat cushion heater assembly LH to the separate type front seat cushion cover with 10 new tack pins as shown in the illustration.

    NOTICE:
    Do not substitute other metal parts for tack pins.


17. INSTALL SEPARATE TYPE FRONT SEAT CUSHION COVER
  1. Set the separate type front seat cushion cover in place.


    B354927E01
  1. Using hog ring pliers, install the separate type front seat cushion cover to the separate type front seat cushion pad with 10 new hog rings as shown in the illustration.

    NOTICE:
    1. Be careful not to damage the separate type front seat cushion cover.
    2. Be sure to securely install the hog rings as shown in the illustration while preventing wrinkles from forming on the separate type front seat cushion cover.

    HINT:
    Install the hog rings at the cutouts if they are there.

  1. Attach the 2 fasteners.
    Text in Illustration 
    *1
    Fastener
    *2
    Hog Ring Pliers
    *a
    Cutout


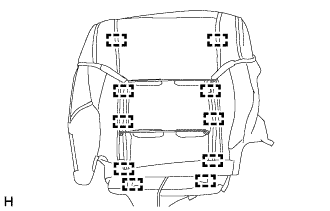
18. INSTALL SEPARATE TYPE FRONT SEAT CUSHION COVER WITH PAD
  1. Set the separate type front seat cushion cover with pad on the front seat cushion frame sub-assembly LH.


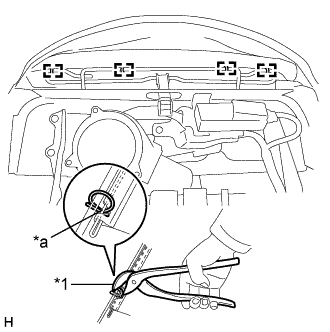
  1. for Driver Side:


      B354923E01
    1. w/ Leg Support Adjustment Switch:
      Using hog ring pliers, install the separate type front seat cushion cover to the front seat cushion frame sub-assembly LH with 4 new hog rings as shown in the illustration.

      NOTICE:
      1. Be careful not to damage the separate type front seat cushion cover.
      2. Be sure to securely install the hog rings as shown in the illustration while preventing wrinkles from forming on the separate type front seat cushion cover.

      HINT:
      Install the hog rings at the cutouts if they are there.

      Text in Illustration 
      *1
      Hog Ring Pliers
      *a
      Cutout

    2. w/ Leg Support Adjustment Switch:
      Attach the 4 hooks.


    3. Attach the 11 hooks to install the separate type front seat cushion cover with pad.


      B354920


  1. for Front Passenger Side:


    1. Attach the 12 hooks to install the separate type front seat cushion cover with pad.


      B354924


    B354925E01
  1. Attach the connector clamp and 2 wire harness clamps to connect the seat cushion wire LH.
    Text in Illustration 
    *1
    Connector Clamp
    *2
    Wire Harness Clamp

  1. Connect the connector.


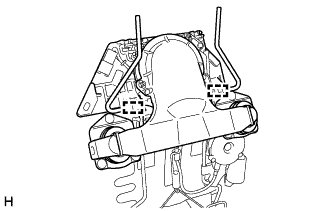
19. INSTALL SEATBACK CLIMATE CONTROL BLOWER LH (w/ Climate Control Seat System)


    B354918
  1. Install the seatback climate control blower LH in the direction indicated by the arrow shown in the illustration.


    B356555
  1. Attach the 2 hooks.


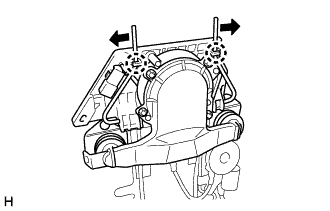
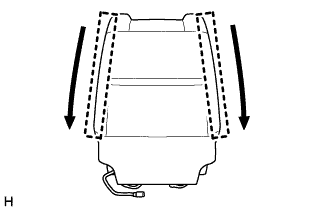
    B359182
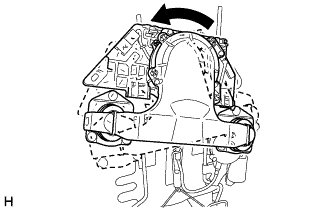
  1. Spread the wires of the lumbar support assembly LH in the direction indicated by the arrow shown in the illustration to attach the 2 claws.


20. INSTALL FRONT SEATBACK HOOK
  1. Install the 2 front seatback hooks to the lumbar support adjuster assembly LH.


21. INSTALL LUMBAR SUPPORT ADJUSTER ASSEMBLY LH
  1. Attach the 2 guides and 2 clips to install the lumbar support adjuster assembly LH.


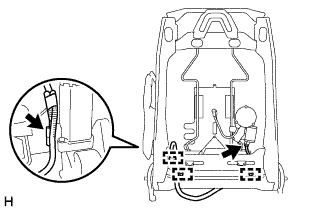
22. INSTALL FRONT SEATBACK WIRE LH (for Driver Side)


    B354945
  1. w/o Climate Control Seat System:

    1. Attach the 3 clamps to install the front seatback wire LH.

    2. Connect the 2 connectors.


    B354914
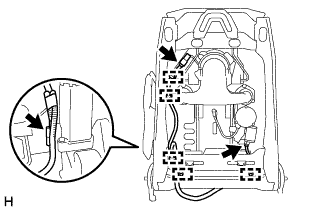
  1. w/ Climate Control Seat System:

    1. Attach the 5 clamps to install the front seatback wire LH.

    2. Connect the 3 connectors.


23. INSTALL FRONT SEATBACK WIRE RH (for Front Passenger Side)


    B356554
  1. Attach the 4 clamps to install the front seatback wire RH.

  1. Connect the 3 connectors.


24. INSTALL FRONT SEAT AIRBAG ASSEMBLY LH

HINT:
Prepare a battery as the power source to deploy the airbag.


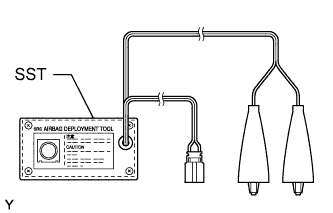
    C110371E06
  1. Check the function of SST (Click here).

  1. Read the precaution (Click here).

  1. Disconnect the cable from the negative (-) battery terminal.

    CAUTION:
    Wait at least 90 seconds after disconnecting the cable from the negative (-) battery terminal to prevent airbag and seat belt pretensioner activation.

  1. Remove the front seat (Click here).

    HINT:
    Keep the front seat in the cabin.


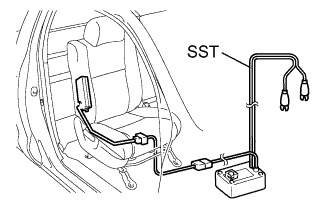
    B256979E01
  1. Install SST.

    1. Disconnect the connector (yellow colored) from the front seat airbag assembly.

      NOTICE:
      When handling the airbag connector, take care not to damage the airbag wire harness.

    2. Connect SST connector to the front seat airbag assembly connector.

      SST
      09082-00700  
      09082-00820  

      NOTICE:
      To avoid damaging SST connector and wire harness, do not lock the secondary lock of the twin lock.

    3. Install the front seat (Click here).


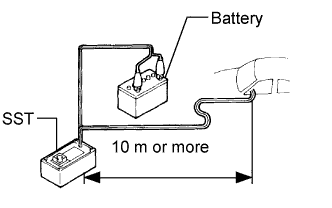
    4. C110476E12
    5. Move SST at least 10 m (32.8 ft.) away from the vehicle front side window.

    6. Maintaining enough clearance for SST wire harness in the front side window, close all doors and windows of the vehicle.

      NOTICE:
      Take care not to damage SST wire harness.

    7. Connect the red clip of SST to the battery positive (+) terminal and the black clip of SST to the battery negative (-) terminal.

  1. Deploy the airbag.

    1. Check that no one is inside the vehicle or within a 10 m (32.8 ft.) radius of the vehicle.

    2. Press SST activation switch and deploy the airbag.

      CAUTION:
      1. When deploying the airbag, make sure that no one is near the vehicle.
      2. The front seat airbag assembly becomes extremely hot when the airbag is deployed, so do not touch it for at least 30 minutes after deployment.
      3. Use gloves and safety glasses when handling a front seat airbag assembly with a deployed airbag.
      4. Do not apply water to a front seat airbag assembly with a deployed airbag.
      5. Always wash your hands with water after completing the operation.

      HINT:
      The airbag is deployed as the LED of SST activation switch comes on.


25. INSTALL SEPARATE TYPE FRONT SEATBACK PAD
  1. Install the separate type front seatback pad to the front seatback frame sub-assembly LH.

  1. w/ Climate Control Seat System:

    1. Attach the 6 clips.


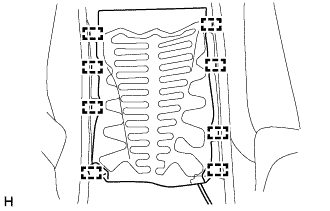
26. INSTALL FRONT SEATBACK HEATER ASSEMBLY LH (w/ Seat Heater System)
  1. Set the front seatback heater assembly LH on the separate type front seatback cover.


    B354912
  1. Using a tacker, install the front seatback heater assembly LH to the separate type front seatback cover with 8 new tack pins as shown in the illustration.

    NOTICE:
    Do not substitute other metal parts for tack pins.


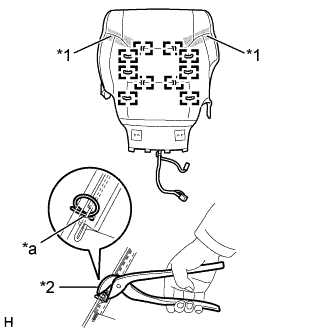
27. INSTALL SEPARATE TYPE FRONT SEATBACK COVER
  1. Set the separate type front seatback cover in place.

  1. Attach the 4 claws to install the 2 front seat headrest supports.


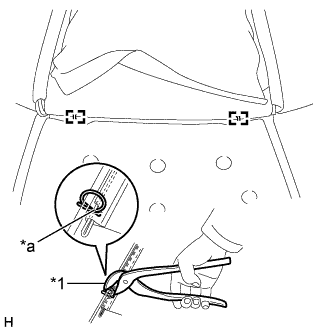
    B354909E01
  1. Using hog ring pliers, install the separate type front seatback cover to the separate type front seatback pad with 2 new hog rings as shown in the illustration.

    NOTICE:
    1. Be careful not to damage the separate type front seatback cover.
    2. Be sure to securely install the hog rings as shown in the illustration while preventing wrinkles from forming on the separate type front seatback cover.

    HINT:
    Install the hog rings at the cutouts if they are there.

    Text in Illustration 
    *1
    Hog Ring Pliers
    *a
    Cutout


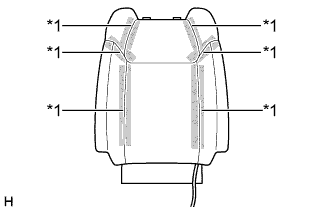
    B354911E01
  1. Attach the 6 fasteners.
    Text in Illustration 
    *1
    Fastener

  1. Pass the 4 straps of the separate type front seatback cover through the separate type front seatback pad.

  1. Attach the 2 hooks.

    CAUTION:
    1. For vehicles with a front seat airbag assembly, the separate type front seatback cover must be securely installed. Otherwise, the front seat airbag assembly may not deploy properly.
    2. Make sure that the strap is not twisted after attaching the 2 hooks.
    3. Attach the 2 hooks securely.


    1. Slide each hook to attach them.

    2. Install the 4 clips.


    B356804
  1. Close the 2 fasteners.


    B354905E01
  1. w/o Seat Heater System:

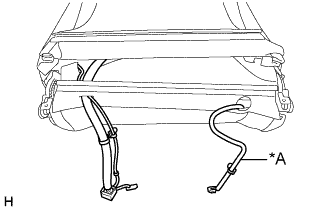
    1. Pass the 2 wire harnesses through the separate type front seatback cover.

  1. w/ Seat Heater System:

    1. Pass the 3 wire harnesses through the separate type front seatback cover.
      Text in Illustration 
      *A
      w/ Seat Heater System

  1. Detach the hook.


28. INSTALL SEPARATE TYPE FRONT SEATBACK ASSEMBLY
  1. When reusing a bolt:

    1. Clean the threads of the bolt with non-residue solvent.

    2. Apply adhesive to the threads of the bolt.

      Adhesive:
      Toyota Genuine Adhesive 1324, Three Bond 1324 or equivalent.


    B354903
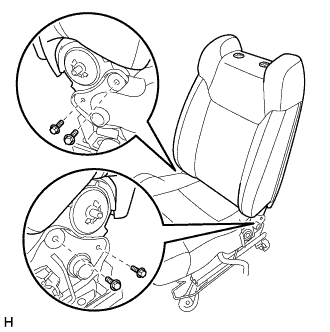
  1. Install the separate type front seatback assembly with the 4 bolts.

    Torque:
    45 N*m{ 459 kgf*cm , 33 ft.*lbf }


    B354902E01
  1. Attach the connector clamp and 3 wire harness clamps to connect the wire harness of the front seat airbag assembly LH.
    Text in Illustration 
    *1
    Connector Clamp
    *2
    Wire Harness Clamp


    B354901
  1. Attach the wire harness clamp to connect the wire harness of the front seatback wire LH.

  1. Connect the connector.


    B354900
  1. w/ Seat Heater System:

    1. Attach the wire harness clamp to connect the wire harness of the front seatback heater assembly LH.

    2. Connect the connector.


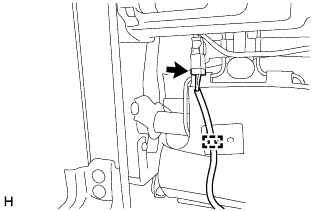
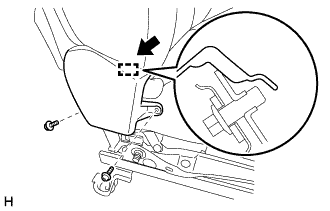
29. INSTALL FRONT INNER NO. 1 SEAT CUSHION SHIELD LH


    B354899
  1. Attach the guide in the direction indicated by the arrow shown in the illustration to install the front inner No. 1 seat cushion shield LH.

  1. Install the 2 screws.

    Torque:
    3.0 N*m{ 31 kgf*cm , 27 in.*lbf }


30. INSTALL FRONT NO. 2 SEAT WIRE LH (w/ Leg Support Adjustment Switch)
  1. Attach the 2 clamps to install the front No. 2 seat wire LH.


31. INSTALL SEAT VARIABLE CUSHION SWITCH (w/ Leg Support Adjustment Switch)
  1. Install the seat variable cushion switch with the 2 screws.

  1. Connect the connector.


32. INSTALL FRONT POWER SEAT LUMBAR SWITCH LH
  1. Attach the 4 claws to install the front power seat lumbar switch LH.


33. INSTALL FRONT POWER SEAT SWITCH LH (w/o Seat Position Memory System)
  1. Install the front power seat switch LH with the 3 screws.


34. INSTALL POSITION CONTROL ECU AND SWITCH ASSEMBLY (w/ Seat Position Memory System)
  1. Install the position control ECU and switch with the 3 screws.


35. INSTALL RECLINING POWER SEAT SWITCH KNOB
  1. Attach the 2 claws to install the reclining power seat switch knob.


36. INSTALL SLIDE AND VERTICAL POWER SEAT SWITCH KNOB
  1. Attach the 2 claws to install the slide and vertical power seat switch knob.


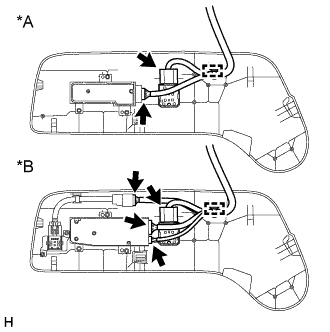
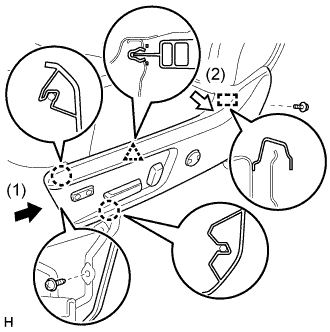
37. INSTALL FRONT SEAT CUSHION SHIELD LH


    B354890E01
  1. w/o Leg Support Adjustment Switch:

    1. Connect the 2 connectors and attach the clamp to install the front seat cushion shield LH.

  1. w/ Leg Support Adjustment Switch:

    1. Connect the 4 connectors and attach the clamp to install the front seat cushion shield LH.
      Text in Illustration 
      *A
      w/o Leg Support Adjustment Switch
      *B
      w/ Leg Support Adjustment Switch


    B354889E01
  1. Attach the 2 claws, clip and guide as indicated by the arrows in the order shown in the illustration.

  1. Install the 2 screws.

    Torque:
    3.0 N*m{ 31 kgf*cm , 27 in.*lbf }

  1. Connect the 2 rubber bands.


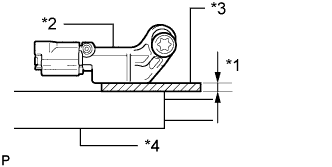
38. INSTALL SEAT POSITION AIRBAG SENSOR


    C107067E19
  1. Using a 1.0 mm (0.0393 in.) feeler gauge, temporarily install the seat position airbag sensor.
    Text in Illustration 
    *1
    1.0 mm
    *2
    Seat Position Airbag Sensor
    *3
    Feeler Gauge
    *4
    Seat Rail

    NOTICE:
    1. If the seat position airbag sensor has been dropped, or there are any cracks, dents or other defects in the case or connector, replace the seat position airbag sensor with a new one.
    2. When installing the seat position airbag sensor, be careful that the SRS wiring does not interfere with or is pinched between other parts.

    HINT:
    Be sure that the clearance between the seat position airbag sensor and the seat rail is within 0.6 to 1.4 mm (0.0236 to 0.0551 in.).

  1. Using a T30 "TORX" socket wrench, tighten the "TORX" screw to install the seat position airbag sensor.

    Torque:
    8.0 N*m{ 82 kgf*cm , 71 in.*lbf }

  1. Make sure that the clearance between the seat position airbag sensor and the seat rail is within 0.6 to 1.4 mm (0.0236 to 0.0551 in.).

  1. Connect the connector.

  1. Check that there is no looseness in the installation parts of the seat position airbag sensor.


39. INSTALL FRONT SEAT INNER BELT ASSEMBLY LH (for Driver Side)


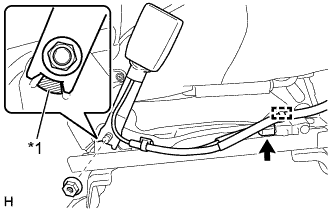
  1. for Manual Seat:


      B356070E01
    1. Install the front seat inner belt assembly LH with the nut.

      Torque:
      42 N*m{ 428 kgf*cm , 31 ft.*lbf }

      NOTICE:
      Do not allow the anchor of the front seat inner belt assembly LH to overlap the protruding part of the separate type front seat cushion spring assembly.

      Text in Illustration 
      *1
      Protruding Part

    2. Attach the wire harness clamp.


    3. B354554E01
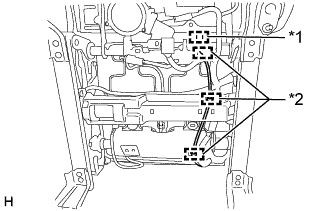
    4. Connect the connector and attach the connector clamp and 3 wire harness clamps.
      Text in Illustration 
      *1
      Connector Clamp
      *2
      Wire Harness Clamp

    5. Attach the 2 hooks of the separate type front seat cushion cover.


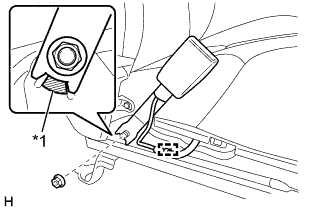
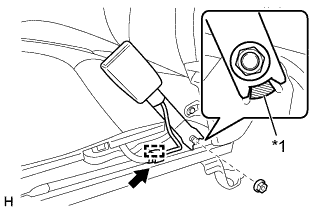
  1. for Power Seat:


      B356091E01
    1. Install the front seat inner belt assembly LH with the nut.

      Torque:
      42 N*m{ 428 kgf*cm , 31 ft.*lbf }

      NOTICE:
      Do not allow the anchor of the front seat inner belt assembly LH to overlap the protruding part of the separate type front seat cushion spring assembly.

      Text in Illustration 
      *1
      Protruding Part

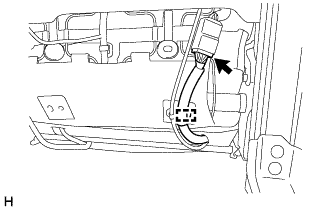
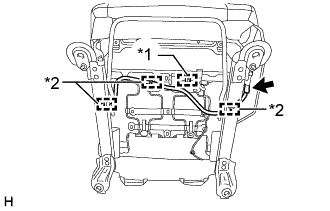
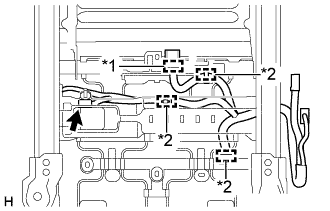
    2. Attach the wire harness clamp and connect the connector.


    3. B354885E01
    4. Attach the connector clamp and 3 wire harness clamps.
      Text in Illustration 
      *1
      Connector Clamp
      *2
      Wire Harness Clamp


40. INSTALL FRONT SEAT INNER BELT ASSEMBLY RH (for Front Passenger Side)


    B356071E01
  1. Install the front seat inner belt assembly RH with the nut.

    Torque:
    42 N*m{ 428 kgf*cm , 31 ft.*lbf }

    NOTICE:
    Do not allow the anchor of the front seat inner belt assembly RH to overlap the protruding part of the separate type front seat cushion spring assembly.

    Text in Illustration 
    *1
    Protruding Part

  1. Connect the connector and attach the connector clamp.