BACK WINDOW GLASS (for Regular Cab and Double Cab) > INSTALLATION |
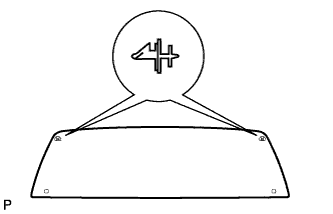
| 1. INSTALL NO. 1 BACK WINDOW GLASS SPACER |
|
Install 2 new spacers onto the back window assembly as shown in the illustration.
| 2. INSTALL NO. 2 BACK WINDOW GLASS SPACER |
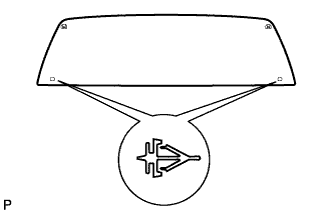 |
Install 2 new spacers onto the back window assembly as shown in the illustration.
| 3. INSTALL BACK WINDOW ASSEMBLY |
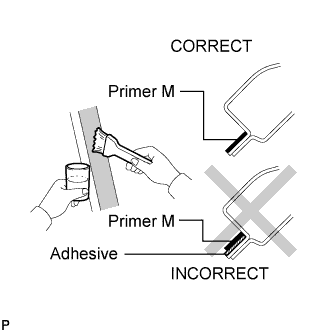 |
Using a brush or sponge, apply Primer M to the exposed part of the vehicle body.
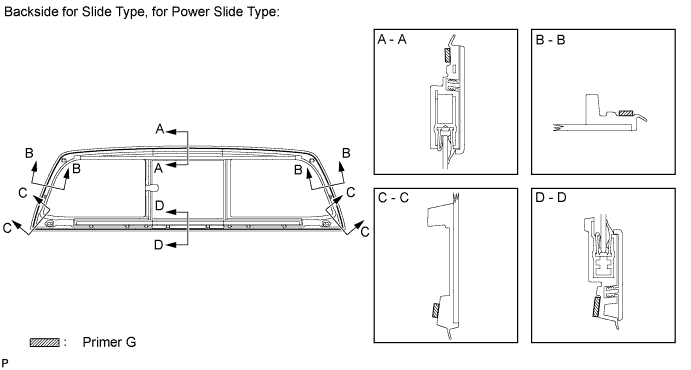
Using a brush or sponge, apply Primer G to the contact surface of the back window.
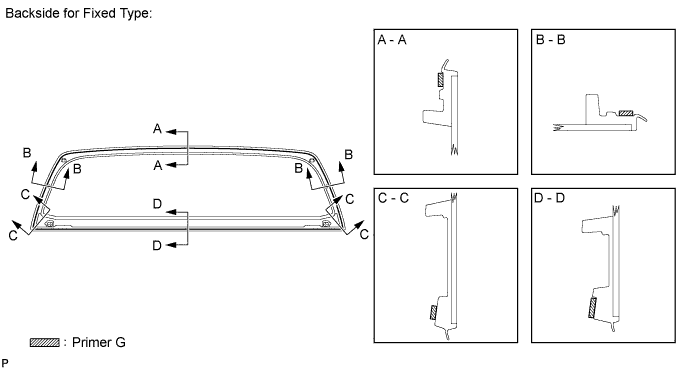
Apply adhesive to the back window.
Cut off the tip of the cartridge nozzle as shown in the illustration below.
| Temperature | Usage Time Frame |
| 35°C (95°F) | 15 minutes |
| 20°C (68°F) | 1 hour 40 minutes |
| 5°C (41°F) | 8 hours |
Load the sealer gun with the cartridge.
Apply adhesive to the back window as shown in the illustration.
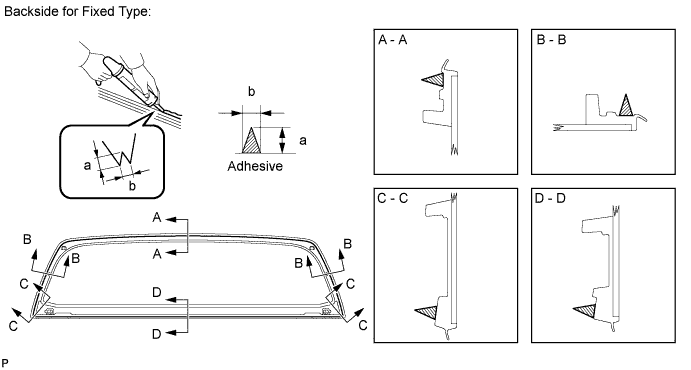
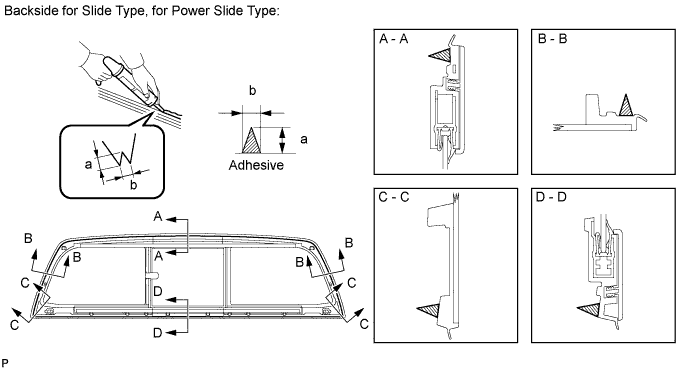
| Area | Specified Condition |
| a | 12.0 mm (0.472 in.) |
| b | 8.0 mm (0.315 in.) |
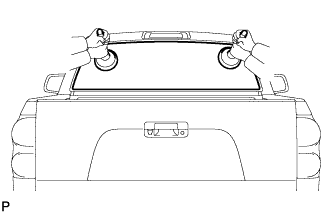 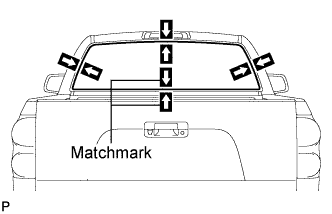 |
Using suction cups, position the glass so that the reference marks are aligned. Press it in gently along the rim.
Lightly press the front surface of the back window to ensure that the back window is securely fit to the vehicle body.
Using a scraper, remove any excess or protruding adhesive.
| Temperature | Minimum time prior to driving vehicle |
| 35°C (95°F) | 1 hour 30 minutes |
| 20°C (68°F) | 5 hours |
| 5°C (41°F) | 24 hours |
| 4. CHECK FOR LEAK AND REPAIR |
Conduct a leak test after the adhesive has completely hardened.
Seal any leaks with auto glass sealer.
| 5. INSTALL UPPER OUTSIDE BACK WINDOW MOULDING (for Slide Type, for Power Slide Type) |
 |
Clean the back window surface.
Using a heat light, heat the back window surface.
Remove the double-sided tape from the back window.
Wipe off any tape adhesive residue with cleaner.
If reusing the moulding:
Clean the moulding.
Using a heat light, heat the moulding.
Remove the double-sided tape from the moulding.
Wipe off any tape adhesive residue with cleaner.
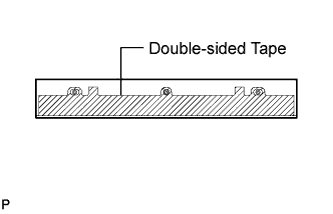
Apply new double-sided tape to the moulding, as shown in the illustration.
Install the moulding.
Using a heat light, heat the back window and moulding.
Remove the peeling paper.
Attach the 3 clips to install the moulding.
| 6. INSTALL LOWER OUTSIDE BACK WINDOW MOULDING (for Slide Type, for Power Slide Type) |
 |
Clean the back window surface.
Using a heat light, heat the back window surface.
Remove the double-sided tape from the back window.
Wipe off any tape adhesive residue with cleaner.
If reusing the moulding:
Clean the moulding.
Using a heat light, heat the moulding.
Remove the double-sided tape from the moulding.
Wipe off any tape adhesive residue with cleaner.
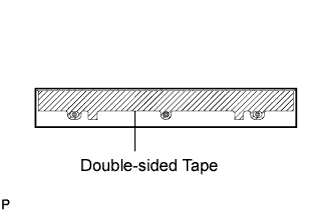
Apply new double-sided tape to the moulding, as shown in the illustration.
Install the moulding.
Using a heat light, heat the back window and moulding.
Remove the peeling paper.
Attach the 3 clips to install the moulding.
| 7. INSTALL REAR ROOF DRIP SIDE FINISH MOULDING LH |
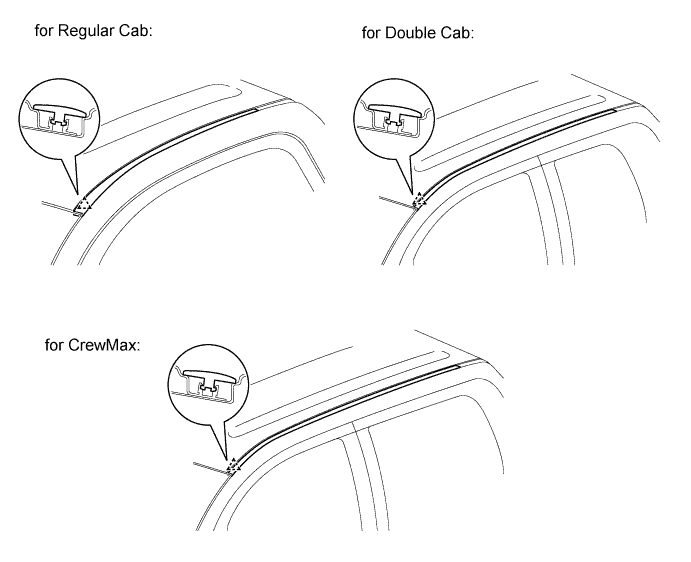
Attach the clip to install the moulding.
| 8. INSTALL REAR ROOF DRIP SIDE FINISH MOULDING RH |
| 9. INSTALL ROOF HEADLINING ASSEMBLY |
for Regular Cab:
Install the roof headlining .
for Double Cab:
Install the roof headlining .
| 10. INSTALL BACK DOOR GLASS CHANNEL (for Power Slide Type) |
Using a brush or sponge, coat the application area of a new back window glass with Primer G.
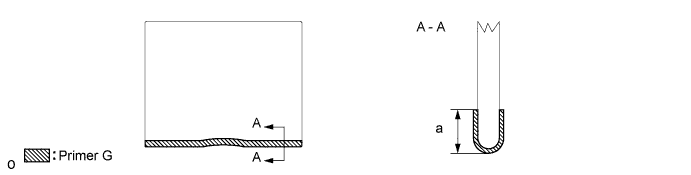
| Area | Specified Condition |
| a | 10.0 mm (0.394 in.) |
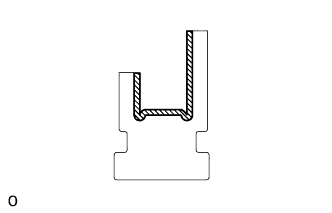 |
Using a brush or sponge, coat the application area of a new back door glass channel with Primer M.
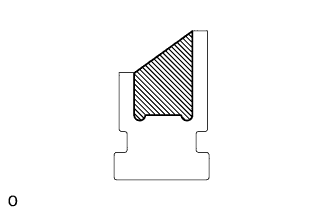
Apply adhesive to the back door glass channel.
Cut off the tip of a cartridge nozzle.
| Temperature | Usage Time Frame |
| 35°C (95°F) | 15 minutes |
| 20°C (68°F) | 1 hour 40 minutes |
| 5°C (41°F) | 8 hours |
 |
Load a sealer gun with the cartridge.
Apply adhesive to the back door glass channel as shown in the illustration.
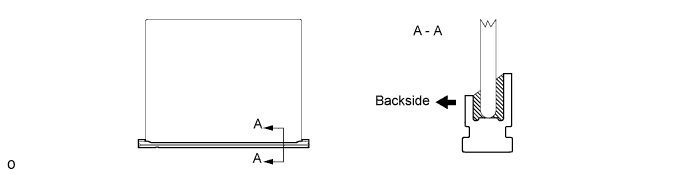
Install the back door glass as shown in the illustration.
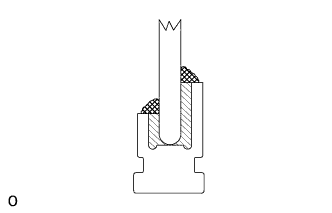 |
Apply non-residue solvent to a clean cloth and wipe off any excess or protruding adhesive.
| 11. INSTALL BACK WINDOW GLASS WITH BACK DOOR GLASS CHANNEL (for Power Slide Type) |
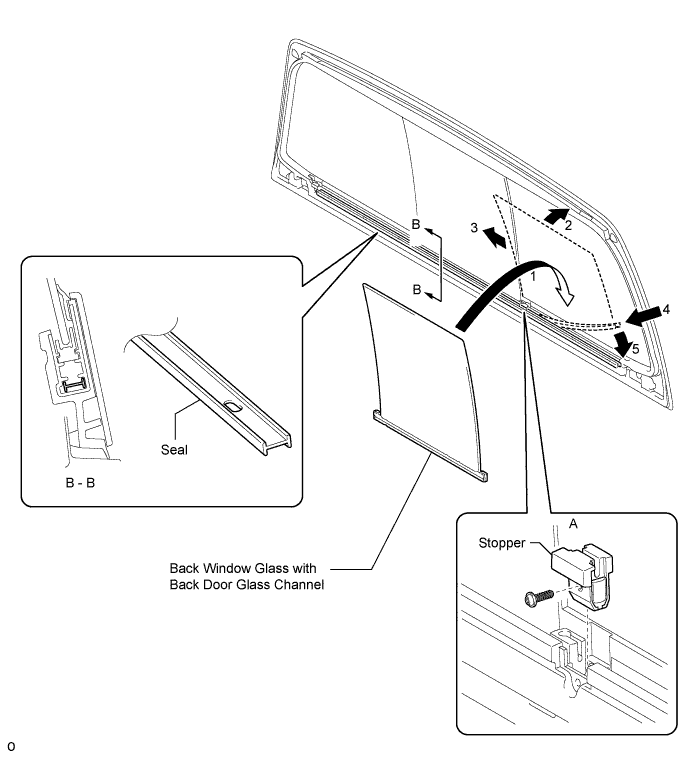
Insert the back window glass into the channel (arrow 1). Attach the upper part of the back window glass to the upper channel (arrow 2). Then slide the back window glass towards the RH side (arrow 3) so that the glass channel fits between the ribs to install the back window glass.
Insert the seal into the bottom of the channel (arrow 4), and then slightly push the seal to the channel (arrow 5) to install it.
Using a T10 "TORX" driver, install the stopper with the screw (illustration A).
| 12. INSTALL POWER WINDOW REGULATOR MOTOR ASSEMBLY (for Power Slide Type) |
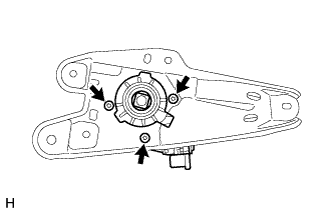 |
Using a T25 "TORX" socket, install the power window regulator motor to the base plate with the 3 screws.
| 13. INSTALL DOOR WINDOW REGULATOR BASE PLATE (for Power Slide Type) |
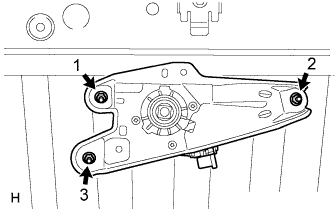 |
Install the door window regulator base plate with the 3 nuts in the order shown in the illustration.
| 14. INSTALL DOOR WINDOW REGULATOR CABLE SUB-ASSEMBLY (for Power Slide Type) |
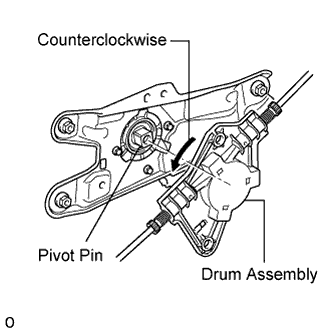 |
Rotate the drum assembly counterclockwise to align it with the motor pivot pin, and then connect the motor drum assembly to the motor pivot pin.
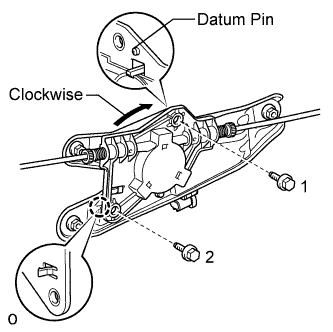 |
Rotate the drum assembly clockwise to attach the claw and connect the datum pin.
Install the 2 bolts in the order shown in the illustration.
Insert the wires into the back window as shown in the illustration labeled A.
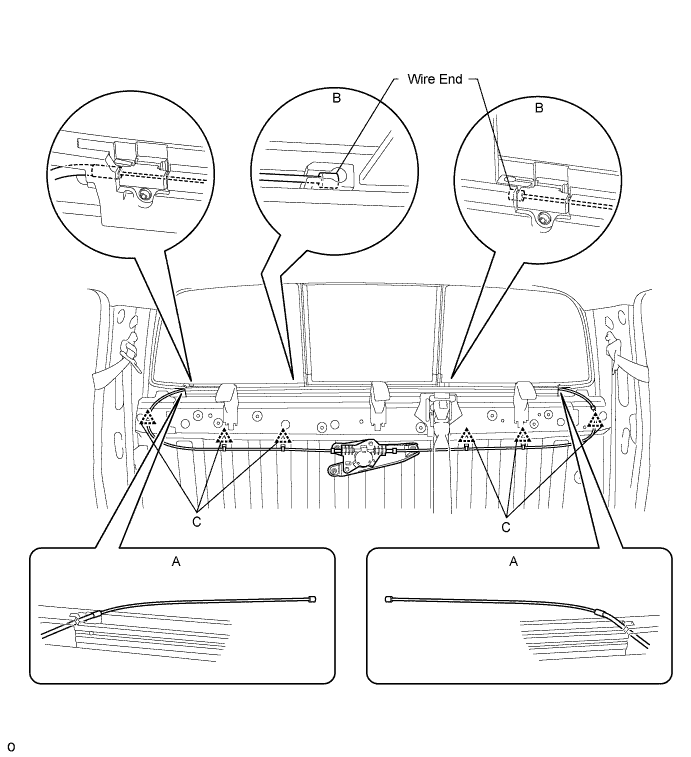
Compress the springs to release the tension in the cables, connect the wire ends to the back window as shown in the illustration labeled B, Then release the springs to restore the tension.
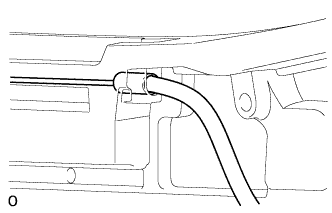 |
Attach the 6 clips labeled C in the illustration.
| 15. INSTALL NO. 1 BACK PANEL SILENCER (for Power Slide Type) |
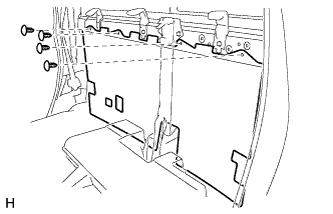 |
Install the No. 1 back panel silencer with the 4 clips.
| 16. INSTALL COAT HOOK |
Using a T20 "TORX" driver, install the coat hook with the "TORX" screw.
Attach the 2 claws to install the coat hook cap.
| 17. INSTALL NO. 1 ROOM LIGHT ASSEMBLY |
Attach the 3 guides and 2 clips to install the No. 1 room light assembly.
Attach the 2 guides and 4 claws to install the No. 1 room light lens.
| 18. INSTALL FRONT QUARTER TRIM PANEL ASSEMBLY LH |
for Regular Cab:
Install the quarter trim panel .
for Double Cab:
Install the quarter trim panel .
| 19. INSTALL FRONT QUARTER TRIM PANEL ASSEMBLY RH |
| 20. INSTALL LOWER QUARTER TRIM PANEL ASSEMBLY LH |
for Regular Cab:
Install the quarter trim panel .
for Double Cab:
Install the quarter trim panel .
| 21. INSTALL LOWER QUARTER TRIM PANEL ASSEMBLY RH |
| 22. INSTALL LUGGAGE COMPARTMENT BOX RH (for Regular Cab) |
Install the luggage compartment box RH with the 4 clips.
| 23. INSTALL LUGGAGE COMPARTMENT BOX LH (for Regular Cab) |
Attach the 3 claws to install the luggage compartment box LH.
Install the 2 clips.
| 24. INSTALL UPPER BACK PANEL GARNISH (for Regular Cab) |
Attach the 10 clips to install the upper back panel garnish.
| 25. INSTALL FRONT DOOR OPENING TRIM WEATHERSTRIP LH (for Regular Cab) |
| 26. INSTALL FRONT DOOR OPENING TRIM WEATHERSTRIP RH (for Regular Cab) |
| 27. INSTALL REAR DOOR OPENING TRIM WEATHERSTRIP LH (for Double Cab) |
| 28. INSTALL REAR DOOR OPENING TRIM WEATHERSTRIP RH (for Double Cab) |
| 29. INSTALL FRONT DOOR SCUFF PLATE LH (for Regular Cab) |
Attach the 6 claws and 3 clips to install the front door scuff plate LH.
| 30. INSTALL FRONT DOOR SCUFF PLATE RH (for Regular Cab) |
| 31. INSTALL REAR DOOR SCUFF PLATE LH (for Double Cab) |
Attach the 6 claws and 2 clips to install the rear door scuff plate LH.
| 32. INSTALL REAR DOOR SCUFF PLATE RH (for Double Cab) |
| 33. INSTALL REAR SEAT ASSEMBLY (for Double Cab) |
Install the rear seat (Click here).
| 34. INSTALL FRONT SEAT ASSEMBLY (for Center Seat) |
Install the front seat (Click here).
| 35. INSTALL FRONT SEAT ASSEMBLY (for Power Seat) |
Install the front seat (Click here).
| 36. INSTALL FRONT SEAT ASSEMBLY (for Manual Seat) |
Install the front seat (Click here).