1UR-FE FUEL FUEL TANK INSTALLATION
PROCEDURE

 77641A
1.INSTALL NO. 1 FUEL TANK PROTECTOR (w/ Cover)
- HINT:
-
Only perform this procedure when replacement of the No. 1 fuel tank protector is necessary.
Attach the 4 clamps to install a new No. 1 fuel tank protector.
77020A
2.INSTALL FUEL SUCTION WITH PUMP AND GAUGE TUBE ASSEMBLY
77213B
3.INSTALL FUEL TANK TO FILLER PIPE HOSE
Install the fuel tank to filler pipe hose to the fuel tank assembly.
77697
4.INSTALL NO. 1 FUEL TANK HEAT INSULATOR
Install the No. 1 fuel tank heat insulator with the 4 clips and nut.
- Torque:
- 6.0 N*m (61 kgf*cm, 53 in.*lbf)
77201
5.INSTALL INLET FUEL TANK PIPE SUB-ASSEMBLY
Install the inlet fuel tank pipe sub-assembly with the 2 nuts.
- Torque:
- 20 N*m (204 kgf*cm, 15 ft.*lbf)
77100
6.INSTALL FUEL TANK ASSEMBLY
Set the fuel tank assembly on a transmission jack and raise the fuel tank assembly.
Attach the wire harness clamp and connect the fuel pump and fuel sender gauge connector to the fuel tank assembly.
- NOTICE:
-
Be careful not to cut the wiring.
w/ Cover:
Attach the 3 claws to install the No. 2 fuel tank protector.
Raise the transmission jack.
Install the No. 1 fuel tank band sub-assembly and No. 2 fuel tank band sub-assembly with the 2 pins and 2 clips.
Connect the No. 1 fuel tank band sub-assembly and No. 2 fuel tank band sub-assembly with the 2 bolts.
- Torque:
- 40 N*m (408 kgf*cm, 30 ft.*lbf)
77754
7.CONNECT OUTLET NO. 1 CHARCOAL CANISTER HOSE
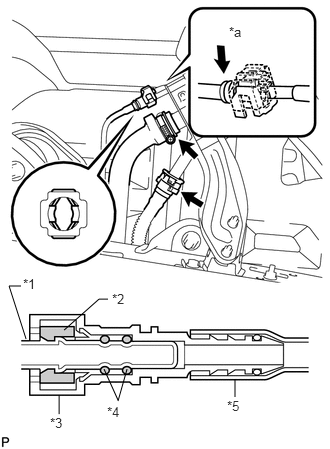
Connect the outlet No. 1 charcoal canister hose to the inlet fuel tank pipe sub-assembly.
| *1 | Pipe |
| *2 | Retainer |
| *3 | Connector |
| *4 | O-Ring |
| *5 | Nylon Tube |
| *a | Push |
Attach the hose to the No. 1 breather tube support.
77213B
8.CONNECT FUEL TANK TO FILLER PIPE HOSE
Connect the fuel tank to filler pipe hose to the inlet fuel tank pipe sub-assembly.
Connect the fuel tank breather tube to the inlet fuel tank pipe sub-assembly.
- HINT:
-
Push the parts together firmly until a "click" sound is heard.
- NOTICE:
- ·
Before installing the tube connectors to the pipes, check if there is any damage or foreign matter in the connectors.
- ·
After the connection, check if the connectors and pipes are securely connected by trying to pull them apart.
Attach the lock claws to the connector by pushing down on the cover as shown in the illustration.
Attach the filler pipe hose and fuel tank breather tube to the No. 1 breather tube clamp.
9.CONNECT WIRE HARNESS
Attach the harness clamp to the fuel tank assembly.
10.CONNECT VENT LINE HOSE
Connect the vent line hose and install the retainer.
- NOTICE:
- ·
Before installing the hose, make sure that it is not damaged. Make sure that there is no foreign matter present on the connecting surfaces.
- ·
After connecting, check if the hose and the connector are securely connected by pulling on them.
77204A
11.CONNECT FUEL TANK RETURN TUBE
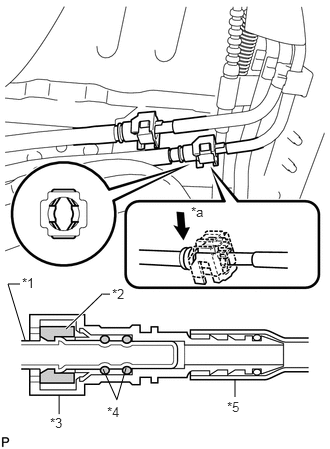
Connect the fuel tank return tube.
| *1 | Pipe |
| *2 | Retainer |
| *3 | Connector |
| *4 | O-Ring |
| *5 | Nylon Tube |
| *a | Push |
- HINT:
-
Push the parts together firmly until a "click" sound is heard.
- NOTICE:
- ·
Before installing the tube connectors to the pipes, check if there is any damage or foreign matter in the connectors.
- ·
After the connection, check if the connectors and pipes are securely connected by trying to pull them apart.
Attach the lock claws to the connector by pushing down on the cover as shown in the illustration.
77209D
12.CONNECT FUEL TANK MAIN TUBE SUB-ASSEMBLY
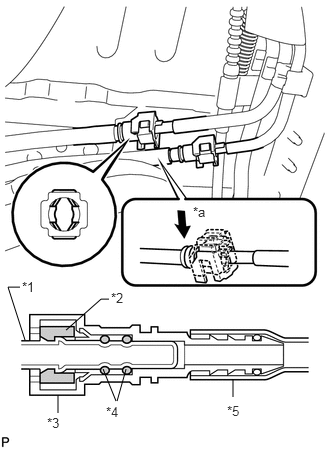
Connect the fuel tank main tube sub-assembly.
| *1 | Pipe |
| *2 | Retainer |
| *3 | Connector |
| *4 | O-Ring |
| *5 | Nylon Tube |
| *a | Push |
- HINT:
-
Push the parts together firmly until a "click" sound is heard.
- NOTICE:
- ·
Before installing the tube connectors to the pipes, check if there is any damage or foreign matter in the connectors.
- ·
After the connection, check if the connectors and pipes are securely connected by trying to pull them apart.
Attach the lock claws to the connector by pushing down on the cover as shown in the illustration.
77606
13.INSTALL NO. 1 FUEL TANK PROTECTOR SUB-ASSEMBLY (for Rough Road Area Specification Vehicles)
Install the No. 1 fuel tank protector sub-assembly with the 2 bolts and 2 nuts.
- Torque:
- for bolt : 29 N*m (296 kgf*cm, 21 ft.*lbf)
- for nut : 20 N*m (204 kgf*cm, 15 ft.*lbf)
77310A
14.INSTALL FUEL TANK CAP
28800
15.CONNECT CABLE TO NEGATIVE BATTERY TERMINAL
16.INSPECT FOR FUEL LEAK