1UR-FE ENGINE MECHANICAL CYLINDER BLOCK INSPECTION
PROCEDURE

 1.INSPECT CYLINDER BLOCK FOR WARPAGE
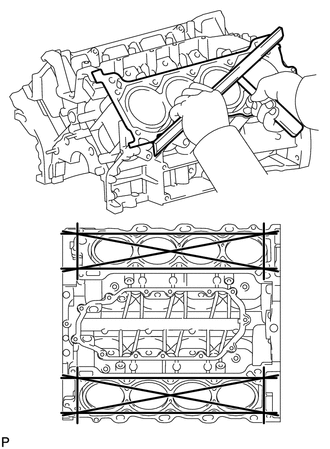
Using a precision straightedge and feeler gauge, measure the warpage of the contact surfaces of the cylinder head gaskets.
- Maximum warpage:
0.07 mm (0.00276 in.)
If the warpage is more than the maximum, replace the cylinder block.
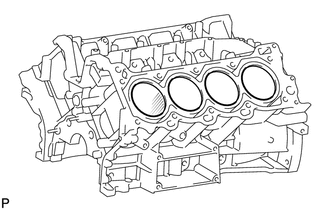
Visually check the cylinder for vertical scratches. If deep scratches are present, rebore all 8 cylinders. If necessary, replace the cylinder block.
2.INSPECT CYLINDER BORE
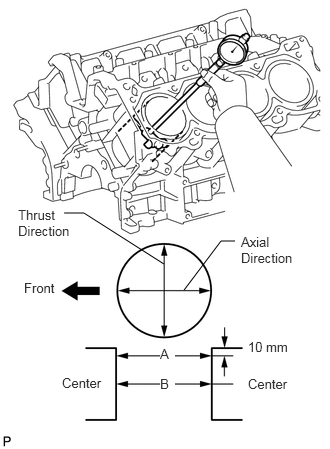
Using a cylinder gauge, measure the cylinder bore diameter at positions A and B in the thrust and axial directions.
- Reference value (new parts):
94.000 to 94.012 mm (3.700 to 3.701 in.)
- Maximum diameter:
94.200 mm (3.709 in.)
If the diameter is more than the maximum, replace the cylinder block.
3.INSPECT RING GROOVE CLEARANCE
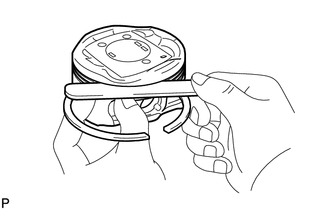
Using a feeler gauge, measure the clearance between a new piston ring and the wall of the ring groove.
- Standard Ring Groove Clearance:
Item Specified Condition No. 1 0.020 to 0.070 mm (0.000787 to 0.00276 in.) No. 2 0.020 to 0.060 mm (0.000787 to 0.00236 in.) Oil 0.070 to 0.145 mm (0.00276 to 0.00571 in.)
If the clearance is not as specified, replace the piston.
4.INSPECT PISTON RING END GAP
Insert the piston ring into the cylinder bore.
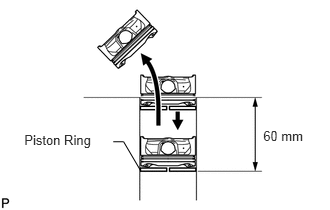
Using a piston, push the piston ring a little beyond the bottom of the ring travel, 60 mm (2.36 in.) from the top of the cylinder block.
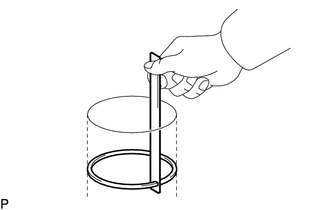
Using a feeler gauge, measure the end gap.
- Standard End Gap (for Type A):
Item Specified Condition No. 1 Compression Ring 0.23 to 0.33 mm (0.00906 to 0.0130 in.) No. 2 Compression Ring 0.40 to 0.50 mm (0.0157 to 0.0197 in.) Oil Ring 0.10 to 0.35 mm (0.00394 to 0.0138 in.)
- Standard End Gap (for Type B):
Item Specified Condition No. 1 Compression Ring 0.22 to 0.32 mm (0.00866 to 0.0126 in.) No. 2 Compression Ring 0.35 to 0.45 mm (0.0138 to 0.0177 in.) Oil Ring 0.10 to 0.35 mm (0.00394 to 0.0138 in.)
- Maximum End Gap:
Item Specified Condition No. 1 Compression Ring 0.42 mm (0.0165 in.) No. 2 Compression Ring 0.55 mm (0.0217 in.) Oil Ring 0.45 mm (0.0177 in.)
- HINT:
-
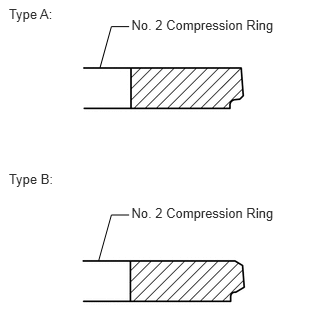 0.092,0.063 0.623,0.240 0.531,0.177 10 Type A: 0.092,1.782 0.623,1.958 0.531,0.177 10 Type B: 1.369,2.14 2.972,2.347 1.603,0.207 10 No. 2 Compression Ring 1.027,2.716 1.16,2.239 1.16,2.239 1.345,2.239 false 1.369,0.178 2.972,0.385 1.603,0.207 10 No. 2 Compression Ring 1.041,0.706 1.16,0.277 1.16,0.277 1.345,0.277 false
-
Type A and type B can be distinguished by the color of the paint marks or the cross-section shape of the No. 2 compression ring.
Item Paint Mark Type A No. 1 Compression Ring Sky Blue No. 2 Compression Ring Orange Type B No. 1 Compression Ring Yellow No. 2 Compression Ring Green
If the end gap is more than the maximum, replace the piston ring. If the end gap is more than the maximum even with a new piston ring, replace the cylinder block.
13101
5.INSPECT PISTON SUB-ASSEMBLY WITH PIN
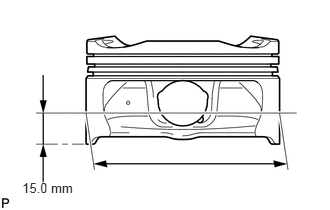
Using a micrometer, measure the piston diameter at a position that is 15.0 mm (0.591 in.) from the bottom of the piston (refer to the illustration).
- Reference value (new parts):
93.980 to 93.990 mm (3.7000 to 3.7004 in.)
- Minimum diameter:
93.815 mm (3.6935 in.)
If the diameter is less than the minimum, replace the piston.
6.INSPECT PISTON OIL CLEARANCE
Measure the cylinder bore diameter in the thrust direction.
Subtract the piston diameter measurement from the cylinder bore diameter measurement.
- Reference value (new parts):
0.010 to 0.032 mm (0.000394 to 0.001260 in.)
- Maximum oil clearance:
0.385 mm (0.0152 in.)
If the oil clearance is more than the maximum, replace all the pistons. If necessary, replace the cylinder block.
7.INSPECT PISTON PIN OIL CLEARANCE
- HINT:
-
There is only 1 type of supply part for piston sub-assembly with pin.
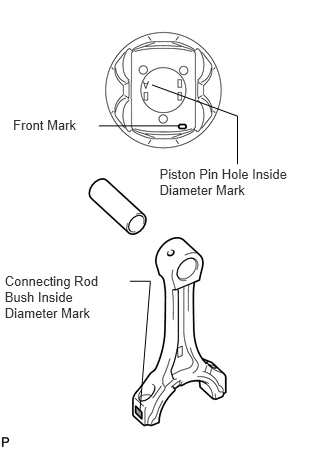
Check each mark on the piston, piston pin and connecting rod.
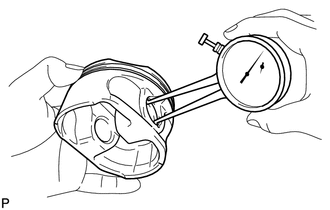
Using a caliper gauge, measure the inside diameter of the piston pin hole.
- Standard Piston Pin Hole Inside Diameter:
Mark Specified Condition A 21.998 to 22.001 mm (0.86606 to 0.86618 in.) B 22.001 to 22.004 mm (0.86618 to 0.86630 in.) C 22.004 to 22.007 mm (0.86630 to 0.86642 in.)
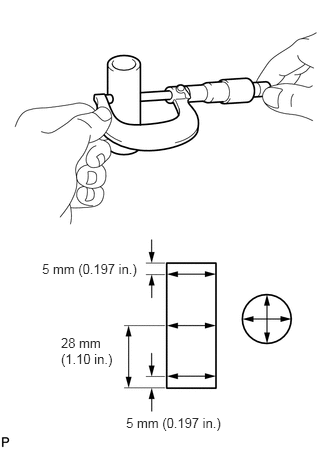
Using a micrometer, measure the piston pin diameter.
- Standard Piston Pin Diameter:
Mark Specified Condition A 21.998 to 22.001 mm (0.86606 to 0.86618 in.) B 22.001 to 22.004 mm (0.86618 to 0.86630 in.) C 22.004 to 22.007 mm (0.86630 to 0.86642 in.)
Subtract the piston pin diameter measurement from the piston pin hole diameter measurement.
- Standard oil clearance:
-0.002 to 0.004 mm (-0.0000787 to 0.000157 in.)
- Maximum oil clearance:
0.015 mm (0.000591 in.)
If the oil clearance is more than the maximum, replace the piston and piston pin as a set.
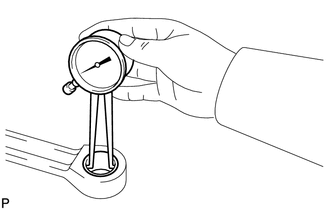
Using a caliper gauge, measure the inside diameter of the connecting rod bush.
- Standard Bush Inside Diameter:
Mark Specified Condition A 22.005 to 22.008 mm (0.86634 to 0.86645 in.) B 22.008 to 22.011 mm (0.86645 to 0.86657 in.) C 22.011 to 22.014 mm (0.86657 to 0.86669 in.)
Subtract the piston pin diameter measurement from the bush inside diameter measurement.
- Standard oil clearance:
0.005 to 0.011 mm (0.000197 to 0.000433 in.)
- Maximum oil clearance:
0.03 mm (0.00118 in.)
If the oil clearance is more than the maximum, replace the connecting rod, and replace the piston and pin as a set.
13201
8.INSPECT CONNECTING ROD SUB-ASSEMBLY
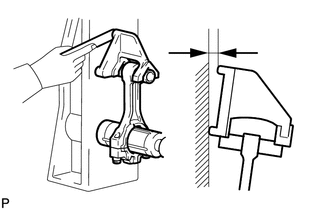
Using a rod aligner and feeler gauge, check the connecting rod alignment.
Check for bend.
- Maximum bend:
0.05 mm (0.00197 in.) per 100 mm (3.94 in.)
If the bend is more than the maximum, replace the connecting rod.
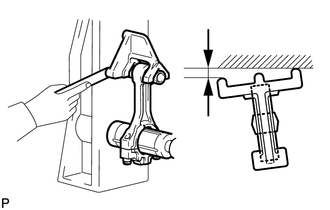
Check for twist.
- Maximum twist:
0.15 mm (0.00591 in.) per 100 mm (3.94 in.)
If the twist is more than the maximum, replace the connecting rod.
9.INSPECT CRANKSHAFT
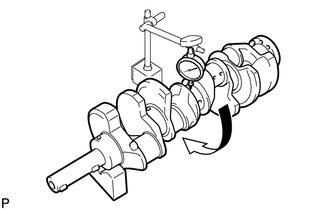
Inspect for circle runout.
Place the crankshaft on V-blocks.
Using a dial indicator, measure the circle runout at the center journal.
- Maximum circle runout:
0.06 mm (0.00236 in.)
If the circle runout is more than the maximum, replace the crankshaft.
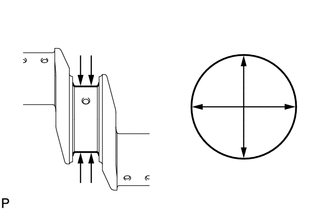
Inspect the main journals.
Using a micrometer, measure the diameter of each main journal.
- Standard journal diameter:
66.988 to 67.000 mm (2.6373 to 2.6378 in.)
If the diameter is not as specified, check the oil clearance. If necessary, replace the crankshaft.
Check each main journal for taper and out-of-round as shown in the illustration.
- Maximum taper and out-of-round:
0.02 mm (0.000787 in.)
If the taper and out-of-round is more than the maximum, replace the crankshaft.
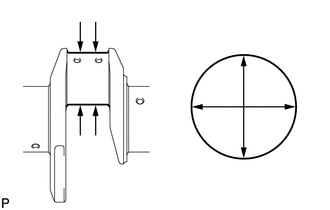
Inspect the crank pins.
Using a micrometer, measure the diameter of each crank pin.
- Standard crank pin diameter:
52.982 to 53.000 mm (2.0859 to 2.0866 in.)
If the diameter is not as specified, check the oil clearance. If necessary, replace the crankshaft.
Check each crank pin for taper and out-of-round as shown in the illustration.
- Maximum taper and out-of-round:
0.02 mm (0.000787 in.)
If the taper and out-of-round is more than the maximum, replace the crankshaft.
10.INSPECT CRANKSHAFT OIL CLEARANCE
Clean each main journal and bearing.
Check each main journal and bearing for pitting and scratches.
If the journal or bearing is damaged, replace the bearing.
Place the crankshaft on the cylinder block.
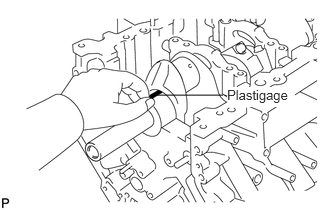
Lay a strip of Plastigage across each journal.
Install the crankshaft bearing caps (See page Engine / Hybrid System>1UR-FE ENGINE MECHANICAL>CYLINDER BLOCK>REASSEMBLY).
Remove the crankshaft bearing caps (See page Engine / Hybrid System>1UR-FE ENGINE MECHANICAL>CYLINDER BLOCK>DISASSEMBLY).
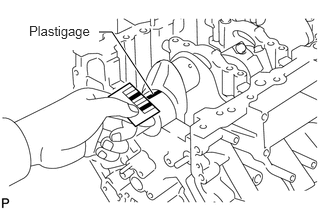
Measure the Plastigage at its widest point.
- Standard Oil Clearance:
Number Mark Specified Condition No. 1 and No. 5 journals 0.017 to 0.030 mm (0.000669 to 0.00118 in.) Other journals 0.024 to 0.037 mm (0.000945 to 0.00146 in.)
- Maximum Oil Clearance:
Number Mark Specified Condition No. 1 and No. 5 journals 0.050 mm (0.00197 in.) Other journals 0.060 mm (0.00236 in.)
If the oil clearance is more than the maximum, replace the bearings. If necessary, replace the crankshaft.
- HINT:
-
If replacing a bearing, replace it with one that has the same number. If the number of the bearing cannot be determined, select the correct bearing by adding together the numbers imprinted on the cylinder block and crankshaft. Refer to the table below for the appropriate bearing number. There are 6 sizes of standard bearings. For the No. 1 and No. 5 position bearings, use bearings marked 4, 5, 6, 7, 8 and 9. For other bearings, use bearings marked 3, 4, 5, 6, 7 and 8.
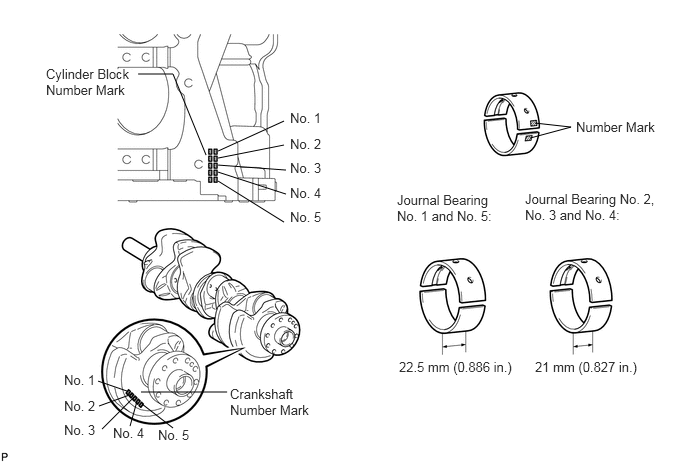
A = Cylinder block number mark
B = Crankshaft number mark
- HINT:
-
(Cylinder block journal diameter - crankshaft journal diameter - 5) X 1000 = A + B
- Standard Bearing Chart:
No. 1 and No. 5 Journals
Item Number Mark (A) + (B) 00 to 02 03 to 05 06 to 08 09 to 11 12 to 14 15 to 17 18 to 20 21 to 23 24 to 26 27 to 28 Use bearing Upper 4 5 5 6 6 7 7 8 8 9 Lower 5 5 6 6 7 7 8 8 9 9
- Other Journals:
Item Number Mark (A) + (B) 00 to 02 03 to 05 06 to 08 09 to 11 12 to 14 15 to 17 18 to 20 21 to 23 24 to 26 27 to 28 Use bearing Upper 3 4 4 5 5 6 6 7 7 8 Lower 4 4 5 5 6 6 7 7 8 8
EXAMPLE:
No. 1 and No. 5 journals
Cylinder block "7" + Crankshaft "6" = Total number 13 (Use upper bearing "6" and lower bearing "7")
Other journals
Cylinder block "7" + Crankshaft "6" = Total number 13 (Use upper bearing "5" and lower bearing "6")
- Standard Bearing Chart:
Standard Cylinder Block Crankshaft Journal Bore Diameter (A)
Number Mark Specified Condition Mark 00 72.000 mm (2.83464 in.) Mark 01 72.001 mm (2.83469 in.) Mark 02 72.002 mm (2.83472 in.) Mark 03 72.003 mm (2.83476 in.) Mark 04 72.004 mm (2.83480 in.) Mark 05 72.005 mm (2.83484 in.) Mark 06 72.006 mm (2.83488 in.) Mark 07 72.007 mm (2.83492 in.) Mark 08 72.008 mm (2.83496 in.) Mark 09 72.009 mm (2.83500 in.) Mark 10 72.010 mm (2.83503 in.) Mark 11 72.011 mm (2.83508 in.) Mark 12 72.012 mm (2.83512 in.) Mark 13 72.013 mm (2.83516 in.) Mark 14 72.014 mm (2.83520 in.) Mark 15 72.015 mm (2.83524 in.) Mark 16 72.016 mm (2.83528 in.)
- Standard Crankshaft Journal Diameter (B):
Number Mark Specified Condition Mark 00 67.000 mm (2.63780 in.) Mark 01 66.999 mm (2.63775 in.) Mark 02 66.998 mm (2.63771 in.) Mark 03 66.997 mm (2.63768 in.) Mark 04 66.996 mm (2.63763 in.) Mark 05 66.995 mm (2.63760 in.) Mark 06 66.994 mm (2.63756 in.) Mark 07 66.993 mm (2.63751 in.) Mark 08 66.992 mm (2.63748 in.) Mark 09 66.991 mm (2.63744 in.) Mark 10 66.990 mm (2.63740 in.) Mark 11 66.989 mm (2.63736 in.) Mark 12 66.988 mm (2.63732 in.)
- Standard Bearing Center Wall Thickness:
No. 1 and No. 5 Journals Upper Bearing Lower Bearing Number Mark Specified Condition Number Mark Specified Condition 4 2.501 to 2.504 (0.0985 to 0.0986 in.) 5 2.488 to 2.491 (0.0980 to 0.0981 in.) 5 2.504 to 2.507 (0.0986 to 0.0987 in.) 6 2.491 to 2.494 (0.0981 to 0.0982 in.) 6 2.507 to 2.510 (0.0987 to 0.0988 in.) 7 2.494 to 2.497 (0.0982 to 0.0983 in.) 7 2.510 to 2.513 (0.0988 to 0.0989 in.) 8 2.497 to 2.500 (0.0983 to 0.0984 in.) 8 2.513 to 2.516 (0.0989 to 0.0991 in.) 9 2.500 to 2.503 (0.0984 to 0.0985 in.) 9 2.516 to 2.519 (0.0991 to 0.0992 in.) - -
- Other Journals:
Upper Bearing Lower Bearing Number Mark Specified Condition Number Mark Specified Condition 3 2.482 to 2.485 (0.0977 to 0.0978 in.) 4 2.501 to 2.504 (0.0985 to 0.0986 in.) 4 2.485 to 2.488 (0.0978 to 0.0980 in.) 5 2.504 to 2.507 (0.0986 to 0.0987 in.) 5 2.488 to 2.491 (0.0980 to 0.0981 in.) 6 2.507 to 2.510 (0.0987 to 0.0988 in.) 6 2.491 to 2.494 (0.0981 to 0.0982 in.) 7 2.510 to 2.513 (0.0988 to 0.0989 in.) 7 2.494 to 2.497 (0.0982 to 0.0983 in.) 8 2.513 to 2.516 (0.0989 to 0.0991 in.) 8 2.497 to 2.500 (0.0983 to 0.0984 in.) - -
Completely remove the Plastigage.
13265
11.INSPECT CONNECTING ROD BOLT
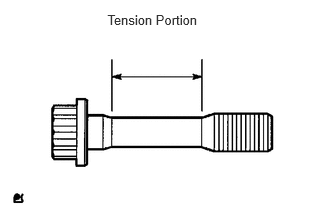
Using a vernier caliper, measure the tension portion diameter of the bolt.
- Standard diameter:
8.5 to 8.6 mm (0.335 to 0.339 in.)
- Minimum diameter:
8.3 mm (0.327 in.)
If the diameter is less than the minimum, replace the bolt.
11416
12.INSPECT CRANKSHAFT BEARING CAP SET BOLT
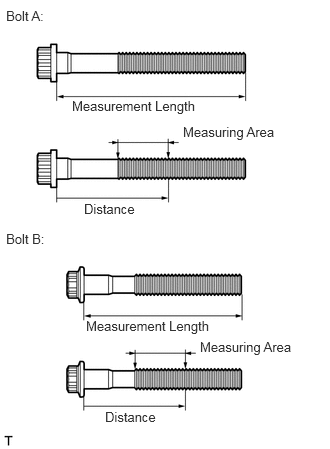
Using a vernier caliper, measure the length of the crankshaft bearing cap bolt from the seat to end.
- Standard Bolt Length:
Item Specified Condition Bolt A 90.3 to 91.7 mm (3.56 to 3.61 in.) Bolt B 78.8 to 80.2 mm (3.10 to 3.16 in.)
- Maximum Bolt Length:
Item Specified Condition Bolt A 92.7 mm (3.65 in.) Bolt B 81.2 mm (3.20 in.)
If the length is more than the maximum, replace the crankshaft bearing cap bolt.
Using a vernier caliper, measure the diameter of the elongated thread at the measuring area.
- Distance:
57.5 mm (2.26 in.)
- Standard Diameter:
Item Specified Condition Bolt A 10.5 to 11.0 mm (0.413 to 0.433 in.) Bolt B 9.5 to 10.0 mm (0.374 to 0.394 in.)
- Minimum Diameter:
Item Specified Condition Bolt A 10.4 mm (0.409 in.) Bolt B 9.4 mm (0.370 in.)
If the diameter is less than the minimum, replace the crankshaft bearing cap bolt.
15708
13.INSPECT NO. 1 OIL NOZZLE SUB-ASSEMBLY
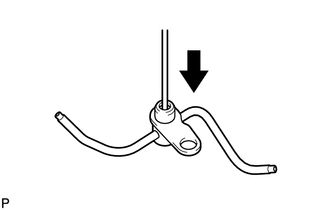
Push the check valve with a pin to check if it is stuck. If stuck, replace the oil nozzle.
Push the check valve with a pin to check if it moves smoothly.
If it does not move smoothly, clean or replace the oil nozzle.
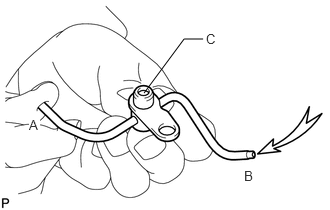
While covering A, apply air into B. Check that air does not leak through C. Perform the check again while covering B and applying air into A.
If air leaks, clean or replace the oil nozzle.
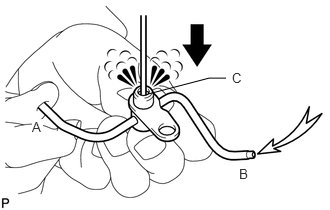
Push the check valve while covering A, and apply air into B. Check that air passes through C. Perform the check again while covering B, pushing the check valve and applying air into A.
If air does not pass through C, clean or replace the oil nozzle.