ENGINE HOOD / DOOR FRONT DOOR(for Regular Cab) DISASSEMBLY
CAUTION / NOTICE / HINT
- HINT:
- ·
Use the same procedure for the RH and LH sides.
·The procedure listed below is for the LH side.
PROCEDURE

 1. PRECAUTION
- NOTICE:
-
After turning the ignition switch off, waiting time may be required before disconnecting the cable from the battery terminal. Therefore, make sure to read the disconnecting the cable from the battery terminal notice before proceeding with work (See page General>INTRODUCTION>REPAIR INSTRUCTION>PRECAUTION).
2.DISCONNECT CABLE FROM NEGATIVE BATTERY TERMINAL
- CAUTION:
-
Wait at least 90 seconds after disconnecting the cable from the negative (-) battery terminal to prevent airbag and seat belt pretensioner activation.
69284C
3.REMOVE FRONT DOOR INSIDE HANDLE BEZEL PLUG LH
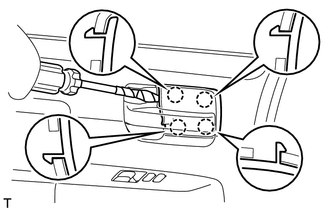
Using a screwdriver, detach the 4 claws and remove the inside handle bezel.
- HINT:
-
Tape the screwdriver tip before use.
74232
4.REMOVE FRONT UPPER ARMREST BASE PANEL LH (w/ Power Window)
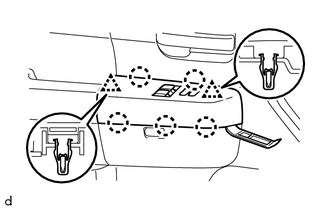
Using a moulding remover A, detach the 2 clips and 5 claws, and remove the front upper armrest base panel LH.
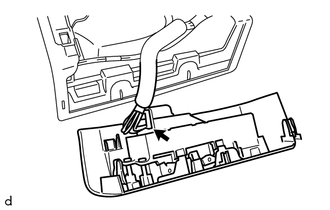
Disconnect the master switch connector.
84820
5.REMOVE POWER WINDOW REGULATOR MASTER SWITCH ASSEMBLY (w/ Power Window)
69260
6.REMOVE FRONT DOOR WINDOW REGULATOR HANDLE ASSEMBLY (w/o Power Window)
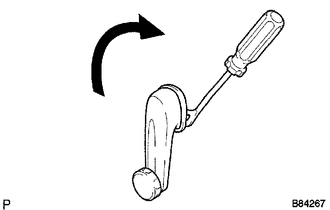
Insert a clip remover between the plate and trim.
Turn the handle clockwise to remove the handle.
67492A
7.REMOVE FRONT LOWER DOOR FRAME BRACKET GARNISH LH
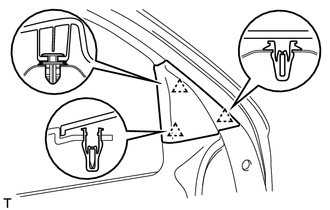
Detach the 3 clips and front lower door frame bracket garnish.
74222A
8.REMOVE FRONT DOOR ARMREST COVER LH
67602
9.REMOVE FRONT DOOR TRIM BOARD SUB-ASSEMBLY LH
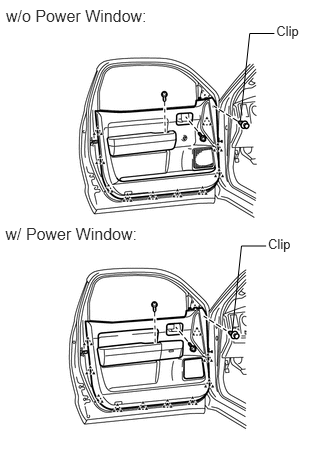
Remove the 2 screws.
Using a clip remover, remove the clip.
Detach the 10 clips and remove the trim cover. Then disconnect the connector.
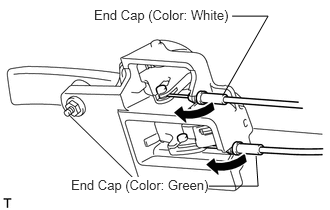
Disconnect the 2 cables from the inside handle.
Remove the inside handle.
68172A
10.REMOVE FRONT INNER DOOR GLASS WEATHERSTRIP LH
87940
11.REMOVE OUTER REAR VIEW MIRROR ASSEMBLY LH
86160
12.REMOVE FRONT NO. 1 SPEAKER ASSEMBLY
67625A
13.REMOVE FRONT NO. 1 DOOR TRIM BRACKET
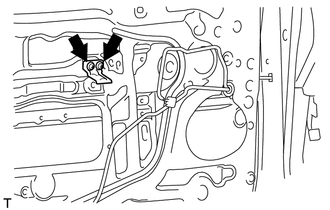
Remove the 2 screws and bracket.
67832
14.REMOVE FRONT DOOR SERVICE HOLE COVER LH
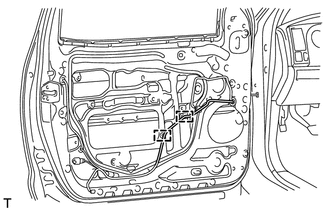
Using a clip remover, detach the 2 clamps.
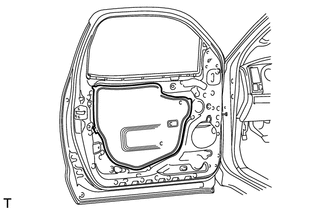
Remove the front door service hole cover.
- HINT:
-
Remove the remaining tape on the door.
68102
15.REMOVE FRONT DOOR GLASS SUB-ASSEMBLY LH
for Driver Side:
Temporarily install the power window regulator master switch.
for Passenger Side:
Temporarily install the power window regulator switch.
Connect the cable to the negative (-) battery terminal.
Remove the hole plug.
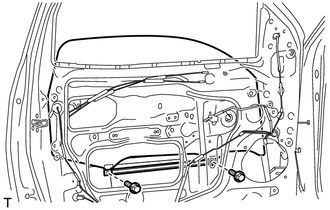
Move the door glass until the bolts appear in the service holes.
Remove the 2 bolts.
- NOTICE:
-
Be careful when removing the bolts as the glass may fall and become damaged.
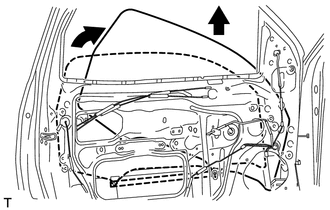
Remove the door glass in the direction indicated by the arrows in the illustration.
- HINT:
-
Remove the glass upward.
- NOTICE:
-
Be careful not to damage the glass.
for Driver Side:
Remove the power window regulator master switch.
for Passenger Side:
Remove the power window regulator switch.
Disconnect the cable from the negative (-) battery terminal.
- CAUTION:
-
Wait at least 90 seconds after disconnecting the cable from the negative (-) battery terminal to prevent airbag and seat belt pretensioner activation.
69802
16.REMOVE FRONT DOOR WINDOW REGULATOR SUB-ASSEMBLY LH (w/ Power Window)
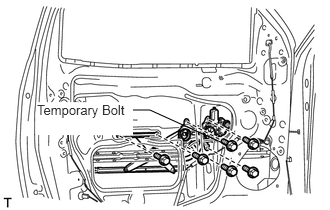
Disconnect the connector.
Loosen the temporary bolt.
- NOTICE:
-
Do not remove the temporary bolt. If the temporary bolt is removed, the front door window regulator may fall and become damaged.
Remove the 5 bolts and window regulator.
Remove the window regulator through the service hole.
Remove the temporary bolt from the window regulator.
85720A
17.REMOVE FRONT POWER WINDOW REGULATOR MOTOR ASSEMBLY LH (w/ Power Window)
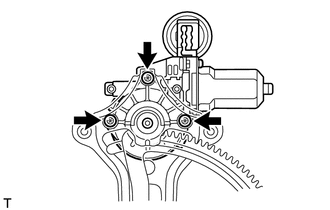
Using a T25 "TORX" driver, remove the 3 screws and motor.
- NOTICE:
-
Be careful when removing the screws as the motor may fall and become damaged.
69802
18.REMOVE FRONT DOOR WINDOW REGULATOR SUB-ASSEMBLY LH (w/o Power Window)
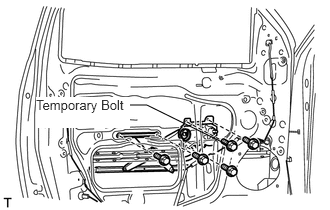
Loosen the temporary bolt.
- NOTICE:
-
Do not remove the temporary bolt. If the temporary bolt is removed, the front door window regulator may fall, causing damage.
Remove the 4 bolts and window regulator.
Remove the window regulator through the service hole.
Remove the temporary bolt from the window regulator.
89860A
19.REMOVE SIDE AIRBAG SENSOR ASSEMBLY LH
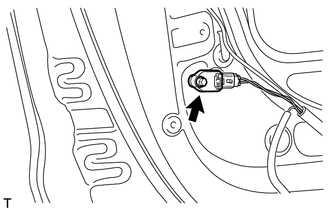
Disconnect the connector.
Remove the bolt and side airbag sensor.
67488F
20.REMOVE FRONT REAR DOOR GUIDE BRACKET GARNISH LH
68210C
21.REMOVE FRONT OUTER DOOR GLASS WEATHERSTRIP ASSEMBLY LH
68151E
22.REMOVE FRONT DOOR GLASS RUN LH
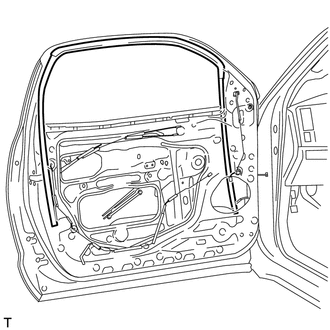
Remove the front door glass run.
67404F
23.REMOVE FRONT DOOR REAR LOWER FRAME SUB-ASSEMBLY LH
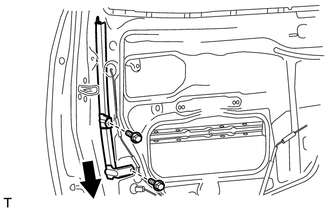
Remove the 2 bolts and front door rear lower frame.
- HINT:
-
Remove the frame through the service hole.
- NOTICE:
-
Be careful when removing the bolts as the frame may fall and become damaged.
67402F
24.REMOVE FRONT DOOR FRONT LOWER FRAME SUB-ASSEMBLY LH
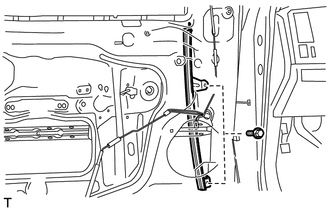
Remove the 2 bolts and front door front lower frame.
- HINT:
-
Remove the frame through the service hole.
- NOTICE:
-
Be careful when removing the bolts as the frame may fall and become damaged.
69217F
25.REMOVE FRONT DOOR OUTSIDE HANDLE COVER LH
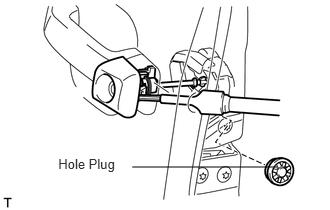
Remove the hole plug.
Using a T30 "TORX" wrench, loosen the screw and remove the front door outside handle cover and the door lock key cylinder as a unit.
Remove the cylinder from the cover.
69320
26.REMOVE FRONT DOOR LOCK ASSEMBLY LH (w/o Power Door Lock)
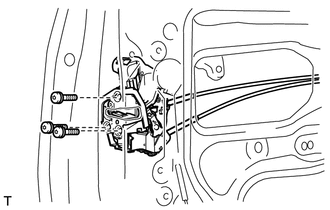
Using a T30 "TORX" wrench, remove the 3 screws and door lock.
- HINT:
-
Remove the door lock through the service hole.
- NOTICE:
-
Be careful when removing the bolts as the door lock may fall and become damaged.
69320
27.REMOVE FRONT DOOR LOCK ASSEMBLY LH (w/ Power Door Lock)
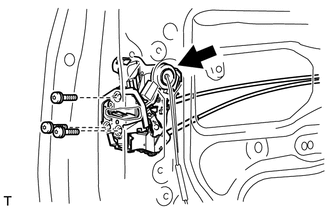
Disconnect the connector.
Using a T30 "TORX" wrench, remove the 3 screws and door lock.
- HINT:
-
Remove the door lock through the service hole.
- NOTICE:
-
Be careful when removing the bolts as the door lock may fall and become damaged.
69720B
28.REMOVE FRONT DOOR LOCK REMOTE CONTROL CABLE ASSEMBLY LH
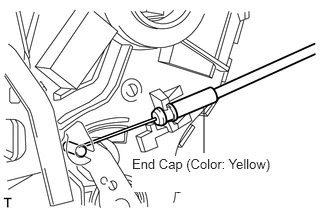
Remove the front door lock remote control cable assembly.
69760C
29.REMOVE FRONT DOOR INSIDE LOCKING CABLE ASSEMBLY LH
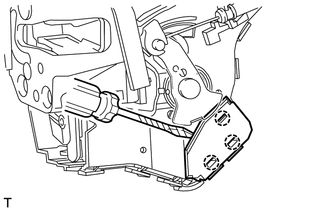
Using a screwdriver, detach the 3 claws.
- HINT:
-
Tape the screwdriver tip before use.
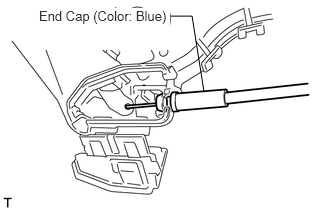
Remove the front door inside locking cable assembly.
69220
30.REMOVE FRONT DOOR HANDLE ASSEMBLY OUTSIDE LH
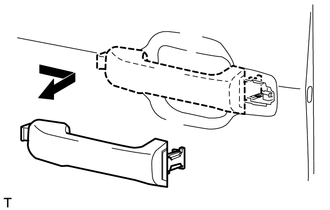
Remove the handle by sliding and pulling it in the direction indicated by the arrow in the illustration.
- NOTICE:
-
If the release plate is not pulled and held when removing the handle, the release plate will interfere with the handle and become damaged.
69202A
31.REMOVE FRONT DOOR OUTSIDE HANDLE FRAME SUB-ASSEMBLY LH
Remove the outside handle pads front and rear.
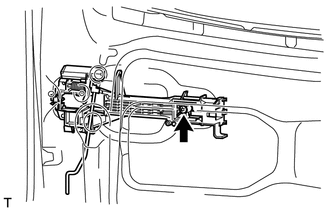
Using a T30 "TORX" wrench, loosen the screw.
Slide the outside handle frame to remove it.
- HINT:
-
Remove the outside handle frame through the service hole.
69312
32.REMOVE FRONT DOOR LOCK OPEN ROD LH
Remove the lock open rod from the outside handle frame.
67924
33.REMOVE FRONT NO. 2 DOOR STIFFENER CUSHION
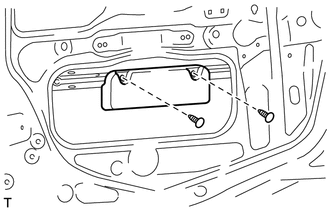
Using a clip remover, remove the 2 clips and stiffener cushion.
67856B
34.REMOVE FRONT DOOR PANEL PROTECTOR LH
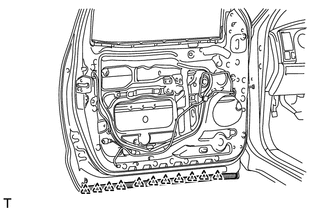
Using a clip remover, detach the 11 clips and remove the door panel protector.
- HINT:
-
If clips are damaged during removal, replace them.
68620
35.REMOVE FRONT DOOR CHECK ASSEMBLY LH
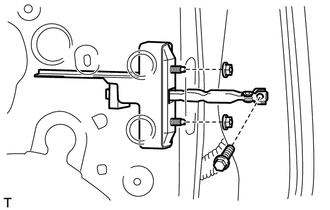
Remove the bolt, 2 nuts and door check.
- HINT:
-
Remove the door check through the service hole.
- NOTICE:
-
Be careful when removing the bolts as the door check may fall and become damaged.
67862
36.REMOVE FRONT DOOR WEATHERSTRIP LH
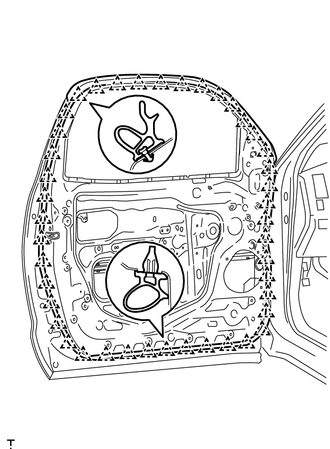
Using a clip remover, detach the 43 clips and remove the weatherstrip.
- HINT:
-
If clips are damaged during removal, replace them.