Home › Vehicle Interior › HORN › INTEGRATION RELAY
RM27M0U _58 Vehicle Interior _049141 HORN _0234354 INTEGRATION RELAY G

HORN  INTEGRATION RELAY  ON-VEHICLE INSPECTION  


PROCEDURE

Hide 1. PRECAUTION

NOTICE:

After turning the ignition switch off, waiting time may be required before disconnecting the cable from the battery terminal. Therefore, make sure to read the disconnecting the cable from the battery terminal notice before proceeding with work (See page General>INTRODUCTION>REPAIR INSTRUCTION>PRECAUTION).


Hide 2.DISCONNECT CABLE FROM NEGATIVE BATTERY TERMINAL

NOTICE:

Some systems need to be initialized after the cable is reconnected (See page General>INTRODUCTION>REPAIR INSTRUCTION>INITIALIZATION).


Hide 3.REMOVE INTEGRATION RELAY (UNIT E)

a.

Remove the engine room relay block cover.
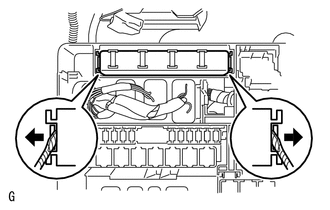

b.
A155875

Using a screwdriver, detach the 2 claws and disconnect the integration relay from the engine room relay block.

HINT:

Tape the screwdriver tip before use.


c.

Disconnect the 3 connectors.


Hide 4.INSPECT INTEGRATION RELAY (HORN RELAY)

NOTICE:
·

Some relays are built into the integration relay (unit E). The integration relay cannot be disassembled. If there is a malfunction in the circuit of the integration relay, replace the integration relay.

·

The internal circuit of the integration relay is as shown in the illustration below. Inspect the integration relay using the following procedures.
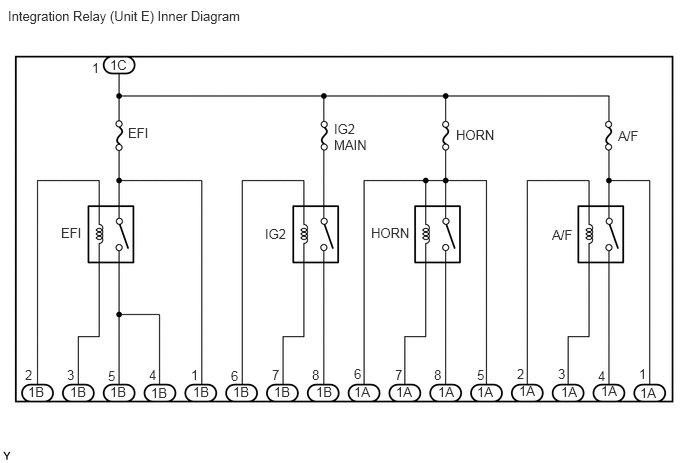


B168112E02
0.083,0.083 2.646,0.396 2.563,0.313 10 false Integration Relay (Unit E) Inner Diagram 1.146,0.594 1.365,0.813 0.219,0.219 10 false 1C 0.958,0.625 1.219,0.781 0.26,0.156 10 false 1 0.292,4 0.573,4.219 0.281,0.219 10 false 1B 0.729,4 1.01,4.219 0.281,0.219 10 false 1B 1.146,4 1.427,4.219 0.281,0.219 10 false 1B 1.573,4.01 1.854,4.229 0.281,0.219 10 false 1B 2.01,4 2.292,4.219 0.281,0.219 10 false 1B 2.427,4 2.708,4.219 0.281,0.219 10 false 1B 2.854,4 3.135,4.219 0.281,0.219 10 false 1B 3.292,4 3.573,4.219 0.281,0.219 10 false 1B 3.688,4 3.948,4.26 0.26,0.26 10 false 1A 4.125,4 4.385,4.26 0.26,0.26 10 false 1A 4.563,4 4.823,4.26 0.26,0.26 10 false 1A 4.969,4 5.229,4.26 0.26,0.26 10 false 1A 5.406,3.99 5.667,4.25 0.26,0.26 10 false 1A 5.844,4 6.104,4.26 0.26,0.26 10 false 1A 6.26,3.99 6.521,4.25 0.26,0.26 10 false 1A 6.667,4.01 6.927,4.271 0.26,0.26 10 false 1A 1.99,3.823 2.25,3.979 0.26,0.156 10 false 1 6.656,3.813 6.917,3.969 0.26,0.156 10 false 1 6.229,3.833 6.542,4.042 0.313,0.208 10 false 4 1.552,3.823 1.865,4.031 0.313,0.208 10 false 4 0.698,3.823 1.052,4.01 0.354,0.188 10 false 3 5.813,3.813 6.167,4 0.354,0.188 10 false 3 5.385,3.813 5.781,4.042 0.396,0.229 10 false 2 0.26,3.823 0.656,4.052 0.396,0.229 10 false 2 1.125,3.833 1.406,4.042 0.281,0.208 10 false 5 4.969,3.823 5.25,4.031 0.281,0.208 10 false 5 2.406,3.833 2.771,4.042 0.365,0.208 10 false 6 3.688,3.813 4.052,4.021 0.365,0.208 10 false 6 2.833,3.823 3.135,3.979 0.302,0.156 10 false 7 4.115,3.823 4.406,4.063 0.292,0.24 10 false 7 3.25,3.823 3.542,4.073 0.292,0.25 10 false 8 4.521,3.823 4.813,4.073 0.292,0.25 10 false 8 0.635,2.344 1.01,2.583 0.375,0.24 10 false EFI 2.76,2.354 3.333,2.615 0.573,0.26 10 false IG2 3.865,2.344 4.323,2.615 0.458,0.271 10 false HORN 5.75,2.365 6.333,2.667 0.583,0.302 10 false A/F 6.438,1.333 6.802,1.615 0.365,0.281 10 false A/F 4.75,1.323 5.208,1.594 0.458,0.271 10 false HORN 3.479,1.26 4.052,1.615 0.573,0.354 10 false IG2 MAIN 1.333,1.302 1.708,1.542 0.375,0.24 10 false EFI

a.

Measure the resistance of the HORN fuse.

i.

Measure the resistance according to the value(s) in the table below.

Standard resistance:
Tester Connection Condition Specified Condition
HORN fuse Always Below 1 Ω


If the result is not as specified, replace the HORN fuse.
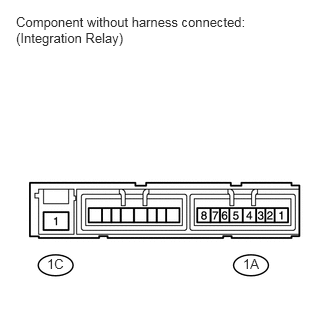


b.
B168111E03
0.49,2.667 0.792,2.917 0.302,0.25 10 false 1C 2.531,2.667 2.833,2.917 0.302,0.25 10 false 1A 0.167,0.146 2.688,0.667 2.521,0.521 10 false Component without harness connected: (Integration Relay)

Measure the resistance of the horn relay circuit.

i.

Measure the resistance according to the value(s) in the table below.

Standard resistance:
Tester Connection Condition Specified Condition
1A-8 - 1C-1 When battery voltage is not applied between 1A-7 and 1C-1 10 kΩ or higher
When battery voltage is applied between 1A-7 and 1C-1 Below 1 Ω


If the result is not as specified, replace the integration relay.


Hide 5.INSTALL INTEGRATION RELAY (UNIT E)

a.

Connect the 3 connectors.


b.

Install the integration relay to the engine room relay block.


c.

Install the engine room relay block cover.


Hide 6.CONNECT CABLE TO NEGATIVE BATTERY TERMINAL

NOTICE:

Some systems need to be initialized after the cable is reconnected (See page General>INTRODUCTION>REPAIR INSTRUCTION>INITIALIZATION).