INTERIOR PANEL INSTRUMENT PANEL SAFETY PAD(for Column Shift Type) REASSEMBLY
CAUTION / NOTICE / HINT
- HINT:
-
A bolt without a torque specification is shown in the standard bolt chart (See page General>SPECIFICATIONS>STANDARD BOLT>SPECIFIED TORQUE FOR STANDARD BOLTS).
PROCEDURE

 73960A
1.INSTALL FRONT PASSENGER AIRBAG ASSEMBLY
86860
2.INSTALL NAVIGATION ANTENNA ASSEMBLY (w/ Navigation System)
55425B
3.INSTALL INSTRUMENT CLUSTER FINISH PANEL REINFORCEMENT
Install the 2 instrument cluster finish panel reinforcements with the 2 screws <F>.
55971C
4.INSTALL NO. 1 SIDE DEFROSTER NOZZLE DUCT
Install the No. 1 side defroster nozzle duct with the 2 screws <E>.
55972C
5.INSTALL NO. 2 SIDE DEFROSTER NOZZLE DUCT
Install the No. 2 side defroster nozzle duct with the 2 screws <E>.
55844
6.INSTALL NO. 2 HEATER TO REGISTER DUCT
Install the No. 2 heater to register duct with the 8 screws <E>.
55950G
7.INSTALL DEFROSTER NOZZLE ASSEMBLY
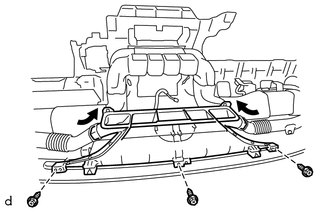
Install the defroster nozzle assembly with the 3 screws <E>.
Connect the No. 1 side defroster nozzle duct and No. 2 side defroster nozzle duct to the defroster nozzle assembly.
55328
8.INSTALL NO. 1 INSTRUMENT PANEL PIN
- HINT:
-
Use the same procedure to install the No. 1 instrument panel pin on the other side.
Install the No. 1 instrument panel pin with the screw <E>.
86160A
9.INSTALL FRONT NO. 4 SPEAKER ASSEMBLY
55525
10.INSTALL NO. 1 SPEAKER HOLE COVER
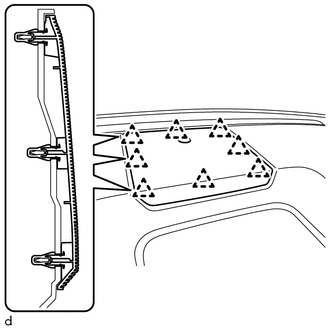
Attach the 8 clips to install the No. 1 speaker hole cover.
58916
11.INSTALL BOX BOTTOM MAT
Install the box bottom mat.