EXTERIOR PANELS / TRIM BLACK OUT TAPE(for Front Door) REMOVAL
CAUTION / NOTICE / HINT
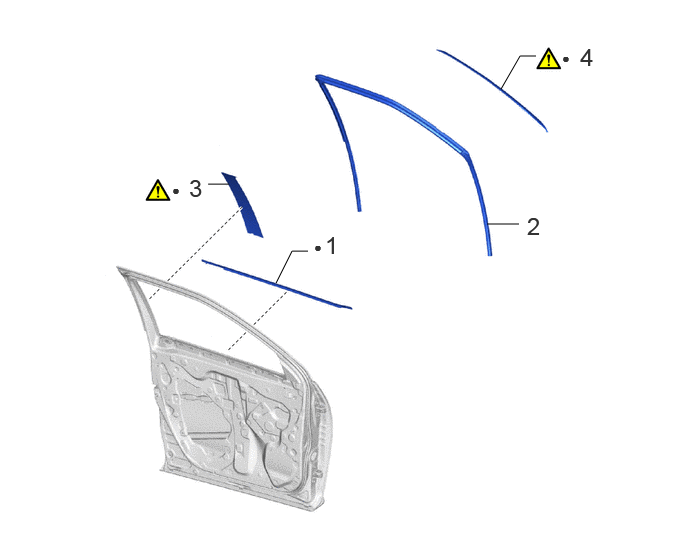
| Procedure | Part Name Code | 
|

|

|
|
|---|---|---|---|---|---|
| 1 | FRONT DOOR GLASS OUTER WEATHERSTRIP ASSEMBLY | 68210C | - | - | - |
| 2 | FRONT DOOR GLASS RUN | 68151C | - | - | - |
| 3 | NO. 1 BLACK OUT TAPE | 75922M | ( ) |
- | - |
| 4 | NO. 3 BLACK OUT TAPE | 75926 | ()
|
- | - |
| ● | Non-reusable part | - | - |
CAUTION / NOTICE / HINT
The necessary procedures (adjustment, calibration, initialization or registration) that must be performed after parts are removed and installed, or replaced during the black out tape removal/installation are shown below.
| Replaced Part or Performed Procedure | Necessary Procedure | Effect/Inoperative Function when Necessary Procedure not Performed | Link |
|---|---|---|---|
| Door glass run | Initialize power window control system | ·
Auto up and down function ·
Jam protection function ·
Remote control function ·
Key-linked function ·
Wireless transmitter-linked function ·
Key-off operation function ·
Catch protection function ·
Window open warning function |
()
|
- HINT:
- ·
Use the same procedure for the RH side and LH side.
·The following procedure is for the LH side.
PROCEDURE

 68210C
1.REMOVE FRONT DOOR GLASS OUTER WEATHERSTRIP ASSEMBLY
68151C
2.REMOVE FRONT DOOR GLASS RUN
Use the same procedure as for the RH side.
Click hereVehicle Exterior>DOOR / HATCH>FRONT DOOR>DISASSEMBLY
75922M
3.REMOVE NO.1 BLACK OUT TAPE
|
|
|
- Standard:
Item Temperature ·Vehicle Body
·No. 1 Black Out Tape
40 to 60°C (104 to 140°F)
- CAUTION:
-
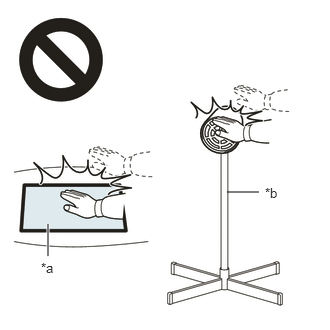 2.365,2 2.698,2 false 0.5,2.333 0.5,2.667 true 0.427,2.708 0.74,2.865 0.313,0.156 10 false *a 2.76,1.927 3.073,2.083 0.313,0.156 10 false *b
*a Heated Part *b Heat Light
- ·
Do not touch the heat light and heated parts.
·Touching the heat light may result in burns.
·Touching heated parts for a long time may result in burns.
- NOTICE:
-
Do not heat the vehicle body excessively.
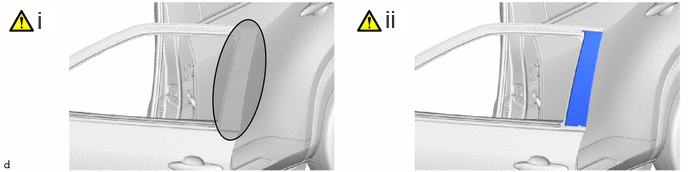

|
Warming range | - | - |
Using a heat light, heat the No. 1 black out tape and vehicle body.
Pull back on one of the ends of the No. 1 black out tape to remove it.
- HINT:
-
When pulling on the No. 1 black out tape, pull it parallel to the vehicle body.
75926
4.REMOVE NO.3 BLACK OUT TAPE
|
|
|
- Standard:
Item Temperature ·Vehicle Body
·No. 3 Black Out Tape
40 to 60°C (104 to 140°F)
- CAUTION:
-
2.365,2 2.698,2 false 0.5,2.333 0.5,2.667 true 0.427,2.708 0.74,2.865 0.313,0.156 10 false *a 2.76,1.927 3.073,2.083 0.313,0.156 10 false *b
*a Heated Part *b Heat Light
- ·
Do not touch the heat light and heated parts.
·Touching the heat light may result in burns.
·Touching heated parts for a long time may result in burns.
- NOTICE:
-
Do not heat the vehicle body excessively.
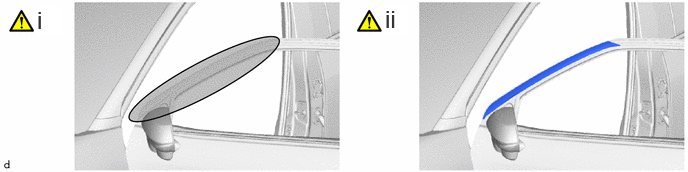
|
|
Warming range | - | - |
Using a heat light, heat the No. 3 black out tape and vehicle body.
Pull back on one of the ends of the No. 3 black out tape to remove it.
- HINT:
-
When pulling on the No. 3 black out tape, pull it parallel to the vehicle body.