P910 HYBRID TRANSMISSION / TRANSAXLE TRANSMISSION CONTROL CABLE INSTALLATION
CAUTION / NOTICE / HINT
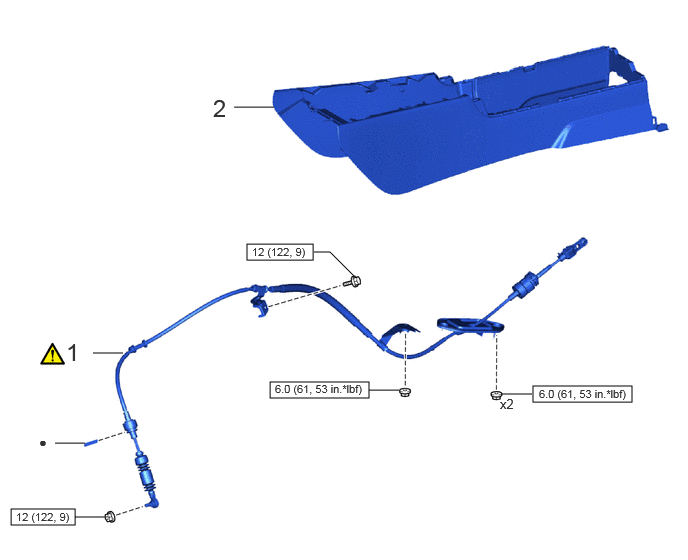
| Procedure | Part Name Code | 
|

|

|
|
|---|---|---|---|---|---|
| 1 | TRANSMISSION CONTROL CABLE ASSEMBLY | 33820B | ( ) |
- | - |
| 2 | REAR CONSOLE BOX ASSEMBLY | 58910C | - | - | - |

|
N*m (kgf*cm, ft.*lbf): Specified torque | ● | Non-reusable part |
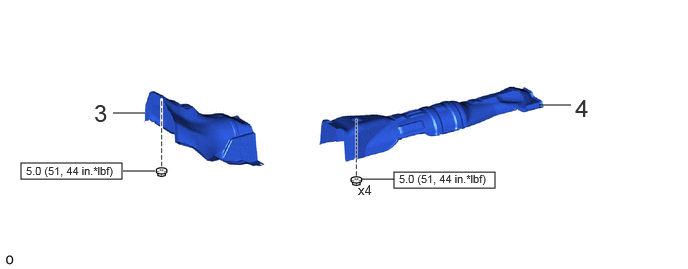
| Procedure | Part Name Code |
|
|
|
|
|---|---|---|---|---|---|
| 3 | FRONT NO. 2 FLOOR HEAT INSULATOR | 58151 | - | - | - |
| 4 | FRONT NO. 1 FLOOR HEAT INSULATOR | 58153 | - | - | - |
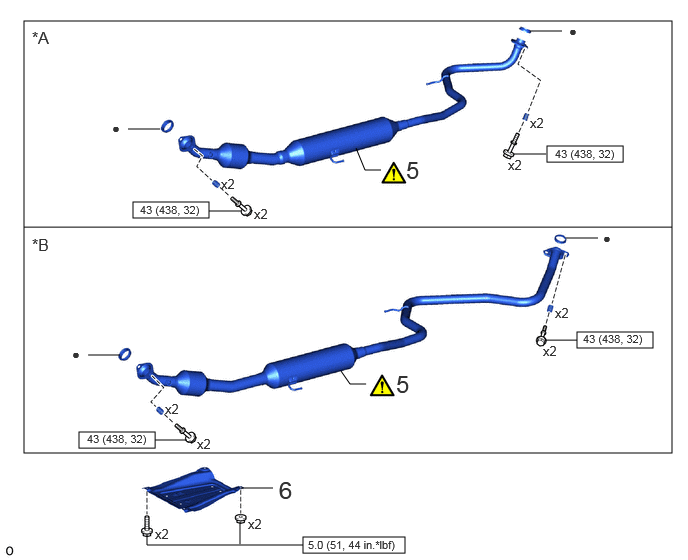
| Procedure | Part Name Code |
|
|
|
|
|---|---|---|---|---|---|
| 5 | FRONT EXHAUST PIPE ASSEMBLY | 17410 | ()
|
- | - |
| 6 | CENTER NO. 4 ENGINE UNDER COVER | 51447D | - | - | - |
| *A | for 2WD | *B | for AWD |
|
|
N*m (kgf*cm, ft.*lbf): Specified torque | ● | Non-reusable part |
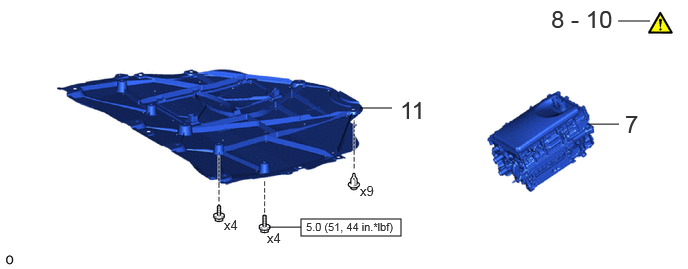
| Procedure | Part Name Code |
|
|
|
|
|---|---|---|---|---|---|
| 7 | HYBRID MOTOR CONTROL INVERTER ASSEMBLY | G92A0 | - | - | - |
| 8 | INSPECT SHIFT LEVER POSITION | - | ()
|
- | - |
| 9 | ADJUST SHIFT LEVER POSITION | - | ()
|
- | - |
| 10 | INSPECT FOR EXHAUST GAS LEAK | - | ()
|
- | - |
| 11 | NO. 1 ENGINE UNDER COVER ASSEMBLY | 51410 | - | - | - |
|
|
N*m (kgf*cm, ft.*lbf): Specified torque | - | - |
PROCEDURE

 33820B
1.INSTALL TRANSMISSION CONTROL CABLE ASSEMBLY
|
|
|
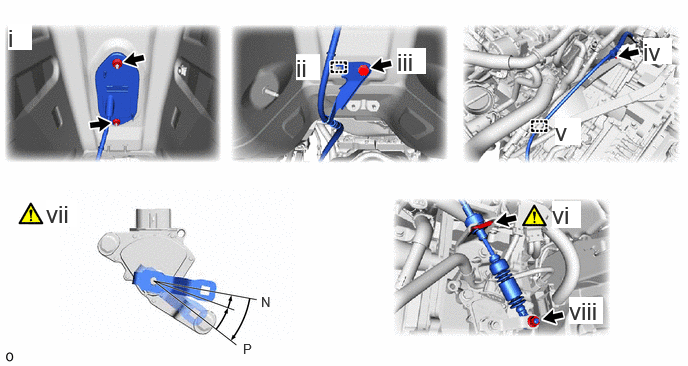
Pass the transmission control cable assembly into the vehicle and install the transmission control cable assembly to the vehicle body with the 2 nuts.
- Torque:
- 6.0 N*m (61 kgf*cm, 53 in.*lbf)
Engage the guide to connect the transmission control cable assembly to vehicle body.
Install the nut.
- Torque:
- 6.0 N*m (61 kgf*cm, 53 in.*lbf)
Install the transmission control cable assembly to the hybrid vehicle transaxle assembly with the bolt.
- Torque:
- 12 N*m (122 kgf*cm, 9 ft.*lbf)
Engage the clamp to connect the transmission control cable assembly.
Connect the transmission control cable assembly to the No. 1 transmission control cable bracket with a new clip.
Turn the control shaft lever clockwise until it stops, and then from that position turn it counterclockwise by 2 notches to set it to the N position.
Connect the transmission control cable assembly to the control shaft lever with the nut.
- Torque:
- 12 N*m (122 kgf*cm, 9 ft.*lbf)
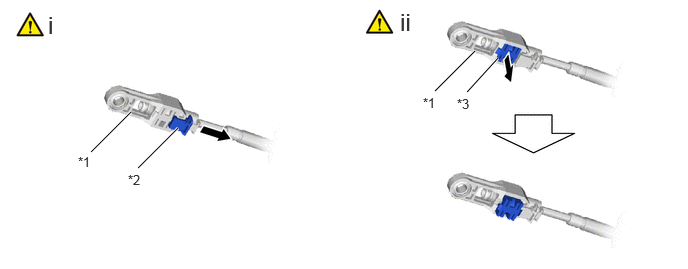
| *1 | Adjuster Case | *2 | Adjuster Case Cover |
| *3 | Lock Piece | - | - |
Slide the adjuster case cover in the direction shown by the arrow.
Using a precision screwdriver, pull out the lock piece of the adjuster case.
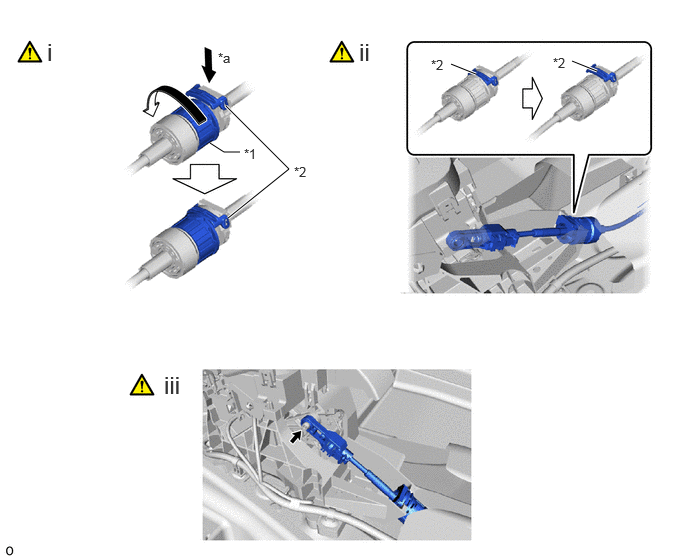
| *1 | Lock Nut | *2 | Stopper |
| *a | Push in | - | - |
Turn the lock nut of the transmission control cable assembly counterclockwise. While holding the lock nut, push in the stopper.
Connect the transmission control cable assembly to the transmission floor shift assembly.
- NOTICE:
- ·
After installation, check that the outer part of the stopper is as shown in the illustration.
·Do not forcibly pull the transmission control cable assembly into the cabin.
Connect the transmission control cable assembly to the transmission floor shift assembly.
- NOTICE:
- ·
Push the end of the transmission control cable assembly all the way to the base of the transmission floor shift assembly pin.
·Connect the transmission control cable assembly so that the lock piece faces the driver side.
·Before connecting the floor shift transmission control select cable, check that the shift lever is in N.
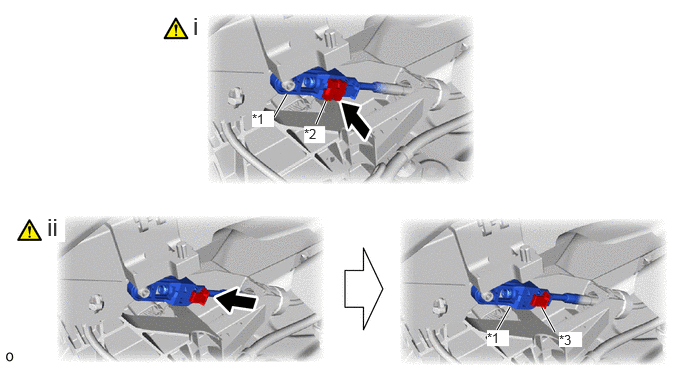
| *1 | Adjuster Case | *2 | Lock Piece |
| *3 | Adjuster Case Cover | - | - |
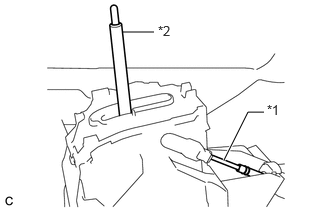
Push in the lock piece of the adjuster case to lock it.
- NOTICE:
-
 1.271,0.333 1.604,0.333 false 2.333,1.667 2.583,1.167 2.583,1.167 2.75,1.167 true 2.781,1.063 3.094,1.219 0.313,0.156 10 false *1 1.646,0.24 1.958,0.396 0.313,0.156 10 false *2
*1 Transmission Control Cable Assembly *2 Lever Shaft
- ·
When pushing in the lock piece of the adjuster case to lock it, remove your hand from the lever shaft.
·When pushing in the lock piece of the adjuster case to lock it, do not move the lever shaft or transmission control cable assembly forward or backward.
Move the adjuster case cover in the direction shown by the arrow.
- NOTICE:
-
If the adjuster case cover is not moved far enough so that the adjuster case cover engages the lock piece, the cable will not be able to lock, and reliable shift operation will not be possible.
58910C
2.INSTALL REAR CONSOLE BOX ASSEMBLY
58153
3.INSTALL FRONT NO. 2 FLOOR HEAT INSULATOR
- Torque:
- 5.0 N*m (51 kgf*cm, 44 in.*lbf)
58151
4.INSTALL FRONT NO. 1 FLOOR HEAT INSULATOR
- Torque:
- 5.0 N*m (51 kgf*cm, 44 in.*lbf)
17410
5.INSTALL FRONT EXHAUST PIPE ASSEMBLY
|
|
Click here()
|
51447D
6.INSTALL CENTER NO. 4 ENGINE UNDER COVER
G92A0
7.INSTALL HYBRID MOTOR CONTROL INVERTER ASSEMBLY
8.INSPECT SHIFT LEVER POSITION
9.ADJUST SHIFT LEVER POSITION
10.INSPECT FOR EXHAUST GAS LEAK
51410
11.INSTALL NO. 1 ENGINE UNDER COVER ASSEMBLY