HYBRID / BATTERY CONTROL INVERTER WITH CONVERTER INSTALLATION
CAUTION / NOTICE / HINT
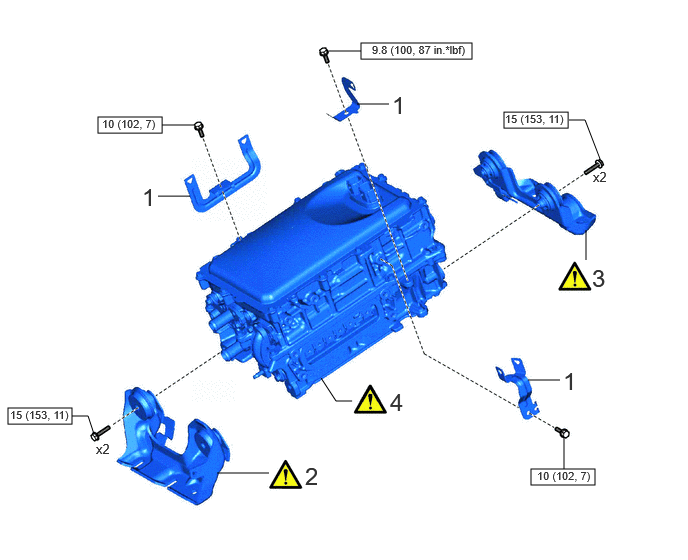
| Procedure | Part Name Code | 
|

|

|
|
|---|---|---|---|---|---|
| 1 | WIRE HARNESS CLAMP BRACKET | - | - | - | - |
| 2 | NO. 1 INVERTER BRACKET | G9214 | ( ) |
- | - |
| 3 | NO. 2 INVERTER BRACKET | G9215 | ()
|
- | - |
| 4 | HYBRID MOTOR CONTROL INVERTER ASSEMBLY | G92A0 | ()
|
- | - |

|
N*m (kgf*cm, ft.*lbf): Specified torque | - | - |
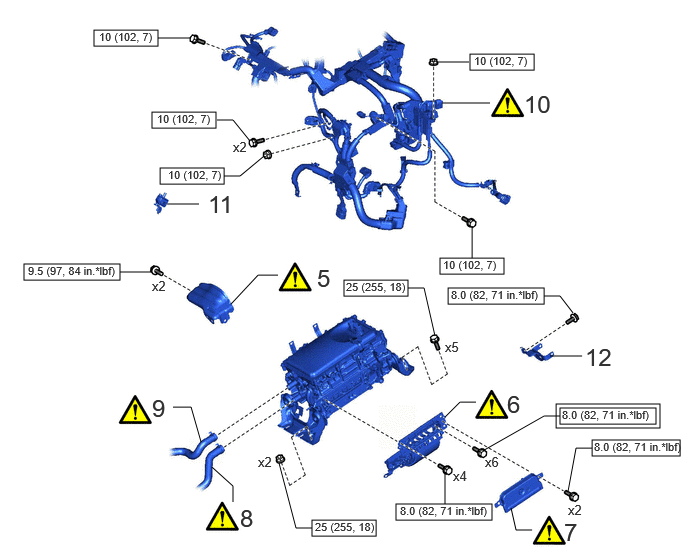
| Procedure | Part Name Code |
|
|
|
|
|---|---|---|---|---|---|
| 5 | INVERTER PROTECTOR | G921E | ()
|
- | - |
| 6 | MOTOR CABLE | G1148 | ()
|
- | - |
| 7 | UPPER INVERTER COVER | G9221A | ()
|
- | - |
| 8 | INLET NO. 1 INVERTER COOLING HOSE | G922AA | ()
|
- | - |
| 9 | OUTLET NO. 1 INVERTER COOLING HOSE | G922C | ()
|
- | - |
| 10 | ENGINE WIRE | 82121 | ()
|
- | - |
| 11 | PURGE VALVE (PURGE VSV) | 25860 | - | - | - |
| 12 | WIRE HARNESS CLAMP BRACKET | - | - | - | - |

|
Tightening torque for "Major areas involving basic vehicle performance such as moving/turning/stopping" : N*m (kgf*cm, ft.*lbf) |
|
N*m (kgf*cm, ft.*lbf): Specified torque |
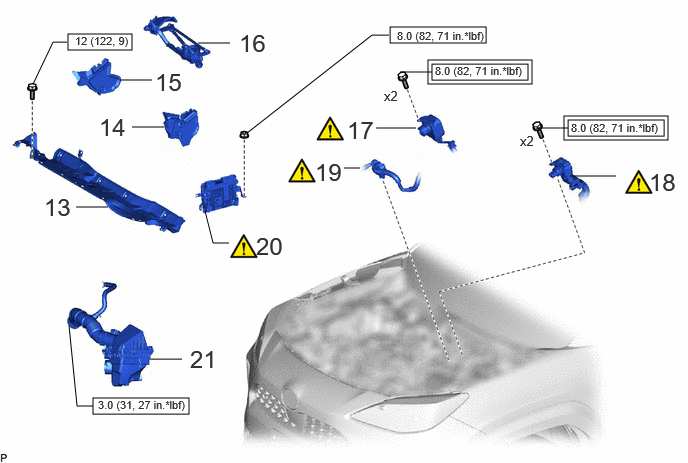
| Procedure | Part Name Code |
|
|
|
|
|---|---|---|---|---|---|
| 13 | OUTER COWL TOP PANEL SUB-ASSEMBLY | 55701J | - | - | - |
| 14 | WATER GUARD PLATE LH | 55735A | - | - | - |
| 15 | FRONT NO. 1 VENTILATOR SEAL | 55815E | - | - | - |
| 16 | WINDSHIELD WIPER MOTOR AND LINK | - | - | - | - |
| 17 | HV AIR CONDITIONING WIRE | 821H2 | ()
|
- | - |
| 18 | HV FLOOR UNDER WIRE | 821H1 | ()
|
- | - |
| 19 | ENGINE WIRE | 82121 | ()
|
- | - |
| 20 | ECM | 89661 | ()
|
- | - |
| 21 | AIR CLEANER ASSEMBLY WITH AIR CLEANER HOSE | - | - | - | - |
|
|
Tightening torque for "Major areas involving basic vehicle performance such as moving/turning/stopping" : N*m (kgf*cm, ft.*lbf) |
|
N*m (kgf*cm, ft.*lbf): Specified torque |
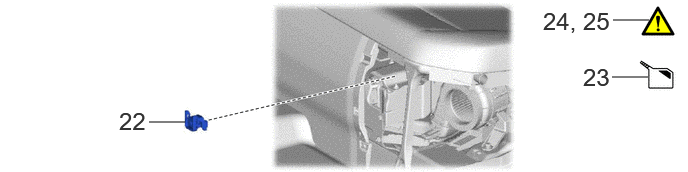
| Procedure | Part Name Code |
|
|
|
|
|---|---|---|---|---|---|
| 22 | SERVICE PLUG GRIP | G3834 | - | - | - |
| 23 | COOLANT (for Inverter) | - | - | ()
|
- |
| 24 | COOLANT LEAK (for Inverter) | - | ()
|
- | - |
| 25 | PERFORM RESOLVER LEARNING | - | ()
|
- | - |
PROCEDURE

 1.INSTALL WIRE HARNESS CLAMP BRACKET
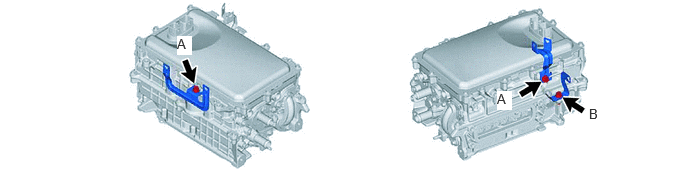
- Torque:
- Bolt A : 10 N*m (102 kgf*cm, 7 ft.*lbf)
- Bolt B : 9.8 N*m (100 kgf*cm, 87 in.*lbf)
G9214
2.INSTALL NO. 1 INVERTER BRACKET
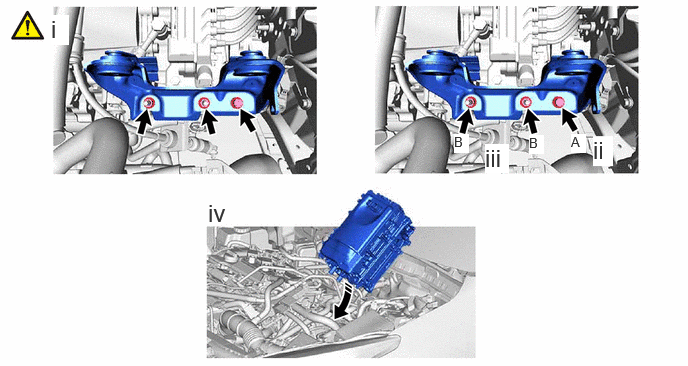
Temporarily install the No. 1 inverter bracket to the hybrid vehicle transaxle assembly with the bolt and 2 nuts.
- NOTICE:
-
Make sure that the hybrid motor control inverter assembly is positioned so that the stud bolts are in contact with the base of the U-shaped portions of the No. 1 inverter bracket.
- HINT:
-
If the bolts and nuts are not tightened appropriately, the hybrid motor control inverter assembly may make an abnormal noise.
Fully tighten the bolt (A).
- Torque:
- 25 N*m (255 kgf*cm, 18 ft.*lbf)
Fully tighten the 2 nuts (B).
- Torque:
- 25 N*m (255 kgf*cm, 18 ft.*lbf)
Set the hybrid motor control inverter assembly on hybrid vehicle transaxle assembly.
- NOTICE:
- ·
When installing the hybrid motor control inverter assembly, be careful not to damage the parts around it.
·To prevent damage, do not hold the hybrid motor control inverter assembly by the connectors, brackets or cooling pipes.
·To prevent damage due to static electricity, do not touch the terminals of the disconnected connectors.
·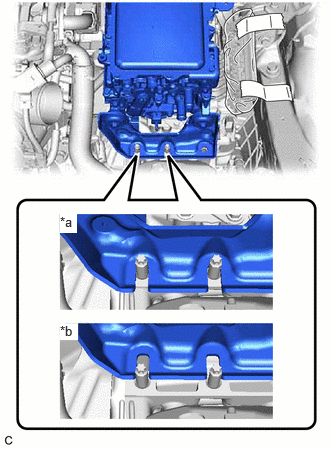 0.625,2.229 0.802,2.427 0.177,0.198 10 true *a 0.625,3.365 0.813,3.542 0.188,0.177 10 true *b
*a Correct *b Incorrect
Make sure that the hybrid motor control inverter assembly is positioned so that the stud bolts are in contact with the base of the U-shaped portions of the No. 1 inverter bracket
- HINT:
-
If the bolts and nuts are not tightened appropriately, the hybrid motor control inverter assembly may make an abnormal noise.
G9215
3.INSTALL NO. 2 INVERTER BRACKET
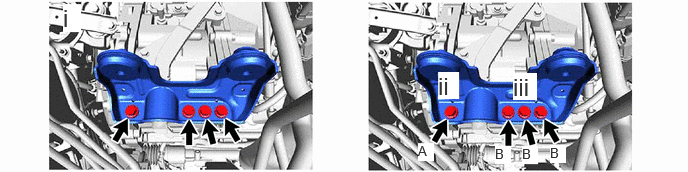
Temporarily install the No. 2 inverter bracket to the hybrid vehicle transaxle assembly with the 4 bolts.
Fully tighten the bolt (A).
- Torque:
- 25 N*m (255 kgf*cm, 18 ft.*lbf)
Fully tighten the 3 bolts (B).
- Torque:
- 25 N*m (255 kgf*cm, 18 ft.*lbf)
G92A0
4.INSTALL HYBRID MOTOR CONTROL INVERTER ASSEMBLY
|
|
|
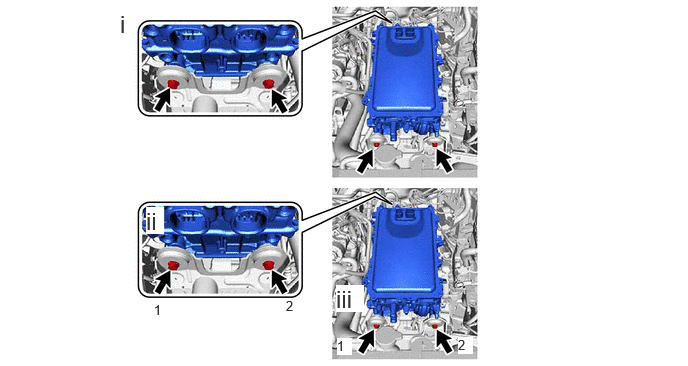
Temporarily install the hybrid motor control inverter assembly with the 4 bolts.
Fully tighten the 2 bolts in the order shown in the illustration to the hybrid motor control inverter assembly.
- Torque:
- 15 N*m (153 kgf*cm, 11 ft.*lbf)
Fully tighten the 2 bolts in the order shown in the illustration to the hybrid motor control inverter assembly.
- Torque:
- 15 N*m (153 kgf*cm, 11 ft.*lbf)
G921E
5.INSTALL INVERTER PROTECTOR
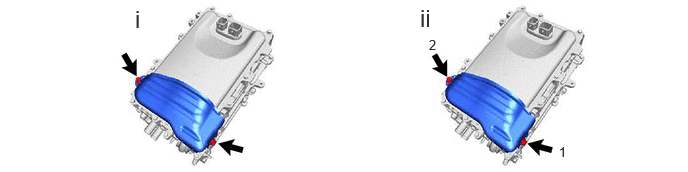
Temporarily install the inverter protector with the 2 bolts.
Fully tighten the 2 bolts in the order shown in the illustration to the hybrid motor control inverter assembly.
- Torque:
- 9.5 N*m (97 kgf*cm, 84 in.*lbf)
G1148
6.CONNECT MOTOR CABLE
|
|
|
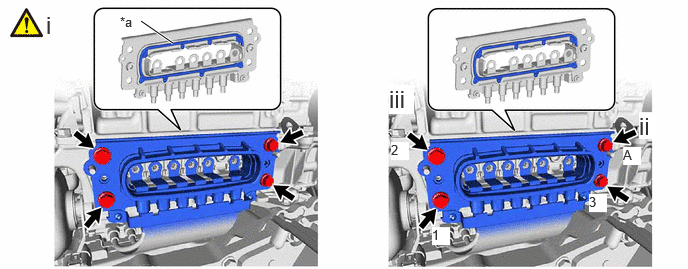
| *a | Waterproof Seal | - | - |
Temporarily connect the motor cable to the hybrid motor control inverter assembly with the 4 bolts.
- NOTICE:
- ·
Do not touch the waterproof seal or terminals of the connector.
·Do not damage the terminals, connector housing or hybrid motor control inverter assembly during disconnection.
Fully tighten the bolt (A).
- Torque:
- 8.0 N*m (82 kgf*cm, 71 in.*lbf)
Fully tighten the 3 bolts in the order shown in the illustration to connect the motor cable to the hybrid motor control inverter assembly.
- Torque:
- 8.0 N*m (82 kgf*cm, 71 in.*lbf)
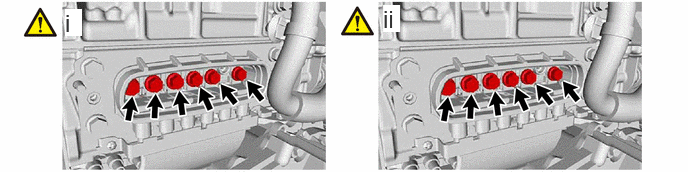
Temporarily install the 6 bolts.
- NOTICE:
- ·
To prevent the threads from being damaged, temporarily tighten the 6 bolts by hand.
·Do not damage the terminals, connector housing or hybrid motor control inverter assembly during disconnection.
Using an insulated tool, fully tighten the 6 bolts.
- Torque:
- 8.0 N*m (82 kgf*cm, 71 in.*lbf)
- NOTICE:
- ·
Do not touch the waterproof seal or terminals of the connector.
·Do not damage the terminals, connector housing or hybrid motor control inverter assembly during disconnection.
·Be sure to use a torque wrench to tighten the bolts.
G9221A
7.INSTALL UPPER INVERTER COVER
|
|
|
Install the upper inverter cover to the hybrid motor control inverter assembly with the 2 bolts.
- Torque:
- 8.0 N*m (82 kgf*cm, 71 in.*lbf)
- NOTICE:
- ·
Visually confirm that the inverter cover waterproof seal is securely installed before installing the upper inverter cover.
·Do not touch the waterproof seal of the upper inverter cover.
·Make sure that the interlock is fully engaged.
·Do not damage the terminals, interlock connector or hybrid motor control inverter assembly during installation.
·Do not allow any foreign matter or water to enter the hybrid motor control inverter assembly.
·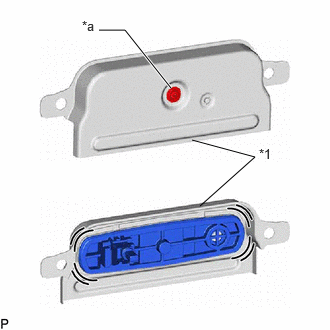 2.083,2.146 2.656,1.635 2.656,1.635 2,1.458 false 1.031,0.313 1.302,0.313 1.302,0.313 1.781,0.917 true 0.854,0.188 1.167,0.385 0.313,0.198 10 false *a 2.698,1.521 3.01,1.719 0.313,0.198 10 false *1
*1 Inverter Cover *a Screw
Do not remove or excessively tighten the screw of the upper inverter cover.
·Although the upper inverter cover may feel loose, this is not due to a malfunction.
·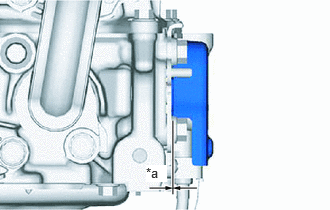 1.521,1.719 1.74,1.896 0.219,0.177 10 true *a
*a No Gap
Push in the upper inverter cover until it contacts the hybrid motor control inverter assembly.
G922AA
8.CONNECT INLET NO. 1 INVERTER COOLING HOSE
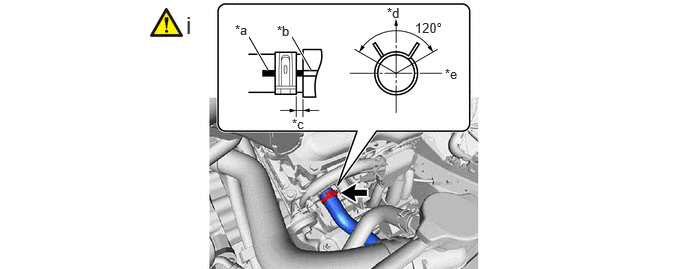
| *a | Alignment Mark (Green) | *b | Rib |
| *c | 2 to 5 mm (0.0787 to 0.197 in.) | *d | Up |
| *e | LH Side | - | - |
Connect the inlet No. 1 inverter cooling hose to the hybrid motor control inverter assembly and slide the clip to secure it.
- NOTICE:
-
To prevent foreign matter from entering the hybrid motor control inverter assembly and inverter cooling system, do not remove the pieces of cloth from the pipe and disconnected hose until installation.
- HINT:
- ·
Make sure that the clip is positioned as shown in the illustration.
·Make sure to align the alignment mark of the hose with the rib of the hybrid motor control inverter assembly.
G922C
9.CONNECT OUTLET NO. 1 INVERTER COOLING HOSE
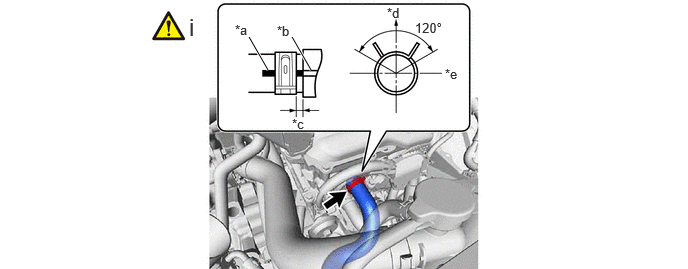
| *a | Alignment Mark (Blue) | *b | Rib |
| *c | 2 to 5 mm (0.0787 to 0.197 in.) | *d | Up |
| *e | LH Side | - | - |
Connect the outlet No. 1 inverter cooling hose to the hybrid motor control inverter assembly and slide the clip to secure it.
- NOTICE:
-
To prevent foreign matter from entering the hybrid motor control inverter assembly and inverter cooling system, do not remove the pieces of cloth from the pipe and disconnected hose until installation.
- HINT:
- ·
Make sure that the clip is positioned as shown in the illustration.
·Make sure to align the alignment mark of the hose with the rib of the hybrid motor control inverter assembly.
82121
10.INSTALL ENGINE WIRE
|
|
|
- Torque:
- 10 N*m (102 kgf*cm, 89 in.*lbf)
25860
11.INSTALL PURGE VALVE (PURGE VSV)
12.INSTALL WIRE HARNESS CLAMP BRACKET
- Torque:
- 8.0 N*m (82 kgf*cm, 71 in.*lbf)
55701J
13.INSTALL OUTER COWL TOP PANEL SUB-ASSEMBLY
55735A
14.INSTALL WATER GUARD PLATE LH
55815E
15.INSTALL FRONT NO. 1 VENTILATOR SEAL
16.INSTALL WINDSHIELD WIPER MOTOR AND LINK
821H2
17.CONNECT HV AIR CONDITIONING WIRE
|
|
|
- Torque:
- 8.0 N*m (82 kgf*cm, 71 in.*lbf)
821H1
18.CONNECT FLOOR UNDER WIRE
|
|
|
- Torque:
- 8.0 N*m (82 kgf*cm, 71 in.*lbf)
82121
19.CONNECT ENGINE WIRE
|
|
|
89661
20.INSTALL ECM
21.INSTALL AIR CLEANER ASSEMBLY WITH AIR CLEANER HOSE
|
|
|
- Torque:
- 3.0 N*m (31 kgf*cm, 27 in.*lbf)
G3834
22.INSTALL SERVICE PLUG GRIP
23.ADD COOLANT (for Inverter)
24.INSPECT FOR COOLANT LEAK (for Inverter)
25. PERFORM RESOLVER LEARNING