BRAKE (REAR) REAR BRAKE(for 2WD) INSTALLATION
CAUTION / NOTICE / HINT
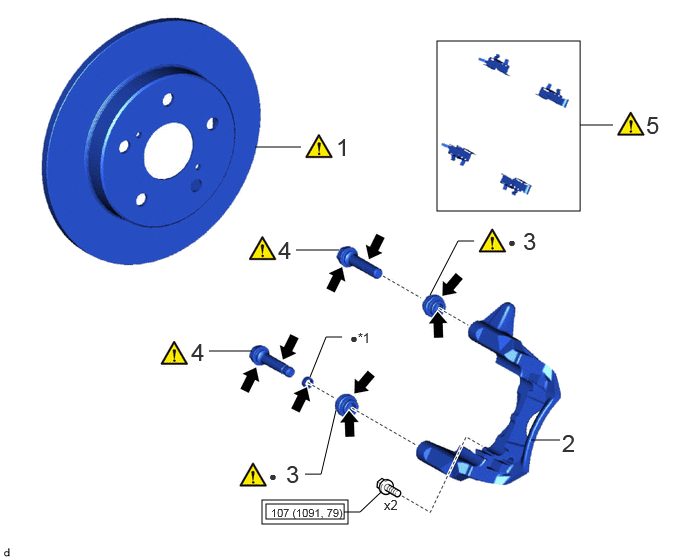
| Procedure | Part Name Code | 
|

|

|
|
|---|---|---|---|---|---|
| 1 | REAR DISC | 42431 | ( ) |
- | - |
| 2 | REAR DISC BRAKE CYLINDER MOUNTING | 47822 | - | - | - |
| 3 | NO. 1 BUSH DUST BOOT | 47775B | ()
|
- | - |
| 4 | REAR DISC BRAKE CYLINDER SLIDE PIN | - | ()
|
- | - |
| 5 | REAR DISC BRAKE PAD SUPPORT PLATE | - | ()
|
- | - |
| *1 | NO. 1 REAR DISC BRAKE CYLINDER SLIDE BUSH | - | - |

|
Tightening torque for "Major areas involving basic vehicle performance such as moving/turning/stopping" : N*m (kgf*cm, ft.*lbf) | ● | Non-reusable part |

|
Lithium Soap Base Glycol Grease | - | - |
| Procedure | Part Name Code |
|
|
|
|
|---|---|---|---|---|---|
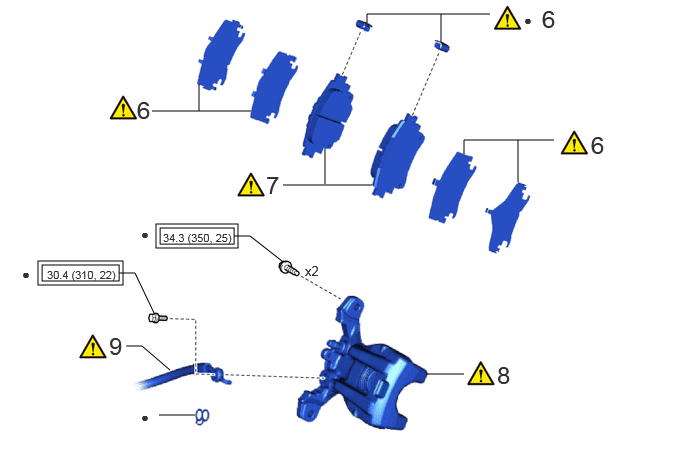
| 6 | REAR DISC BRAKE ANTI-SQUEAL SHIM KIT | 04946 | ()
|
- | - |
| 7 | REAR DISC BRAKE PAD | 04466 | ()
|
- | - |
| 8 | REAR DISC BRAKE CYLINDER ASSEMBLY | 47850 | ()
|
- | - |
| 9 | REAR FLEXIBLE HOSE | 47319F | ()
|
- | - |
| *A | for HV Model | *B | for Gasoline Model |
|
|
Tightening torque for "Major areas involving basic vehicle performance such as moving/turning/stopping" : N*m (kgf*cm, ft.*lbf) | ● | Non-reusable part |
|
|
Lithium Soap Base Glycol Grease | - | - |
| Procedure | Part Name Code |
|
|
|
|
|---|---|---|---|---|---|
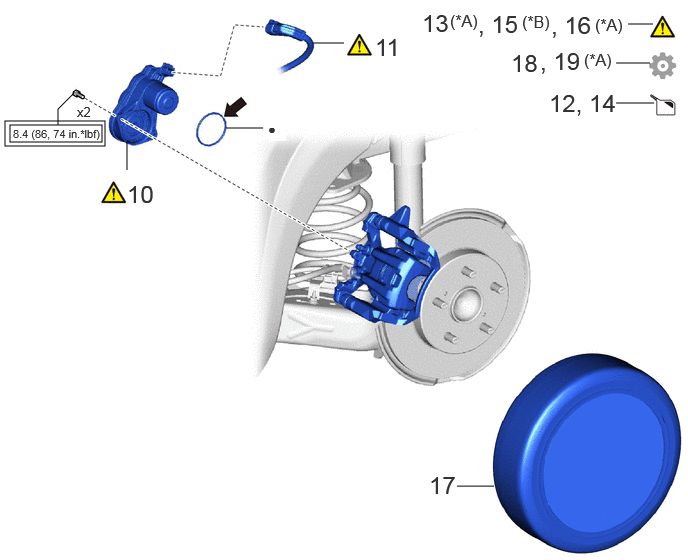
| 10 | PARKING BRAKE ACTUATOR ASSEMBLY | 46310B | ()
|
- | - |
| 11 | NO. 2 PARKING BRAKE WIRE ASSEMBLY | 890C0A | ()
|
- | - |
| 12 | ADD BRAKE FLUID | - | - | ()
|
- |
| 13 | CONNECT CABLE TO NEGATIVE AUXILIARY BATTERY TERMINAL | - | ()
|
- | - |
| 14 | BLEED BRAKE LINE | - | - | ()
|
- |
| 15 | BLEED REAR DISC BRAKE CYLINDER ASSEMBLY | 47850 | ()
|
- | - |
| 16 | BLEED REAR DISC BRAKE CYLINDER ASSEMBLY | 47850 | ()
|
- | - |
| 17 | REAR WHEEL | - | - | - | - |
| 18 | NORMAL CONDITION RECOVERY | - | - | - | ()
|
| 19 | INITIALIZATION AFTER RECONNECTING AUXILIARY BATTERY TERMINAL | - | - | - | ()
|
| *A | for HV Model | *B | for Gasoline Model |
|
|
Tightening torque for "Major areas involving basic vehicle performance such as moving/turning/stopping" : N*m (kgf*cm, ft.*lbf) | ● | Non-reusable part |
|
|
Lithium Soap Base Glycol Grease | - | - |
CAUTION / NOTICE / HINT
- NOTICE:
- ·
Immediately after installing the brake pads, the braking performance may be reduced. Always perform a road test in a safe place while paying attention to the surroundings.
·After replacing the front disc brake pads, the brake pedal may feel soft due to clearance between the front disc brake pads and front disc. Depress the brake pedal several times until the brake pedal feels firm.
·After replacing the front disc brake pads, always perform a road test to check the braking performance and check for vibrations.
·When the brake pedal is first depressed after replacing the brake pads or pushing back the disc brake piston, DTC [C13CD00, C13CE00, C140000] may be stored. As there is no malfunction, clear the DTC. (for HV Model)
·While the auxiliary battery is connected, even if the power switch is off, the brake control system activates when the brake pedal is depressed or any door courtesy switch turns on. Therefore, when servicing the brake system components, do not operate the brake pedal or open/close the doors while the auxiliary battery is connected. (for HV Model)
- HINT:
- ·
Use the same procedure for the RH side and LH side.
·The following procedure is for the LH side.
PROCEDURE

 42431
1.INSTALL REAR DISC
|
|
|

| *a | Matchmark | - | - |
Align the matchmarks of the rear disc and rear axle hub and bearing assembly, and install the rear disc.
47822
2.INSTALL REAR DISC BRAKE CYLINDER MOUNTING
- Torque:
- 107 N*m (1091 kgf*cm, 79 ft.*lbf)
47775B
3.INSTALL NO. 1 BUSH DUST BOOT
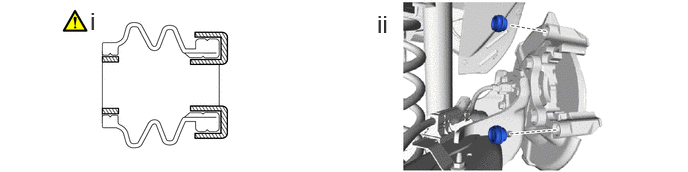

|
Lithium Soap Base Glycol Grease | - | - |
Apply a 0.3 g (0.01 oz) of lithium soap base glycol grease to the entire circumference of 2 new rear disc brake bushing dust boots.
Install the 2 rear disc brake bushing dust boots to the rear disc brake cylinder mounting.
4.INSTALL REAR DISC BRAKE CYLINDER SLIDE PIN
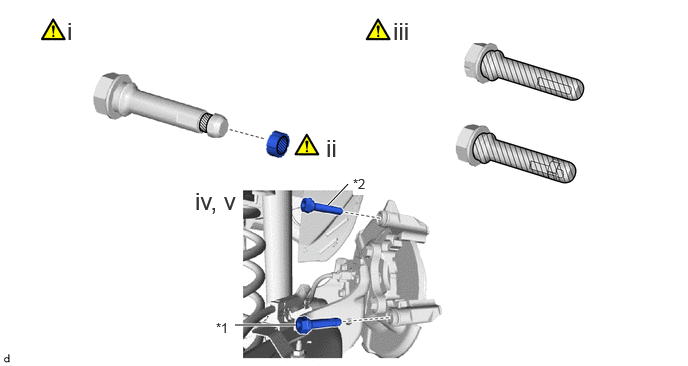
| *1 | Rear No. 1 Disc Brake Cylinder Slide Pin | *2 | Rear No. 2 Disc Brake Cylinder Slide Pin |
|
|
Lithium Soap Base Glycol Grease | - | - |
Apply a light layer of lithium soap base glycol grease to the contact surface of the rear No. 2 disc brake cylinder slide pin.
Install a new rear disc brake cylinder slide bushing to the rear No. 2 disc brake cylinder slide pin.
Apply a light layer of lithium soap base glycol grease to the sliding part and the sealing surfaces of the rear No. 1 disc brake cylinder slide pin and rear No. 2 disc brake cylinder slide pin.
Install the rear No. 1 disc brake cylinder slide pin and rear No. 2 disc brake cylinder slide pin to the rear disc brake cylinder mounting.
Push the rear No. 1 disc brake cylinder slide pin and rear No. 2 disc brake cylinder slide pin into each rear disc brake bushing dust boot to engage the pins to the boots.
5.INSTALL REAR DISC BRAKE PAD SUPPORT PLATE
|
|
|
04946
6.INSTALL REAR DISC BRAKE ANTI-SQUEAL SHIM KIT
|
|
Click here()
|
04466
7.INSTALL REAR DISC BRAKE PAD
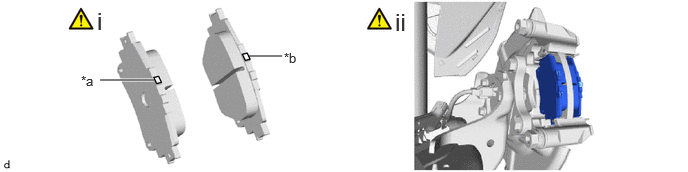
| *a | Inner Side (Pink) | *b | Outer Side (Light Blue) |
Check the rear disc brake pad has an identification mark, be sure to confirm the installation location.
Install the rear disc brake pad to the rear disc brake cylinder mounting.
- NOTICE:
-
Install the rear disc brake pad so that the rear disc brake pad wear indicator plate is mounted on the lower side of the vehicle.
47850
8.INSTALL REAR DISC BRAKE CYLINDER ASSEMBLY
|
|
|
- Torque:
- 34.3 N*m (350 kgf*cm, 25 ft.*lbf)
47319F
9.CONNECT REAR FLEXIBLE HOSE
|
|
|
- Torque:
- 30.4 N*m (310 kgf*cm, 22 ft.*lbf)
46310B
10.INSTALL PARKING BRAKE ACTUATOR ASSEMBLY
|
|
Click here()
|
890C0A
11.INSTALL NO. 2 PARKING BRAKE WIRE ASSEMBLY
|
|
Click here()
|
12.ADD BRAKE FLUID
for HV Model:
Click hereBrake>BRAKE SYSTEM (OTHER)>BRAKE FLUID (for HV Model)>ON-VEHICLE INSPECTION
for Gasoline Model:
Click hereBrake>BRAKE SYSTEM (OTHER)>BRAKE FLUID (for Gasoline Model)>ON-VEHICLE INSPECTION
13.CONNECT CABLE TO NEGATIVE AUXILIARY BATTERY TERMINAL (for HV Model)
|
|
Click here()
|
14. BLEED BRAKE LINE
for HV Model:
Click hereBrake>BRAKE SYSTEM (OTHER)>BRAKE FLUID (for HV Model)>BLEEDING
for Gasoline Model:
Click hereBrake>BRAKE SYSTEM (OTHER)>BRAKE FLUID (for Gasoline Model)>BLEEDING
47850
15.BLEED REAR DISC BRAKE CYLINDER ASSEMBLY (for Gasoline Model)
|
|
|
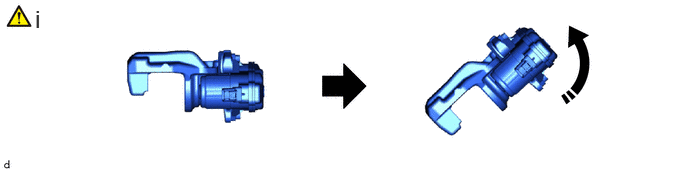
Perform the following procedure.
1. Perform the procedure to enter rear disc brake pad replacement mode 5 times.
Click hereBrake>PARKING BRAKE>ELECTRIC PARKING BRAKE SYSTEM (for Gasoline Model)>TEST MODE PROCEDURE
2. Release the parking brake.
3. Disconnect the No. 2 parking brake wire assembly connector from the parking brake actuator assembly.
Click hereBrake>PARKING BRAKE>ELECTRIC PARKING BRAKE ACTUATOR (for 2WD)>REMOVAL
4. Hold the 2 rear disc brake cylinder slide pins and remove the 2 bolts and separate the rear disc brake cylinder assembly from the rear disc brake cylinder mounting.(*1)
5. Hold the rear disc brake cylinder assembly horizontally, then tilt it 45° toward the bleeder plug side as shown in the illustration.(*2)
6. Temporarily install the rear disc brake cylinder assembly to the rear disc brake cylinder mounting with the 2 bolts.(*3)
7. Remove the center No. 1 cowl top ventilator louver.
Click hereGeneral>MAINTENANCE>BRAKE FLUID (for Gasoline Model)>REPLACEMENT
8. Remove the brake master cylinder reservoir filler cap assembly.
Click hereGeneral>MAINTENANCE>BRAKE FLUID (for Gasoline Model)>REPLACEMENT
9. Add brake fluid to keep the level between the MIN and MAX lines of the reservoir while bleeding the brakes.
- NOTICE:
- ·
Make sure that there is sufficient brake fluid in the reservoir.
·Do not remove the filter from the brake master cylinder reservoir assembly and be sure to fill the brake master cylinder reservoir assembly with new brake fluid to avoid any potential contamination of the brake system. Contamination, for example by dirt particles or mineral oil, could lead to functional brake problems.
·If brake fluid leaks onto any painted surface, immediately wash it off.
10. Remove the rear disc brake bleeder plug cap.
11. Connect a vinyl tube to the rear disc brake bleeder plug.
12. Depress the brake pedal several times, and then loosen the rear disc brake bleeder plug with the pedal depressed.(*4)
13. When fluid stops coming out, tighten the rear disc brake bleeder plug and release the brake pedal.(*5)
- NOTICE:
-
Repeat steps (*4) through (*5) until there are no signs of air in the brake fluid.
14. Repeat steps (*1) through (*5) 3 times.
- NOTICE:
-
If there is still air in the system after performing steps (*1) through (*5) 3 times, repeat the steps (*1) through (*5) until the air has been bled.
15. Tighten the rear disc brake bleeder plug completely.
- Torque:
- 8.3 N*m (85 kgf*cm, 73 in.*lbf)
16. Install the rear disc brake bleeder plug cap.
17. Hold the 2 rear disc brake cylinder slide pins, and install the rear disc brake cylinder assembly to the rear disc brake cylinder mounting with 2 new bolts.
- Torque:
- 34.3 N*m (350 kgf*cm, 25 ft.*lbf)
18. Connect the No. 2 parking brake wire assembly connector to the parking brake actuator assembly.
Click hereBrake>PARKING BRAKE>ELECTRIC PARKING BRAKE ACTUATOR (for 2WD)>INSTALLATION
19. Inspect for brake fluid leaks.
20. Inspect the brake fluid level in the reservoir.
Click hereBrake>BRAKE SYSTEM (OTHER)>BRAKE FLUID (for Gasoline Model)>ON-VEHICLE INSPECTION
21. Install the brake master cylinder reservoir filler cap assembly.
Click hereGeneral>MAINTENANCE>BRAKE FLUID (for Gasoline Model)>REPLACEMENT
22. Install the center No. 1 cowl top ventilator louver.
Click hereGeneral>MAINTENANCE>BRAKE FLUID (for Gasoline Model)>REPLACEMENT
47850
16.BLEED REAR DISC BRAKE CYLINDER ASSEMBLY (for HV Model)
|
|
|
Perform the following procedure.
1. Perform the procedure to enter rear disc brake pad replacement mode 5 times.
Click hereBrake>PARKING BRAKE>ELECTRIC PARKING BRAKE SYSTEM (for HV Model)>UTILITY
2. Release the parking brake.
3. Force air within the rear disc brake cylinder assembly to accumulate at the rear disc brake bleeder plug.(*1)
(a) Disable brake control.
Click hereBrake>BRAKE (REAR)>REAR BRAKE (for 2WD)>REMOVAL
(b) Disconnect the No. 2 parking brake wire assembly connector.
Click hereBrake>PARKING BRAKE>ELECTRIC PARKING BRAKE ACTUATOR (for 2WD)>REMOVAL
(c) Hold the 2 rear disc brake cylinder slide pins and remove the 2 bolts and separate the rear disc brake cylinder assembly from the rear disc brake cylinder mounting.
(d) Hold the rear disc brake cylinder assembly horizontally, then tilt it 45° toward the bleeder plug side as shown in the illustration.
(e) Temporarily install the rear disc brake cylinder assembly to the rear disc brake cylinder mounting with the 2 bolts.
(f) Connect the No. 2 parking brake wire assembly connector.
Click hereBrake>PARKING BRAKE>ELECTRIC PARKING BRAKE ACTUATOR (for 2WD)>INSTALLATION
(g) Connect the reservoir level switch connector.
(h) Connect the cable to the negative (-) auxiliary battery terminal.
Click hereBrake>BRAKE (FRONT)>FRONT BRAKE>INSTALLATION
(i) Turn the ignition switch ON.
(j) Depress the brake pedal and release it.
(k) Apply the parking brake.
4. Enter ECB (Electronically Controlled Brake system) Invalid Mode.(*2)
- NOTICE:
- ·
Performing the following procedure enters ECB (Electronically Controlled Brake system) Invalid Mode without using the GTS.
·ECB (Electronically Controlled Brake system) Invalid Mode allows the brake lines to be bled without using the GTS.
·The brake warning light blinks (yellow) to indicate that ECB (Electronically Controlled Brake system) Invalid Mode is selected.
·Be sure to confirm that the brake warning light is blinking (yellow) throughout the brake line bleeding procedure.
·If any of the following conditions are met, ECB (Electronically Controlled Brake system) Invalid Mode is canceled and the brake warning light (yellow) turns off. Do not allow ECB (Electronically Controlled Brake system) Invalid Mode to be canceled while bleeding the brake lines or DTCs may be stored.
The shift lever is moved from P to any other position. The ignition switch to ON. The ignition switch is turned off. The parking brake is released. The vehicle speed is more than 0 km/h (0 mph).
·Do not rotate any brake disc while ECB (Electronically Controlled Brake system) Invalid Mode is selected.
·Although the brake warning light (yellow) will blink and a buzzer will sound while performing brake line bleeding, this is not a malfunction.
(a) Perform the procedure listed below within 1 minute.
Turn the power switch on (IG) with the shift lever in P and parking brake applied.
Move the shift lever to N and then depress the brake pedal more than 8 times within 5 seconds.
Move the shift lever to P and then depress the brake pedal more than 8 times within 5 seconds.
Move the shift lever to N and then depress the brake pedal more than 8 times within 5 seconds.
Move the shift lever to P.
(b) Check that the brake warning light is blinking (yellow).
5. Remove the center No. 1 cowl top ventilator louver.
Click hereGeneral>MAINTENANCE>BRAKE FLUID (for HV Model)>REPLACEMENT
6. Remove the brake master cylinder reservoir filler cap assembly.
7. Bleed the brake line.(*3)
(a) Remove the rear disc brake bleeder plug cap.
(b) Connect a vinyl tube to the rear disc brake bleeder plug.
(c) Add brake fluid to the reservoir until the fluid level is between the MAX and MIN lines on the brake fluid reservoir.(*a)
(d) Depress the brake pedal several times with approximately 1 second between each depression, and then loosen the bleeder plug with the pedal depressed.(*b)
(e) When brake fluid stops coming out, tighten the bleeder plug and then release the brake pedal for 1 second or more.(*c)
- HINT:
-
When the brake pedal is released, the piston inside the master cylinder may take longer than the brake pedal to return to its original position. Therefore, make sure to wait for 1 second or more between each depression of the brake pedal.
(f) Repeat steps (*a) through (*c) until there are no signs of air in the brake fluid.
8. Repeat steps (*a) through (*c) until there are no signs of air in the brake fluid.
- NOTICE:
-
If there is still air in the system after performing steps (*1) through (*3) 3 times, repeat the steps (*1) through (*3) until the air has been bled.
9. Tighten the rear disc brake bleeder plug completely.
- Torque:
- 8.3 N*m (85 kgf*cm, 73 in.*lbf)
10. Install the rear disc brake bleeder plug cap to the rear disc brake bleeder plug.
11. Hold the 2 rear disc brake cylinder slide pins, and install the rear disc brake cylinder assembly to the rear disc brake cylinder mounting with 2 new bolts.
- Torque:
- 34.3 N*m (350 kgf*cm, 25 ft.*lbf)
12. Inspect for brake fluid leaks.
13. Adjust the brake fluid level in the reservoir.
Click hereBrake>BRAKE SYSTEM (OTHER)>BRAKE FLUID (for HV Model)>ON-VEHICLE INSPECTION
14. Install the brake master cylinder reservoir filler cap assembly.
15. Install the center No. 1 cowl top ventilator louver.
Click hereGeneral>MAINTENANCE>BRAKE FLUID (for HV Model)>REPLACEMENT
16. Turn the ignition switch off.
17. Clear the DTCs.
17.INSTALL REAR WHEEL
18. NORMAL CONDITION RECOVERY
for HV Model: Click hereBrake>PARKING BRAKE>ELECTRIC PARKING BRAKE SYSTEM (for HV Model)>UTILITY
for Gasoline Model: Click hereBrake>PARKING BRAKE>ELECTRIC PARKING BRAKE SYSTEM (for Gasoline Model)>TEST MODE PROCEDURE
19. INITIALIZATION AFTER RECONNECTING AUXILIARY BATTERY TERMINAL (for HV Model)
Click hereGeneral>SETUP>WHEN DISCONNECTING OR RECONNECTING BATTERY TERMINAL>WORK PROCEDURE
- HINT:
-
When disconnecting and reconnecting the auxiliary battery, there is an automatic learning function that completes learning when the respective system is used.
-
Click hereGeneral>SETUP>WHEN DISCONNECTING OR RECONNECTING BATTERY TERMINAL>AUTOMATIC LEARNING CHART