M15A-FKS INTAKE / EXHAUST INTAKE MANIFOLD INSTALLATION
CAUTION / NOTICE / HINT
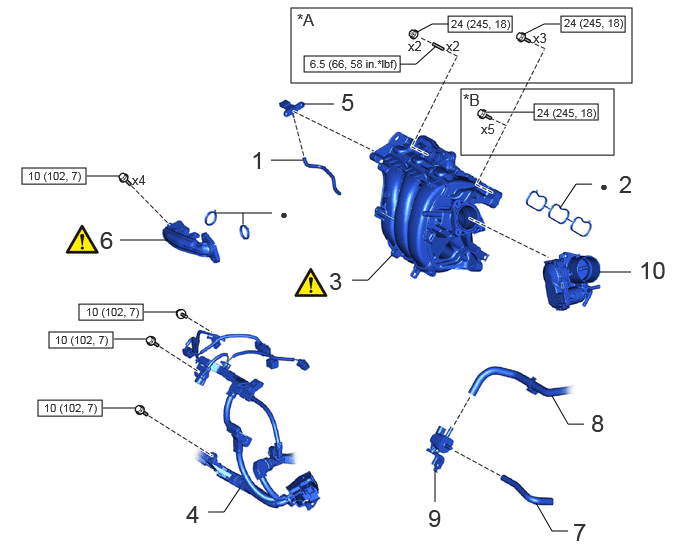
| Procedure | Part Name Code | 
|

|

|
|
|---|---|---|---|---|---|
| 1 | VACUUM HOSE | - | - | - | - |
| 2 | NO. 1 INTAKE MANIFOLD TO HEAD GASKET | 17177 | - | - | - |
| 3 | INTAKE MANIFOLD | 17111 | ( ) |
- | - |
| 4 | ENGINE WIRE | 82121 | - | - | - |
| 5 | E.F.I. VACUUM SENSOR ASSEMBLY (MANIFOLD ABSOLUTE PRESSURE SENSOR) | 89421 | - | - | - |
| 6 | E.F.I. VACUUM SENSOR ASSEMBLY (MANIFOLD ABSOLUTE PRESSURE SENSOR) | 25601 | ()
|
- | - |
| 7 | NO. 1 FUEL VAPOR FEED HOSE | 23826 | - | - | - |
| 8 | FUEL VAPOR FEED HOSE ASSEMBLY | 23820 | - | - | - |
| 9 | PURGE VALVE (PURGE VSV) | 25860 | - | - | - |
| 10 | THROTTLE BODY WITH MOTOR ASSEMBLY | 22030 | - | - | - |
| *A | w/ Stud Bolt | *B | w/o Stud Bolt |

|
N*m (kgf*cm, ft.*lbf): Specified torque | ● | Non-reusable part |
CAUTION / NOTICE / HINT
- NOTICE:
-
This procedure includes the installation of small-head bolts. Refer to Small-Head Bolts of Basic Repair Hint to identify the small-head bolts.
-
Click hereGeneral>INTRODUCTION>REPAIR INSTRUCTION>PRECAUTION
PROCEDURE

 1.INSTALL VACUUM HOSE
17177
2.INSTALL NO. 1 INTAKE MANIFOLD TO HEAD GASKET
17111
3.INSTALL INTAKE MANIFOLD
w/ Stud Bolt:
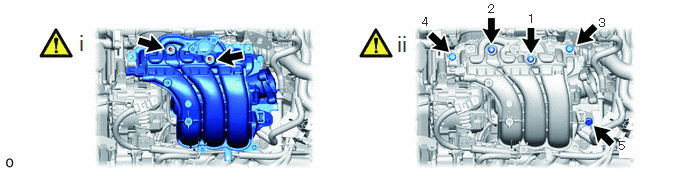
Temporarily install the intake manifold to the cylinder head sub-assembly.
Using an E8 "TORX" socket wrench, install the 2 stud bolts.
- Torque:
- 6.5 N*m (66 kgf*cm, 58 in.*lbf)
Temporarily install the 3 bolts and 2 nuts.
Tighten the 3 bolts and 2 nuts in the order shown in the illustration.
- Torque:
- 24 N*m (245 kgf*cm, 18 ft.*lbf)
w/o Stud Bolt:
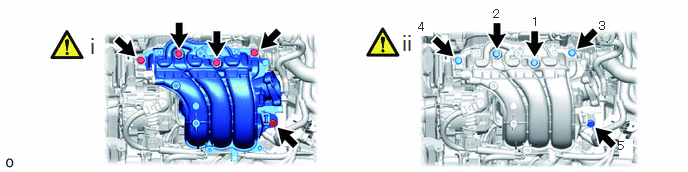
Temporarily install the intake manifold to the cylinder head sub-assembly with the 5 bolts.
Tighten the 5 bolts in the order shown in the illustration.
- Torque:
- 24 N*m (245 kgf*cm, 18 ft.*lbf)
82121
4.CONNECT ENGINE WIRE
- Torque:
- 10 N*m (102 kgf*cm, 7 ft.*lbf)
89421
5.INSTALL E.F.I. VACUUM SENSOR ASSEMBLY (MANIFOLD ABSOLUTE PRESSURE SENSOR)
25601
6.INSTALL NO. 1 EGR PIPE SUB-ASSEMBLY
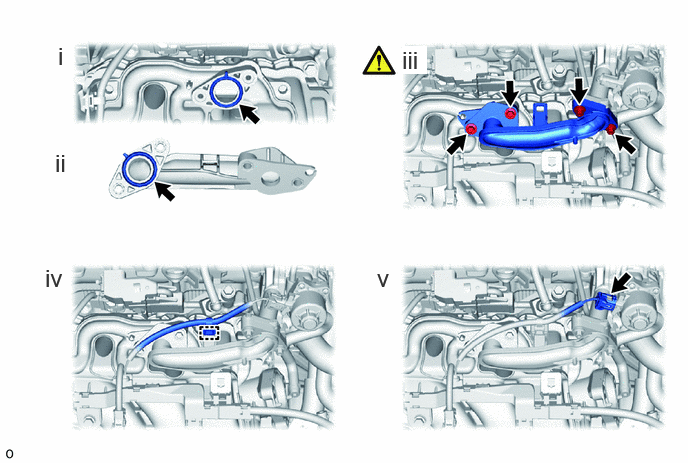
Install a new EGR inlet gasket to the intake manifold.
Install a new EGR valve adapter gasket to the No. 1 EGR pipe sub-assembly.
Using an 8 mm socket wrench, install the No. 1 EGR pipe sub-assembly to the intake manifold and EGR valve assembly with the 4 bolts.
- Torque:
- 10 N*m (102 kgf*cm, 7 ft.*lbf)
Engage the clamp to connect the engine wire.
Connect the EGR valve assembly connector.
23826
7.CONNECT NO. 1 FUEL VAPOR FEED HOSE
23820
8.CONNECT FUEL VAPOR FEED HOSE ASSEMBLY
25860
9.INSTALL PURGE VALVE (PURGE VSV)
22030
10.INSTALL THROTTLE BODY WITH MOTOR ASSEMBLY