INTERIOR PANELS / TRIM REAR CONSOLE BOX REMOVAL
CAUTION / NOTICE / HINT
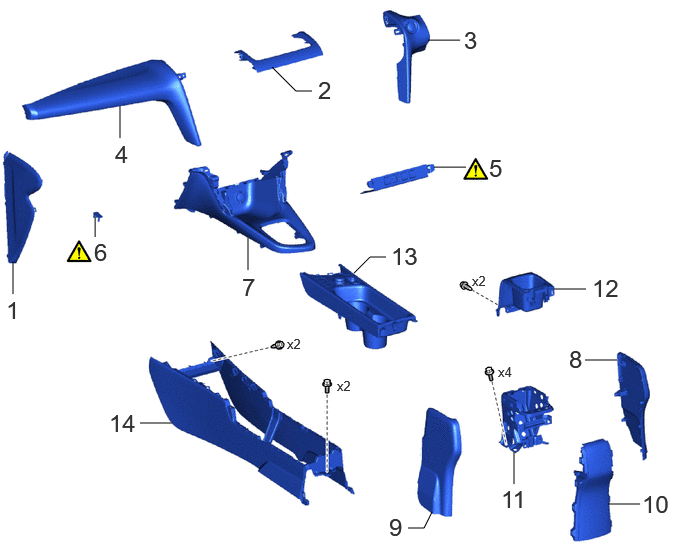
| Procedure | Part Name Code | 
|

|

|
|
|---|---|---|---|---|---|
| 1 | NO. 2 INSTRUMENT SIDE PANEL | 55318F | - | - | - |
| 2 | CENTER INSTRUMENT CLUSTER FINISH PANEL GARNISH | 55475B | - | - | - |
| 3 | INSTRUMENT PANEL FINISH PANEL | 55431A | - | - | - |
| 4 | LOWER INSTRUMENT PANEL FINISH PANEL | 55432B | - | - | - |
| 5 | SWITCH HOLE BASE SUB-ASSEMBLY | 55407B | ( ) |
- | - |
| 6 | SHIFT LEVER CAP | 33554 | ()
|
- | - |
| 7 | CONSOLE BOX ASSEMBLY | 58810J | - | - | - |
| 8 | NO. 1 BOX SIDE PANEL | - | - | - | - |
| 9 | NO. 2 BOX SIDE PANEL | 58912C | - | - | - |
| 10 | CONSOLE REAR END PANEL SUB-ASSEMBLY | 58903A | - | - | - |
| 11 | UPPER NO. 1 CONSOLE SUPPORT BRACKET | 58857A | - | - | - |
| 12 | CONSOLE BOX FRONT COVER | 58818A | - | - | - |
| 13 | REAR UPPER CONSOLE PANEL | 58805C | - | - | - |
| 14 | REAR CONSOLE BOX ASSEMBLY | 58910C | - | - | - |
PROCEDURE

 55318F
1.REMOVE NO. 2 INSTRUMENT SIDE PANEL
- HINT:
-
Use the same procedure as for the No. 1 side.
-
Click hereVehicle Interior>INTERIOR PANELS / TRIM>INSTRUMENT PANEL SAFETY PAD>REMOVAL
55475B
2.REMOVE CENTER INSTRUMENT CLUSTER FINISH PANEL GARNISH


|
Remove in this Direction | - | - |
55431A
3.REMOVE INSTRUMENT PANEL FINISH PANEL
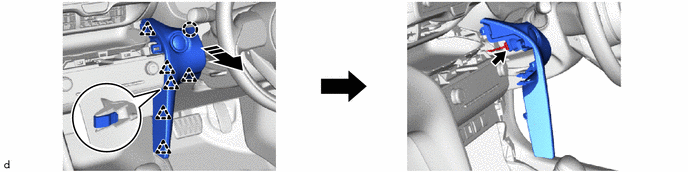
|
|
Remove in this Direction | - | - |
55432B
4.REMOVE LOWER INSTRUMENT PANEL FINISH PANEL

|
|
Remove in this Direction | - | - |
55407B
5.REMOVE SWITCH HOLE BASE SUB-ASSEMBLY
|
|
|
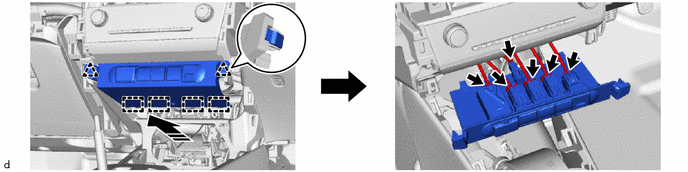
|
|
Remove in this Direction | - | - |
33554
6.REMOVE SHIFT LEVER CAP
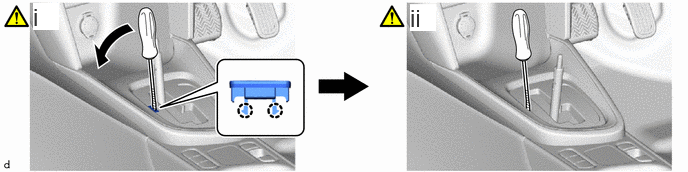
Using a screwdriver with its tip wrapped in protective tape, disengage the claws to remove the shift lever cap.
- NOTICE:
- ·
When removing the shift lever cap, if the screwdriver is lowered in the direction opposite to the one shown in the illustration, the cap could be damaged as a result.
·Be careful not to damage the shift lever cap and position indicator housing.
Using a screwdriver with its tip wrapped in protective tape, push the shift lock release button to move the shift lever to N.
- NOTICE:
-
Be careful not to damage the floor shift lever assembly.
58810J
7.REMOVE CONSOLE BOX ASSEMBLY
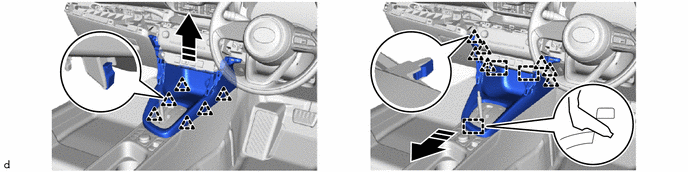
|
|
Remove in this Direction | - | - |
8.REMOVE NO. 1 BOX SIDE PANEL

|
|
Remove in this Direction | - | - |
58912C
9.REMOVE NO. 2 BOX SIDE PANEL
- HINT:
-
Use the same procedure as for the No. 1 side.
58903A
10.REMOVE CONSOLE REAR END PANEL SUB-ASSEMBLY

|
|
Remove in this Direction | - | - |
58857A
11.REMOVE UPPER NO. 1 CONSOLE SUPPORT BRACKET

58818A
12.REMOVE CONSOLE BOX FRONT COVER

58805C
13.REMOVE REAR UPPER CONSOLE PANEL
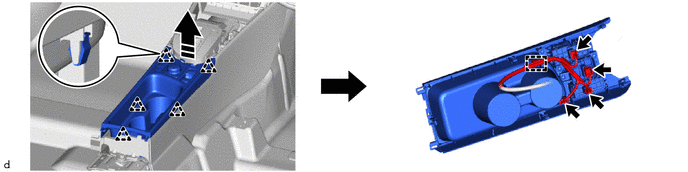
|
|
Remove in this Direction | - | - |
58910C
14.REMOVE REAR CONSOLE BOX ASSEMBLY
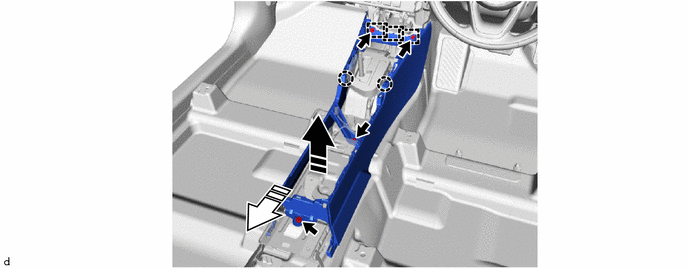
|
|
Remove in this Direction (1) | 
|
Remove in this Direction (2) |