HYBRID / BATTERY CONTROL HYBRID CONTROL SYSTEM P0A301C Drive Motor "B" Temperature Sensor Circuit Voltage Out of Range P0A301F Drive Motor "B" Temperature Sensor Circuit Intermittent
DTC SUMMARY
MALFUNCTION DESCRIPTION
These DTCs are stored when the rear motor temperature sensor output is abnormal.
The cause of this DTC output may be the following:
Rear motor temperature sensor internal malfunction
The connectors are not connected properly
Foreign matter or water on the connector terminals
- HINT:
-
When any of these DTCs are stored, the rear motor temperature sensor is malfunctioning and the self-protection function may not operate. Therefore under certain high load driving condition, the temperature of the rear motor becomes high. If the self-protection function does not operate, the rear motor may malfunction and cause the vehicle to enter fail-safe mode.
DESCRIPTION
Refer to the wiring diagram for DTC P0A3011.
Click hereEngine / Hybrid System>HYBRID / BATTERY CONTROL>HYBRID CONTROL SYSTEM>P0A3011
| DTC No. | Detection Item | DTC Detection Condition | Trouble Area | MIL | Warning Indicate | DTC Output from | Priority |
|---|---|---|---|---|---|---|---|
| P0A301C | Drive Motor "B" Temperature Sensor Circuit Voltage Out of Range | Under conditions in which the rear motor temperature sensor value is expected with certainty to increase, it does not increase; or under conditions in which the rear motor temperature sensor value is expected with certainty to decrease, it does not decrease.
(1 trip detection logic) |
·
Wire harness or connector ·
Rear traction motor with transaxle assembly (Rear motor temperature sensor) |
Does not come on | Master Warning: Comes on | Hybrid Control | A |
| P0A301F | Drive Motor "B" Temperature Sensor Circuit Intermittent | Sudden change in rear motor temperature sensor output or hunting:
Unusual sudden change in rear motor temperature sensor output occurs and offset condition continues for a certain period of time, or unusual change in rear motor temperature sensor output occurs repeatedly. (1 trip detection logic) |
·
Wire harness or connector ·
Rear traction motor with transaxle assembly (Rear motor temperature sensor) |
Does not come on | Master Warning: Comes on | Hybrid Control | A |
| DTC No. | Data List |
|---|---|
| P0A301C
P0A301F |
Rear Motor Temperature |
CONFIRMATION DRIVING PATTERN
Clear the DTCs (even if no DTCs are stored, perform the clear DTC procedure).
Turn the ignition switch off and wait for 2 minutes or more.
Drive the vehicle at approximately 10 km/h (6 mph) or less for approximately 10 seconds or more while maintaining the vehicle speed.
Enter the following menus: Powertrain / Hybrid Control / Utility / All Readiness.
Check the DTC judgment result.
- HINT:
- ·
If the judgment result shows NORMAL, the system is normal.
·If the judgment result shows ABNORMAL, the system has a malfunction.
·If the judgment result shows INCOMPLETE, perform the normal judgment procedure again.
Clear the DTCs (even if no DTCs are stored, perform the clear DTC procedure).
Turn the ignition switch off and wait for 2 minutes or more.
With ignition switch on (IG) and wait for 5 seconds or more.
Enter the following menus: Powertrain / Hybrid Control / Utility / All Readiness.
Check the DTC judgment result.
- HINT:
- ·
If the judgment result shows NORMAL, the system is normal.
·If the judgment result shows ABNORMAL, the system has a malfunction.
·If the judgment result shows INCOMPLETE, perform the normal judgment procedure again.
WIRING DIAGRAM
Refer to the wiring diagram for DTC P0A3011.
Click hereEngine / Hybrid System>HYBRID / BATTERY CONTROL>HYBRID CONTROL SYSTEM>P0A3011
PROCEDURE
Pre-procedure1
None.
Procedure1
Check for DTCs.
- Powertrain > Hybrid Control > Trouble Codes
- 50001 397
- Result:
Result Proceed to No DTCs are output, or DTCs except the ones in the table below are also output. A Any of the following DTCs are also output. B
| Relevant DTC | |
|---|---|
| P0A3011 | Drive Motor "B" Temperature Sensor Circuit Short to Ground |
| P0A3015 | Drive Motor "B" Temperature Sensor Circuit Short to Battery or Open |
Post-procedure1
Turn the ignition switch off.
A
B
Click hereEngine / Hybrid System>HYBRID / BATTERY CONTROL>HYBRID CONTROL SYSTEM>P0A2A11
- Result:
Result Proceed to OK A NG (The connector is not connected securely.) B NG (The terminals are not making secure contact or are deformed, or water or foreign matter exists in the connector.) C
A
B
C
Pre-procedure1
Disconnect the H44 hybrid vehicle control ECU connector.
Procedure1
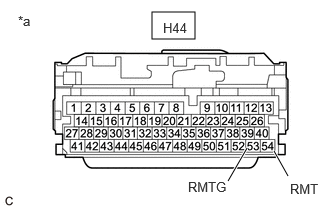
| *a | Front view of wire harness connector
(to Hybrid Vehicle Control ECU) |
Measure the resistance according to the value(s) in the table below.
- Standard Resistance:
Tester Connection Condition Specified Condition Click Location & Routing(H44)Location & Routingewd_type=routing;type=c;code=H44
Click Connector(H44)Instrument Panel>Instrument Panel Wire / Speaker Wire>Hybrid Vehicle Control ECUewd_type=component;type=c;code=H44;pinno=54,53
H44-54 (RMT) - H44-53 (RMTG) Ignition switch off 0.343 to 1442 kΩ
- Result:
Proceed to OK NG
Post-procedure1
Reconnect the H44 hybrid vehicle control ECU connector.
OK
NG
Click hereEngine / Hybrid System>HYBRID / BATTERY CONTROL>HYBRID CONTROL SYSTEM>P0A3011
- Result:
Result Proceed to OK A NG (The connector is not connected securely.) B NG (The terminals are not making secure contact or are deformed, or water or foreign matter exists in the connector.) C
A
B
C
Pre-procedure1
Disconnect the OH3 floor wire connector.
Disconnect the H44 hybrid vehicle control ECU connector.
Procedure1
Measure the resistance according to the value(s) in the table below.
- HINT:
-
When performing the measurement, lightly jiggle the wire harness up and down and left and right and confirm that the resistance does not fluctuate.
- Standard Resistance (Check for Open):
Tester Connection Condition Specified Condition Click Location & Routing(OH3,H44)Location & Routingewd_type=routing;type=w,c;code=OH3,H44
Click Connector(OH3)Instrument Panel>Floor Wire>Floor Wire and Instrument Panel Wireewd_type=component;type=w;code=OH3;pinno=2,1
Click Connector(H44)Instrument Panel>Instrument Panel Wire / Speaker Wire>Hybrid Vehicle Control ECUewd_type=component;type=c;code=H44;pinno=54,53
OH3-2 (RMT) - H44-54 (RMT) Ignition switch off Below 1 Ω OH3-1 (RMTG) - H44-53 (RMTG) Ignition switch off Below 1 Ω
- Standard Resistance (Check for Short):
Tester Connection Condition Specified Condition Click Location & Routing(OH3,H44)Location & Routingewd_type=routing;type=w,c;code=OH3,H44
Click Connector(OH3)Instrument Panel>Floor Wire>Floor Wire and Instrument Panel Wireewd_type=component;type=w;code=OH3;pinno=2,1
Click Connector(H44)Instrument Panel>Instrument Panel Wire / Speaker Wire>Hybrid Vehicle Control ECUewd_type=component;type=c;code=H44;pinno=54,53
OH3-2 (RMT) or H44-54 (RMT) - Body ground and other terminals Ignition switch off 10 kΩ or higher OH3-1 (RMTG) or H44-53 (RMTG) - Body ground and other terminals Ignition switch off 10 kΩ or higher
- Result:
Proceed to OK NG
Post-procedure1
Reconnect the H44 hybrid vehicle control ECU connector.
Reconnect the OH3 floor wire connector.
OK
NG
Click hereEngine / Hybrid System>HYBRID / BATTERY CONTROL>HYBRID CONTROL SYSTEM>P0A3011
- Result:
Result Proceed to OK A NG (The connector is not connected securely.) B NG (The terminals are not making secure contact or are deformed, or water or foreign matter exists in the connector.) C
A
B
C
Pre-procedure1
Disconnect the UO1 No. 3 frame wire connector.
Disconnect the OH3 floor wire connector.
Procedure1
Measure the resistance according to the value(s) in the table below.
- HINT:
-
When performing the measurement, lightly jiggle the wire harness up and down and left and right and confirm that the resistance does not fluctuate.
- Standard Resistance (Check for Open):
Tester Connection Condition Specified Condition Click Location & Routing(UO1,OH3)Location & Routingewd_type=routing;type=w,w;code=UO1,OH3
Click Connector(UO1)Body>No. 6 Floor Wire>No. 6 Floor Wire and Floor Wireewd_type=component;type=w;code=UO1;pinno=2,8
Click Connector(OH3)Instrument Panel>Floor Wire>Floor Wire and Instrument Panel Wireewd_type=component;type=w;code=OH3;pinno=2,1
UO1-2 (RMT) - OH3-2 (RMT) Ignition switch off Below 1 Ω UO1-8 (RMTG) - OH3-1 (RMTG) Ignition switch off Below 1 Ω
- Standard Resistance (Check for Short):
Tester Connection Condition Specified Condition Click Location & Routing(UO1,OH3)Location & Routingewd_type=routing;type=w,w;code=UO1,OH3
Click Connector(UO1)Body>No. 6 Floor Wire>No. 6 Floor Wire and Floor Wireewd_type=component;type=w;code=UO1;pinno=2,8
Click Connector(OH3)Instrument Panel>Floor Wire>Floor Wire and Instrument Panel Wireewd_type=component;type=w;code=OH3;pinno=2,1
UO1-2 (RMT) or OH3-2 (RMT) - Body ground and other terminals Ignition switch off 10 kΩ or higher UO1-8 (RMTG) or OH3-1 (RMTG) - Body ground and other terminals Ignition switch off 10 kΩ or higher
- Result:
Proceed to OK NG
Post-procedure1
Reconnect the UO1 No. 3 frame wire connector.
Reconnect the OH3 floor wire connector.
OK
NG
Click hereEngine / Hybrid System>HYBRID / BATTERY CONTROL>HYBRID CONTROL SYSTEM>P0A3011
- Result:
Result Proceed to OK A NG (The connector is not connected securely.) B NG (The terminals are not making secure contact or are deformed, or water or foreign matter exists in the connector.) C
A
B
C
Pre-procedure1
Disconnect the UO1 No. 3 frame wire connector.
Disconnect the U1 rear motor temperature sensor connector.
Procedure1
Measure the resistance according to the value(s) in the table below.
- HINT:
-
When performing the measurement, lightly jiggle the wire harness up and down and left and right and confirm that the resistance does not fluctuate.
- Standard Resistance (Check for Open):
Tester Connection Condition Specified Condition Click Location & Routing(UO1,U1)Location & Routingewd_type=routing;type=w,c;code=UO1,U1
Click Connector(UO1)Body>No. 6 Floor Wire>No. 6 Floor Wire and Floor Wireewd_type=component;type=w;code=UO1;pinno=2,8
Click Connector(U1)Body>No. 6 Floor Wire>Rear Traction with Transaxle Motor Assemblyewd_type=component;type=c;code=U1;pinno=2,12
UO1-2 (RMT) - U1-2 (RMT) Ignition switch off Below 1 Ω UO1-8 (RMTG) - U1-12 (RMTG) Ignition switch off Below 1 Ω
- Standard Resistance (Check for Short):
Tester Connection Condition Specified Condition Click Location & Routing(UO1,U1)Location & Routingewd_type=routing;type=w,c;code=UO1,U1
Click Connector(UO1)Body>No. 6 Floor Wire>No. 6 Floor Wire and Floor Wireewd_type=component;type=w;code=UO1;pinno=2,8
Click Connector(U1)Body>No. 6 Floor Wire>Rear Traction with Transaxle Motor Assemblyewd_type=component;type=c;code=U1;pinno=2,12
UO1-2 (RMT) or U1-2 (RMT) - Body ground and other terminals Ignition switch off 10 kΩ or higher UO1-8 (RMTG) or U1-12 (RMTG) - Body ground and other terminals Ignition switch off 10 kΩ or higher
- Result:
Proceed to OK NG
Post-procedure1
Reconnect the U1 rear motor temperature sensor connector.
Reconnect the UO1 No. 3 frame wire connector.
OK
NG
Pre-procedure1
Disconnect the OH3 floor wire connector.
Procedure1
Measure the resistance according to the value(s) in the table below.
- Standard Resistance:
Tester Connection Condition Specified Condition Click Location & Routing(OH3)Location & Routingewd_type=routing;type=w;code=OH3
Click Connector(OH3)Instrument Panel>Floor Wire>Floor Wire and Instrument Panel Wireewd_type=component;type=w;code=OH3;pinno=2,1
OH3-2 (RMT) - OH3-1 (RMTG) Ignition switch off 0.343 to 1442 kΩ
- Result:
Proceed to OK NG
Post-procedure1
Reconnect the OH3 floor wire connector.
OK
NG
Pre-procedure1
Disconnect the UO1 No. 3 flrame wire connector.
Procedure1
Measure the resistance according to the value(s) in the table below.
- Standard Resistance:
Tester Connection Condition Specified Condition Click Location & Routing(UO1)Location & Routingewd_type=routing;type=w;code=UO1
Click Connector(UO1)Body>No. 6 Floor Wire>No. 6 Floor Wire and Floor Wireewd_type=component;type=w;code=UO1;pinno=2,8
UO1-2 (RMT) - UO1-8 (RMTG) Ignition switch off 0.343 to 1442 kΩ
- Result:
Proceed to OK NG
Post-procedure1
Reconnect the UO1 No. 3 frame wire connector.
OK
NG
Click hereEngine / Hybrid System>HYBRID / BATTERY CONTROL>HYBRID CONTROL SYSTEM>P0A3011
- Result:
Proceed to OK NG
OK
NG