LIGHTING (EXT) LIGHTING SYSTEM B243900 Headlight LH Circuit B243A00 Headlight RH Circuit
DESCRIPTION
The light control LED ECU supplies internally boosted voltage to the light control LED ECU so that the current supplied to the LED is always maintained at a constant value.
These DTCs are also output when the main body ECU (multiplex network body ECU) detects malfunctions while monitoring the applied voltage.
| DTC No. | Detection Item | DTC Detection Condition | Trouble Area | DTC Output from | Priority |
|---|---|---|---|---|---|
| B243900 | Headlight LH Circuit | Detection condition:
Ignition switch is to ON, low beam headlights illuminated Malfunction status:
·
LED (LED) malfunction ·
Open/short in LED (LEG) circuit Malfunction duration:
10 seconds or more |
·
Headlight unit assembly LH ·
Harness or connector ·
Light control LED ECU LH |
Main Body | A |
| B243A00 | Headlight RH Circuit | Detection condition:
Ignition switch is to ON, low beam headlights illuminated Malfunction status:
·
LED (LED) malfunction ·
Open/short in LED (LEG) circuit Malfunction duration:
10 seconds or more |
·
Headlight unit assembly RH ·
Harness or connector ·
Light control LED ECU RH |
Main Body | A |
WIRING DIAGRAM
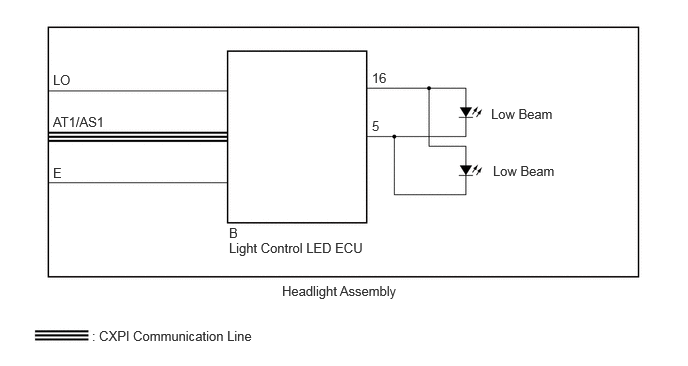
CAUTION / NOTICE / HINT
- NOTICE:
- ·
First perform the communication function inspections in How to Proceed with Troubleshooting to confirm that there are no CAN communication malfunctions before troubleshooting this symptom.
Click hereVehicle Exterior>LIGHTING (EXT)>LIGHTING SYSTEM>HOW TO PROCEED WITH TROUBLESHOOTING
·First perform the communication function inspections in How to Proceed with Troubleshooting to confirm that there are no CXPI communication malfunctions before troubleshooting this symptom.
Click hereVehicle Exterior>LIGHTING (EXT)>LIGHTING SYSTEM>HOW TO PROCEED WITH TROUBLESHOOTING
PROCEDURE
Clear the DTCs.
- Body Electrical > Main Body > Clear DTCs
- 50002 449
- Result:
Proceed to NEXT
NEXT
Pre-procedure 1
Turn ignition switch to ON.
Operate the light control switch to turn on the low beam headlights and wait 10 seconds or more.
Procedure 1
Check for DTCs.
- Body Electrical > Main Body > Trouble Codes
- 50001 449
- Result:
Result Proceed to B243900 is not output A B243900 is output B
Post-procedure 1
None
A
B
Clear the DTCs.
- Body Electrical > Main Body > Clear DTCs
- 50002 449
- Result:
Proceed to NEXT
NEXT
Pre-procedure 1
Turn ignition switch to ON.
Operate the light control switch to turn on the low beam headlights and wait 10 seconds or more.
Procedure 1
Check for DTCs.
- Body Electrical > Main Body > Trouble Codes
- 50001 449
- Result:
Result Proceed to B243A00 is not output A B243A00 is output B
Post-procedure 1
None
A
Click hereGeneral>INTRODUCTION>HOW TO TROUBLESHOOT ECU CONTROLLED SYSTEMS>HOW TO PROCEED WITH TROUBLESHOOTING
B
Interchange the headlight unit assembly RH with LH and connect the connectors.
- HINT:
-
Click hereVehicle Exterior>LIGHTING (EXT)>HEADLIGHT ASSEMBLY (for Halogen Headlight)>DISASSEMBLY
- Result:
Proceed to NEXT
NEXT
Clear the DTCs.
- Body Electrical > Main Body > Clear DTCs
- 50002 449
- Result:
Proceed to NEXT
NEXT
Pre-procedure 1
Turn ignition switch to ON.
Operate the light control switch to turn on the low beam headlights and wait 10 seconds or more.
Procedure 1
Check for DTCs.
- Body Electrical > Main Body > Trouble Codes
- 50001 449
- Result:
Result Proceed to B243A00 is output A B243A00 is not output B
Post-procedure 1
None
A
B
Pre-procedure 1
Remove the headlight unit assembly LH.
- HINT:
-
Click hereVehicle Exterior>LIGHTING (EXT)>HEADLIGHT ASSEMBLY (for Halogen Headlight)>DISASSEMBLY
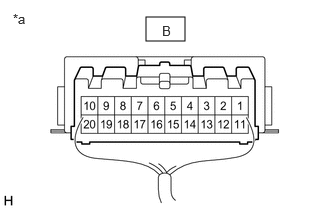
| *a | Component with harness connected
(Light Control LED ECU LH) |
Procedure 1
Measure the resistance according to the value(s) in the table below.
- Standard Resistance:
Tester Connection Condition Specified Condition B-16 - B-5 Light control switch in HEAD position 11 to 14 V
- Result:
Proceed to OK NG
Post-procedure 1
None
OK
NG
Interchange the headlight unit assembly LH with RH and connect the connectors.
- HINT:
-
Click hereVehicle Exterior>LIGHTING (EXT)>HEADLIGHT ASSEMBLY (for Halogen Headlight)>DISASSEMBLY
Clear the DTCs.
- Body Electrical > Main Body > Clear DTCs
- 50002 449
- Result:
Proceed to NEXT
NEXT
Clear the DTCs.
- Body Electrical > Main Body > Clear DTCs
- 50002 449
- Result:
Proceed to NEXT
NEXT
Pre-procedure 1
Turn ignition switch to ON.
Operate the light control switch to turn on the low beam headlights and wait 10 seconds or more.
Procedure 1
Check for DTCs.
- Body Electrical > Main Body > Trouble Codes
- 50001 449
- Result:
Result Proceed to B243900 is output A B243900 is not output B
Post-procedure 1
None
A
B
Pre-procedure 1
Remove the headlight unit assembly LH.
- HINT:
-
Click hereVehicle Exterior>LIGHTING (EXT)>HEADLIGHT ASSEMBLY (for Halogen Headlight)>DISASSEMBLY
Procedure 1
| *a | Component with harness connected
(Light Control LED ECU LH) |
Measure the resistance according to the value(s) in the table below.
- Standard Resistance:
Tester Connection Condition Specified Condition B-16 - B-5 Light control switch in HEAD position 11 to 14 V
- Result:
Proceed to OK NG
Post-procedure 1
None
OK
NG