INTERIOR PANELS / TRIM INSTRUMENT PANEL SAFETY PAD INSTALLATION
CAUTION / NOTICE / HINT
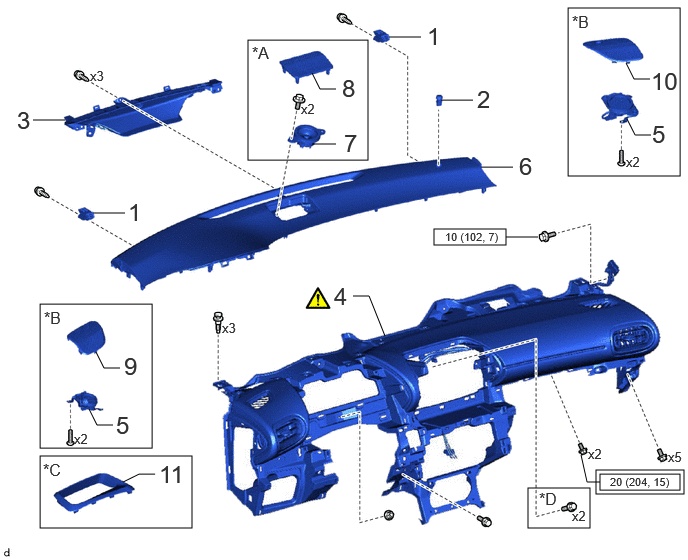
| Procedure | Part Name Code | 
|

|

|
|
|---|---|---|---|---|---|
| 1 | NO. 1 INSTRUMENT PANEL PIN | 55328 | - | - | - |
| 2 | AUTOMATIC LIGHT CONTROL SENSOR | 89120A | - | - | - |
| 3 | DEFROSTER NOZZLE ASSEMBLY | 55950G | - | - | - |
| 4 | INSTRUMENT PANEL SUB-ASSEMBLY | 55302G | ( ) |
- | - |
| 5 | FRONT NO. 3 SPEAKER ASSEMBLY WITH BRACKET | - | - | - | - |
| 6 | INSTRUMENT MAIN PANEL | 55313A | - | - | - |
| 7 | NO. 4 FRONT SPEAKER ASSEMBLY | 86160L | - | - | - |
| 8 | NO. 1 SPEAKER OPENING COVER ASSEMBLY | 55510F | - | - | - |
| 9 | NO. 1 INSTRUMENT PANEL SPEAKER PANEL SUB-ASSEMBLY | 55408F | - | - | - |
| 10 | NO. 2 INSTRUMENT PANEL SPEAKER PANEL SUB-ASSEMBLY | 55409F | - | - | - |
| 11 | INSTRUMENT CLUSTER FINISH END PANEL | 55414A | - | - | - |
| *A | w/ Telematics Transceiver | *B | for 8 Speakers |
| *C | w/ Headup Display | *D | w/o Audio |

|
Tightening torque for "Major areas involving basic vehicle performance such as moving/turning/stopping" : N*m (kgf*cm, ft.*lbf) | 
|
N*m (kgf*cm, ft.*lbf): Specified torque |
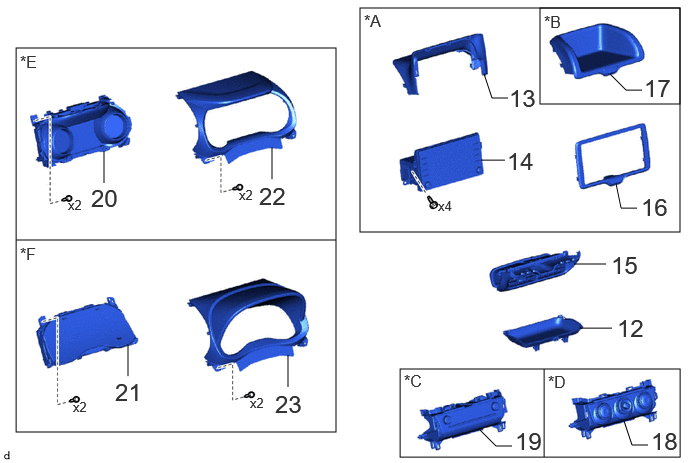
| Procedure | Part Name Code |
|
|
|
|
|---|---|---|---|---|---|
| 12 | INSTRUMENT PANEL CENTER TRAY | 55624A | - | - | - |
| 13 | INSTRUMENT CLUSTER FINISH CENTER PANEL ASSEMBLY | 55420A | - | - | - |
| 14 | RADIO AND DISPLAY RECEIVER ASSEMBLY WITH BRACKET | - | - | - | - |
| 15 | INSTRUMENT PANEL CENTER REGISTER ASSEMBLY | 55670A | - | - | - |
| 16 | INSTRUMENT CLUSTER FINISH CENTER PANEL SUB-ASSEMBLY | 55405B | - | - | - |
| 17 | INSTRUMENT CLUSTER FINISH CENTER PANEL SUB-ASSEMBLY | 55405B | - | - | - |
| 18 | INSTRUMENT CLUSTER FINISH LOWER CENTER PANEL SUB-ASSEMBLY WITH NO. 2 HEATER CONTROL SUB-ASSEMBLY | - | - | - | - |
| 19 | AIR CONDITIONING CONTROL ASSEMBLY | 55900 | - | - | - |
| 20 | COMBINATION METER ASSEMBLY | 83100 | - | - | - |
| 21 | COMBINATION METER ASSEMBLY | 83100 | - | - | - |
| 22 | INSTRUMENT CLUSTER FINISH PANEL ASSEMBLY | 55410C | - | - | - |
| 23 | INSTRUMENT CLUSTER FINISH PANEL ASSEMBLY | 55410C | - | - | - |
| *A | w/ Audio | *B | w/o Audio |
| *C | for Automatic Air Conditioning System | *D | for Manual Air Conditioning System |
| *E | for Digital Meter | *F | for Analog Meter |
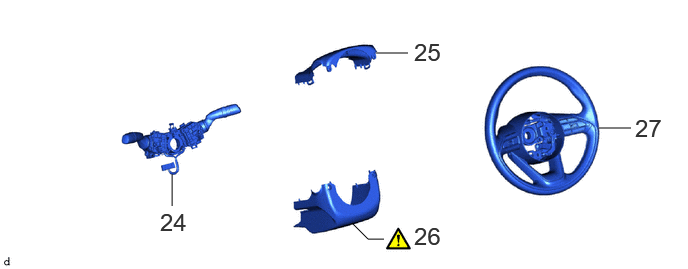
| Procedure | Part Name Code |
|
|
|
|
|---|---|---|---|---|---|
| 24 | TURN SIGNAL SWITCH ASSEMBLY WITH SPIRAL CABLE SUB-ASSEMBLY | - | - | - | - |
| 25 | UPPER STEERING CLUMN COVER | 45286B | - | - | - |
| 26 | LOWER STEERING CLUMN COVER | 45287 | ()
|
- | - |
| 27 | STEERING WHEEL ASSEMBLY | 45100 | - | - | - |
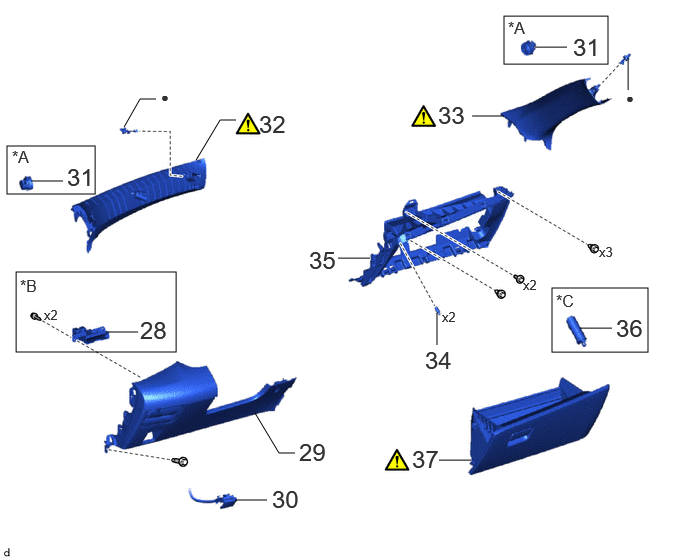
| Procedure | Part Name Code |
|
|
|
|
|---|---|---|---|---|---|
| 28 | INSTRUMENT PANEL HOLE COVER | 55548A | - | - | - |
| 29 | LOWER INSTRUMENT PANEL FINISH PANEL ASSEMBLY | 55480D | - | - | - |
| 30 | HOOD LOCK CONTROL LEVER SUB-ASSEMBLY | 53601 | - | - | - |
| 31 | FRONT NO. 2 SPEAKER ASSEMBLY | 86160P | - | - | - |
| 32 | FRONT PILLAR GARNISH LH | 62212 | ()
|
- | - |
| 33 | FRONT PILLAR GARNISH RH | 62211 | ()
|
- | - |
| 34 | GLOVE COMPARTMENT DOOR CHECK CUSHION | 55557A | - | - | - |
| 35 | LOWER NO. 2 INSTRUMENT PANEL FINISH PANEL | 55433B | - | - | - |
| 36 | GLOVE COMPARTMENT DOOR STOPPER SUB-ASSEMBLY | 55054 | - | - | - |
| 37 | GLOVE COMPARTMENT DOOR ASSEMBLY | 55550 | ()
|
- | - |
| *A | for 6 or 8 Speakers | *B | for TMC Made |
| *C | for TMMF Made | - | - |
| ● | Non-reusable part | - | - |
| Procedure | Part Name Code |
|
|
|
|
|---|---|---|---|---|---|
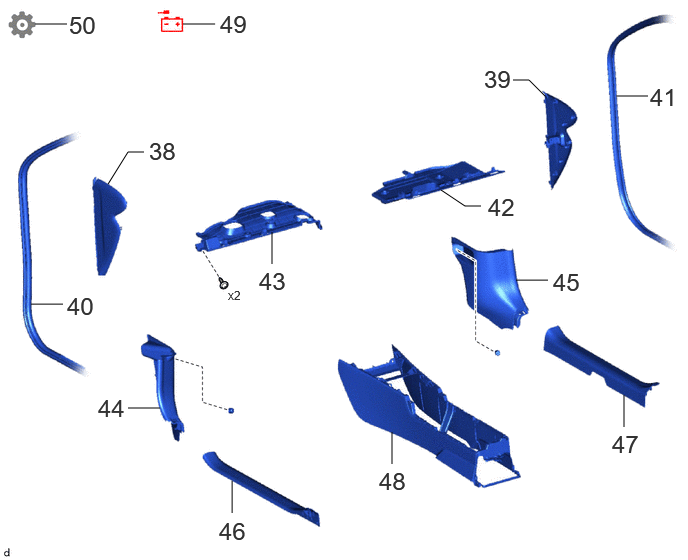
| 38 | NO. 1 INSTRUMENT SIDE PANEL | 55317E | - | - | - |
| 39 | NO. 2 INSTRUMENT SIDE PANEL | 55318F | - | - | - |
| 40 | FRONT DOOR OPENING TRIM WEATHERSTRIP LH | 62312B | - | - | - |
| 41 | FRONT DOOR OPENING TRIM WEATHERSTRIP RH | 62311B | - | - | - |
| 42 | NO. 2 INSTRUMENT PANEL UNDER COVER SUB-ASSEMBLY | 55607 | - | - | - |
| 43 | NO. 1 INSTRUMENT PANEL UNDER COVER SUB-ASSEMBLY | 55606 | - | - | - |
| 44 | COWL SIDE TRIM BOARD LH | 62112 | - | - | - |
| 45 | COWL SIDE TRIM BOARD RH | 62111C | - | - | - |
| 46 | FRONT DOOR SCUFF PLATE LH | 67914B | - | - | - |
| 47 | FRONT DOOR SCUFF PLATE RH | 67913B | - | - | - |
| 48 | REAR CONSOLE BOX ASSEMBLY | 58910C | - | - | - |
| 49 | CABLE TO NEGATIVE BATTERY TERMINAL | - | - | - | - |
| 50 | INITIALIZATION AFTER RECONNECTING AUXILIARY BATTERY TERMINAL | - | - | - | ()
|
CAUTION / NOTICE / HINT
- HINT:
- ·
Use the same procedure for the RHD and LHD.
·The following procedure is for LHD.
PROCEDURE

 55328
1.INSTALL NO. 1 INSTRUMENT PANEL PIN
89120A
2.INSTALL AUTOMATIC LIGHT CONTROL SENSOR
55950G
3.INSTALL DEFROSTER NOZZLE ASSEMBLY
55302C
4.INSTALL INSTRUMENT PANEL SUB-ASSEMBLY
When installing a new instrument panel sub-assembly:
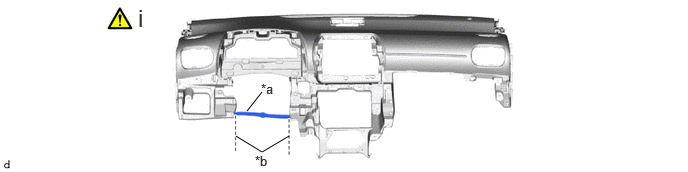
| *a | Runner Portion | *b | Cut Off |
Using a nipper, cut off both ends of the runner portion.
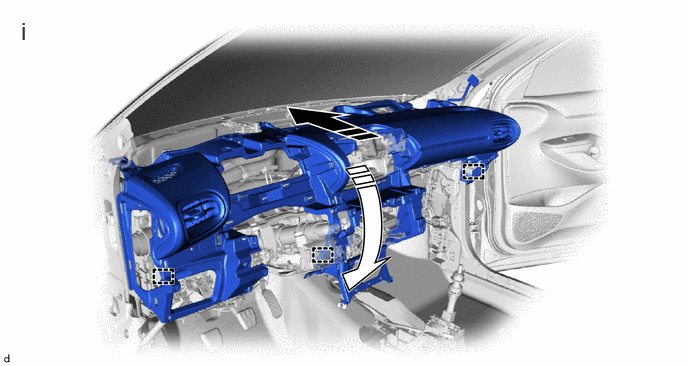

|
Install in this Direction (1) | 
|
Install in this Direction (2) |
Engage the guides to install the instrument panel sub-assembly.
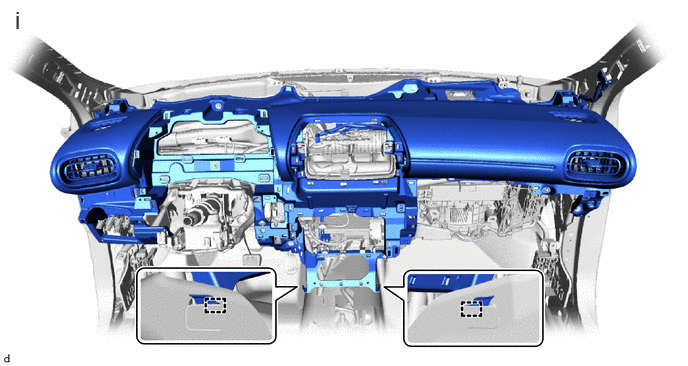
Engage the hooks.
w/o Audio:
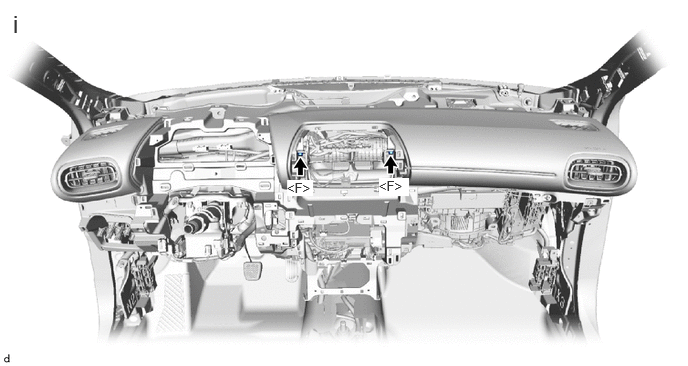
Install the 2 bolt <F>.
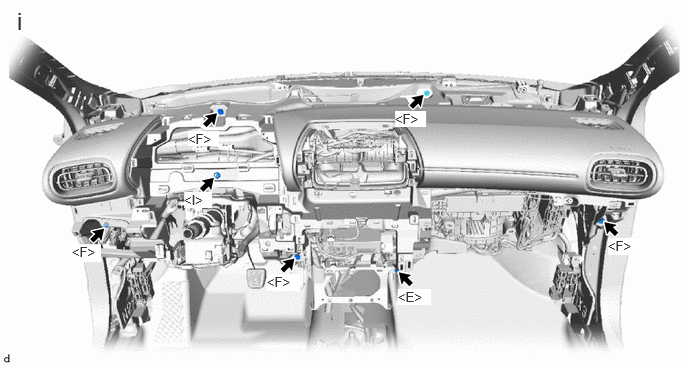
Install the 5 bolts <F>, screw <E> and nut <I>.
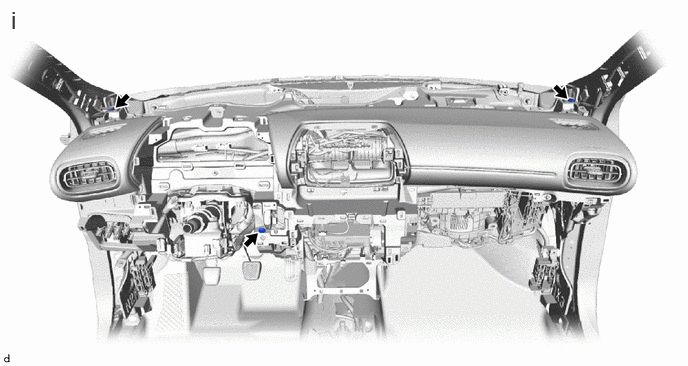
Install the 3 clips.
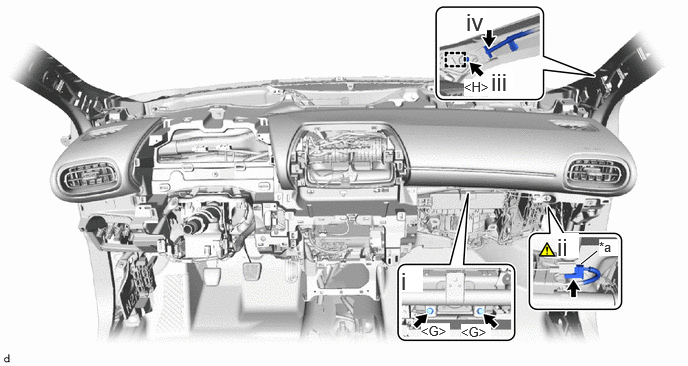
| *a | Airbag Connector | - | - |
Install the 2 bolts <G>.
- Torque:
- 20 N*m (204 kgf*cm, 15 ft.*lbf)
Connect the airbag connector.
- NOTICE:
-
When disconnecting airbag connector, take care not to damage the airbag wire harness.
- HINT:
-
Refer to How to Connect or Disconnect Airbag Connector:
Engage the guide and install the ground bracket with the bolt <H>.
- Torque:
- 10 N*m (102 kgf*cm, 7 ft.*lbf)
Connect the connector.
5.INSTALL FRONT NO. 3 SPEAKER ASSEMBLY WITH BRACKET (for 8 Speakers)
55313A
6.INSTALL INSTRUMENT MAIN PANEL
86160L
7.INSTALL NO. 4 FRONT SPEAKER ASSEMBLY (w/ Telematics Transceiver)
55510F
8.INSTALL NO. 1 SPEAKER OPENING COVER ASSEMBLY (w/ Telematics Transceiver)
55408F
9.INSTALL NO. 1 INSTRUMENT PANEL SPEAKER PANEL SUB-ASSEMBLY (for 8 Speakers)
55409F
10.INSTALL NO. 2 INSTRUMENT PANEL SPEAKER PANEL SUB-ASSEMBLY (for 8 Speakers)
55414A
11.INSTALL INSTRUMENT CLUSTER FINISH END PANEL (w/ Headup Display)
55624A
12.INSTALL INSTRUMENT PANEL CENTER TRAY
55420A
13.INSTALL INSTRUMENT CLUSTER FINISH CENTER PANEL ASSEMBLY (w/ Audio)
86140A
14.INSTALL RADIO AND DISPLAY RECEIVER ASSEMBLY WITH BRACKET (w/ Audio)
55670A
15.INSTALL INSTRUMENT PANEL CENTER REGISTER ASSEMBLY
55405B
16.INSTALL INSTRUMENT CLUSTER FINISH CENTER PANEL SUB-ASSEMBLY (w/ Audio)
55405B
17.INSTALL INSTRUMENT CLUSTER FINISH CENTER PANEL SUB-ASSEMBLY (w/o Audio)
18.INSTALL INSTRUMENT CLUSTER FINISH LOWER CENTER PANEL SUB-ASSEMBLY WITH NO. 2 HEATER CONTROL SUB-ASSEMBLY (for Manual Air Conditioning System)
55900
19.INSTALL AIR CONDITIONING CONTROL ASSEMBLY (for Automatic Air Conditioning System)
83100
20.INSTALL COMBINATION METER ASSEMBLY (for Digital Meter)
83100
21.INSTALL COMBINATION METER ASSEMBLY (for Analog Meter)
55410C
22.INSTALL INSTRUMENT CLUSTER FINISH PANEL ASSEMBLY (for Digital Meter)
55410C
23.INSTALL INSTRUMENT CLUSTER FINISH PANEL ASSEMBLY (for Analog Meter)
24.INSTALL TURN SIGNAL SWITCH ASSEMBLY WITH SPIRAL CABLE SUB-ASSEMBLY
45286
25.INSTALL UPPER STEERING COLUMN COVER
45286
26.INSTALL LOWER STEERING COLUMN COVER
|
|
Click here()
|
45100
27.INSTALL STEERING WHEEL ASSEMBLY
55548A
28.INSTALL INSTRUMENT PANEL HOLE COVER (for TMC Made)
55480D
29.INSTALL LOWER INSTRUMENT PANEL FINISH PANEL ASSEMBLY
53601
30.CONNECT HOOD LOCK CONTROL LEVER SUB-ASSEMBLY
86160P
31.INSTALL FRONT NO. 2 SPEAKER ASSEMBLY (for 6 or 8 Speakers)
62212
32.INSTALL FRONT PILLAR GARNISH LH

| *a | Protective Cover | - | - |

|
Adhesive Tape | - | - |
Remove the adhesive tape and protective cover.
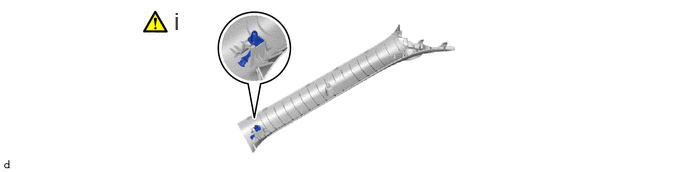
Install a new front pillar garnish clips to the front pillar garnish LH.
- NOTICE:
-
When installing the front pillar garnish clip, make sure to install it in the correct position and facing in the correct direction.
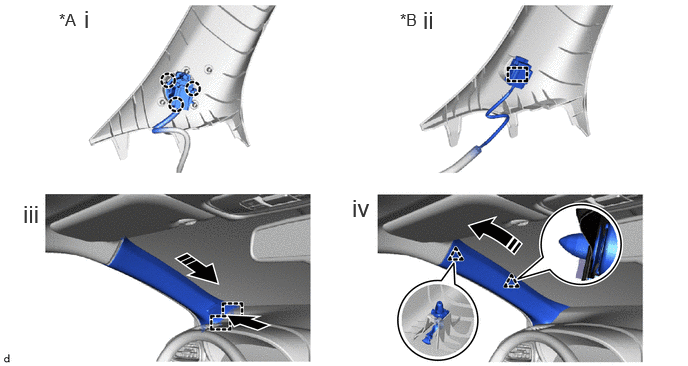
| *A | w/ Speaker | *B | w/o Speaker |

|
Hold Down |
|
Install in this Direction |
w/ Speaker:
1. Engage the claws to connect the No. 2 front speaker assembly.
w/o Speaker:
1. Engage the clamp to connect the wire harness.
While holding down the tip of the front pillar garnish LH, engage the guides as shown in the illustration.
Engage the front pillar garnish clip and clip to install the front pillar garnish LH as shown in the illustration.
62211
33.INSTALL FRONT PILLAR GARNISH RH
55557A
34.INSTALL GLOVE COMPARTMENT DOOR CHECK CUSHION
55433B
35.INSTALL LOWER NO. 2 INSTRUMENT PANEL FINISH PANEL
55054
36.INSTALL GLOVE COMPARTMENT DOOR STOPPER SUB-ASSEMBLY (for TMMF Made)
55550
37.INSTALL GLOVE COMPARTMENT DOOR ASSEMBLY
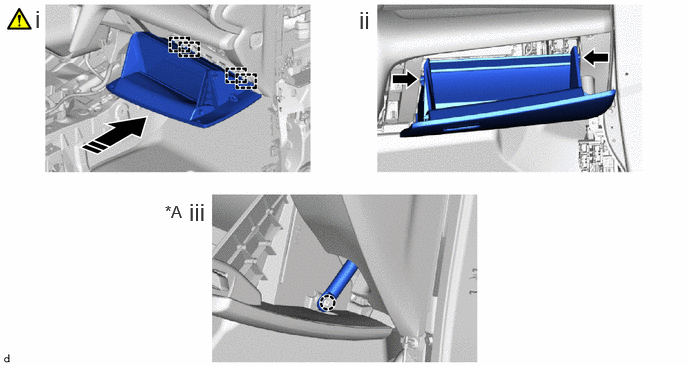
| *A | for TMMF Made | - | - |
|
|
Push |
|
Install in this Direction |
Engage the hinges in the horizontal direction to install the glove compartment door assembly as shown in the illustration.
- NOTICE:
- ·
Engaging the hinges from the top will deform the hinges.
·Be sure to install the glove compartment door assembly horizontally.
While pushing in the sides of the glove compartment door assembly as indicated by the arrows in the illustration, close the door to engage it to the 2 stoppers.
for TMMF Made:
1. Engage the claw.
55317E
38.INSTALL NO. 1 INSTRUMENT SIDE PANEL
55318F
39.INSTALL NO. 2 INSTRUMENT SIDE PANEL
62312B
40.CONNECT FRONT DOOR OPENING TRIM WEATHERSTRIP LH
62311B
41.CONNECT FRONT DOOR OPENING TRIM WEATHERSTRIP RH
55607
42.INSTALL NO. 2 INSTRUMENT PANEL UNDER COVER SUB-ASSEMBLY
55606
43.INSTALL NO. 1 INSTRUMENT PANEL UNDER COVER SUB-ASSEMBLY
62112
44.INSTALL COWL SIDE TRIM BOARD LH
62111C
45.INSTALL COWL SIDE TRIM BOARD RH
67914B
46.INSTALL FRONT DOOR SCUFF PLATE LH
67913B
47.INSTALL FRONT DOOR SCUFF PLATE RH
58910C
48.INSTALL REAR CONSOLE BOX ASSEMBLY
49.CONNECT CABLE TO NEGATIVE AUXILIARY BATTERY TERMINAL
for M15A-FKS:
Click hereGeneral>MAINTENANCE>M15A-FKS AUXILIARY BATTERY>INSTALLATION
for M15A-FXE:
Click hereGeneral>MAINTENANCE>M15A-FXE AUXILIARY BATTERY>INSTALLATION
50. INITIALIZATION AFTER RECONNECTING AUXILIARY BATTERY TERMINAL
Click hereGeneral>SETUP>WHEN DISCONNECTING OR RECONNECTING BATTERY TERMINAL>WORK PROCEDURE
- HINT:
-
When disconnecting and reconnecting the auxiliary battery, there is an automatic learning function that completes learning when the respective system is used.
-
Click hereGeneral>SETUP>WHEN DISCONNECTING OR RECONNECTING BATTERY TERMINAL>AUTOMATIC LEARNING CHART