STOP AND START STOP AND START SYSTEM P323A19 Backup Boost Converter "A" Circuit Current Above Threshold
DESCRIPTION
A backup boost converter is built into the engine stop and start ECU.
The backup boost converter helps maintain auxiliary battery voltage to prevent various functions from failing if power source voltage supplied from the backup boost converter drops due to the high electrical load when the engine is restarted by stop and start control.
The backup boost converter helps maintain the power source voltage if the auxiliary battery voltage drops due to the high electrical load when the engine is restarted by stop and start control.
- HINT:
-
A relay function and fuse function are provided in the backup boost converter.
-
If there is a malfunction in any of the electrical system circuits connected to the backup boost converter, the fuse and relay functions shut off the malfunctioning circuit to protect other circuits (remains shut off until next trip).
-
When the electrical system circuit is shut off, power to the circuit is cut off, causing any systems connected to the circuit to be disabled.
-
The fuse function is reset* when the ignition switch is turned off. If the malfunction still exists in the electrical system circuit that has been shut off by the relay function, it will be shut off again by the relay and fuse functions the next time the ignition switch is turned to ON.
-
*: A semiconductor fuse self resets according to electric signal.
- The backup boost converter supplies power to:·
Meter / gauge system
·Power steering system
·Audio and visual system
·Navigation system
·Headup display system
·Tire pressure warning system
·Toyota Safety Sense
·Air conditioning system (for Automatic Air Conditioning System)
·Clearance Sonar System
| DTC No. | Detection Item | DTC Detection Condition | Trouble Area | Warning Indicate | Memory | DTC Output from | Priority | Note |
|---|---|---|---|---|---|---|---|---|
| P323A19 | Backup Boost Converter "A" Circuit Current Above Threshold | The following condition continues for 1 second or more (1 trip detection logic):
·
Overcurrent is detected at the B41, B42, B43 and IG41 terminals in the engine stop and start ECU |
·
Wire harness or connector ·
Engine stop and start ECU ·
Door control and tire pressure monitoring system receiver assembly ·
Radio and display receiver assembly*1 ·
Navigation ECU*2 ·
Meter mirror subassembly*3 ·
Combination meter assembly ·
Power steering ECU with motor assembly ·
Air conditioning control assembly*4 ·
Millimeter wave radar sensor assembly*5 ·
Clearance warning ECU assembly*6 |
Blinks | DTC stored | Stop and Start | A | SAE Code: P323A |
*1: w/ Radio and Display Receiver Assembly
*2: w/ Navigation System
*3: w/ Headup Display
*4: for Automatic Air conditioning System
*5: w/ Toyota Safety Sense
*6: w/ Clearance Sonar System
CONFIRMATION DRIVING PATTERN
CONFIRMATION AFTER TROUBLESHOOTING
- HINT:
- ·
If the cable is disconnected from the auxiliary battery terminal, stop and start control is prohibited until refresh charge is completed.
In this case, let the vehicle idle to complete the refresh charge. The refresh charge is complete when the Data List item Status of Auxiliary Battery Charge Control changes from "Refresh Charge Mode". (Usually, idling the engine for 5 to 60 minutes with the auxiliary battery fluid temperature at 11°C (52°F) or higher, the refresh charge will be completed.)
·If the GTS is not available and the Data List item Status of Auxiliary Battery Charge Control cannot be checked, charge the auxiliary battery by idling the engine for approximately 5 to 60 minutes or driving the vehicle, and then drive the vehicle and check that stop and start control operates.
If the engine is started with the hood open, the system determines that a jump start has occurred. Therefore, make sure that the hood is closed before starting the engine and driving the vehicle.
·After the refresh charge completes, turn the ignition switch off, wait for at least 30 seconds, and then start the engine again. If the vehicle enters refresh charge mode again while the engine is idling, the initial refresh charge did not properly complete, so wait for the refresh charge to complete.
·Allow the engine to idle for 3 minutes after it is warmed up and check that the engine idle speed is within 50 rpm of the target idle speed.
Clear the DTCs.
- Powertrain > Stop and Start > Clear DTCs
- 50002 392
Start the engine and warm it up.
Drive the vehicle at 7 km/h (4 mph) or more.
- CAUTION:
-
When performing Confirmation Driving Pattern, obey all speed limits and traffic laws.
Stop the vehicle, move the shift lever to neutral and release the clutch pedal.
Keep the engine stopped by stop and start control for 1 second or more.
Depress the clutch pedal and start the engine.
- HINT:
-
If the engine cranks slowly when the engine is restarted, it can be determined that the auxiliary battery voltage is low.
Check that DTCs are not output.
- Powertrain > Stop and Start > Trouble Codes
- 50001 392
STOP AND START SYSTEM OPERATION CHECK
- HINT:
- ·
If the cable is disconnected from the auxiliary battery terminal, stop and start control is prohibited until refresh charge is completed.
In this case, let the vehicle idle to complete the refresh charge. The refresh charge is complete when the Data List item Status of Auxiliary Battery Charge Control changes from "Refresh Charge Mode". (Usually, idling the engine for 5 to 60 minutes with the auxiliary battery fluid temperature at 11°C (52°F) or higher, the refresh charge will be completed.)
·If the GTS is not available and the Data List item Status of Auxiliary Battery Charge Control cannot be checked, charge the auxiliary battery by idling the engine for approximately 5 to 60 minutes or driving the vehicle, and then drive the vehicle and check that stop and start control operates.
If the engine is started with the hood open, the system determines that a jump start has occurred. Therefore, make sure that the hood is closed before starting the engine and driving the vehicle.
·After the refresh charge completes, turn the ignition switch off, wait for at least 30 seconds, and then start the engine again. If the vehicle enters refresh charge mode again while the engine is idling, the initial refresh charge did not properly complete, so wait for the refresh charge to complete.
Start the engine and warm it up.
Turn the air conditioning system off.
Drive the vehicle at 7 km/h (4 mph) or more.
- CAUTION:
-
When performing Confirmation Driving Pattern, obey all speed limits and traffic laws.
Stop the vehicle, move the shift lever to neutral and release the clutch pedal.
Allow the engine to stop by stop and start control.
Depress the clutch pedal and start the engine.
WIRING DIAGRAM
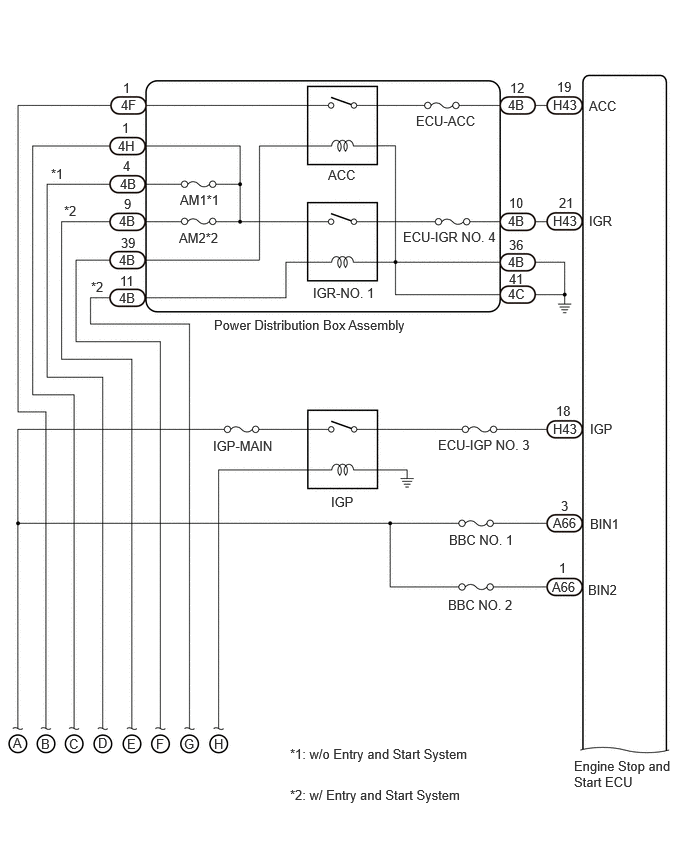
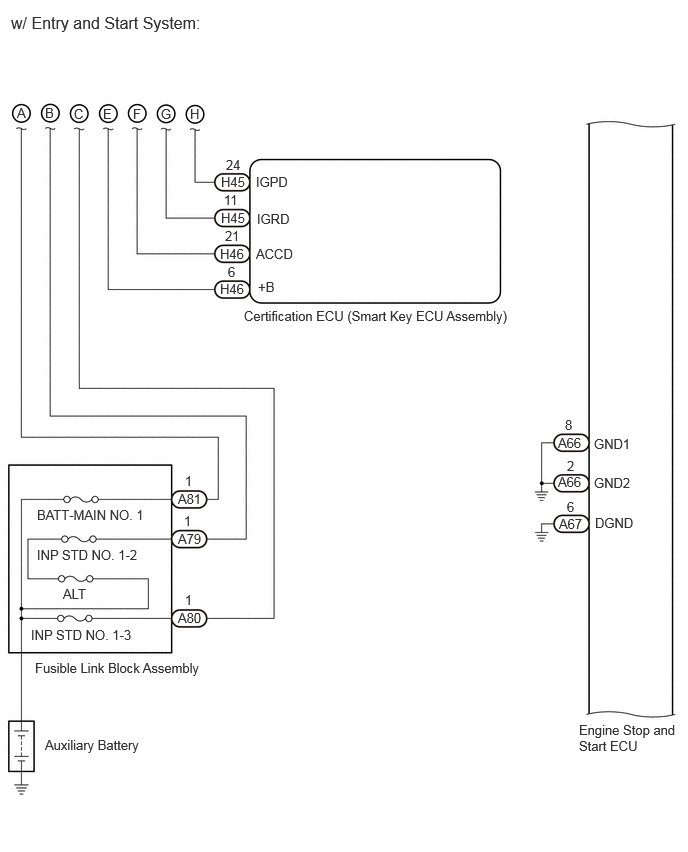
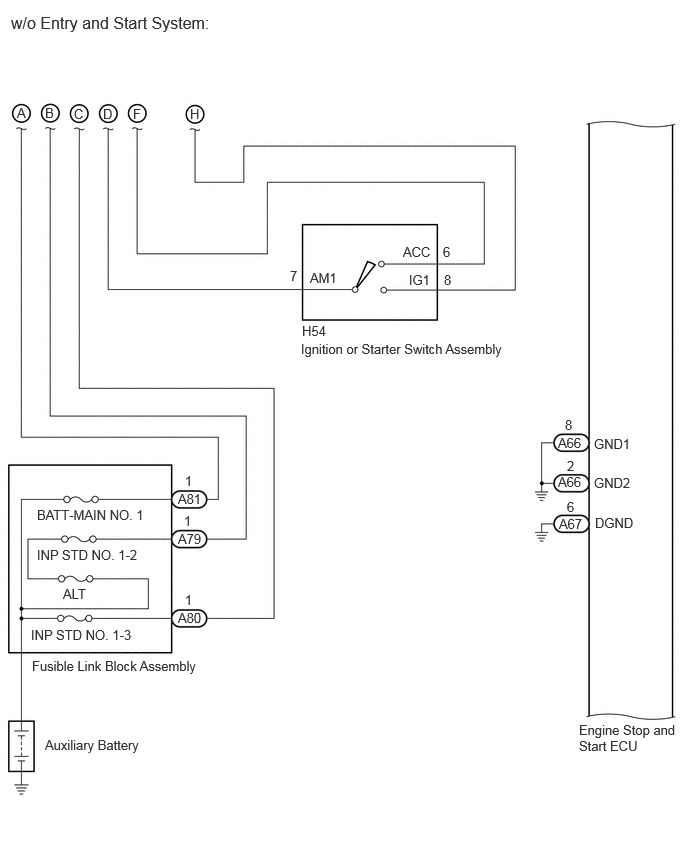
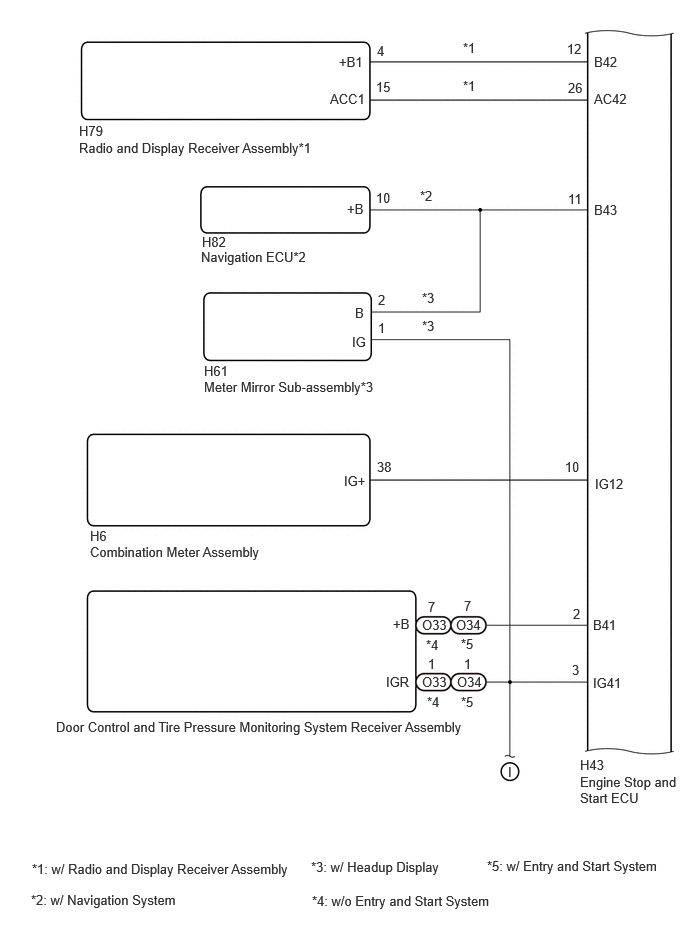
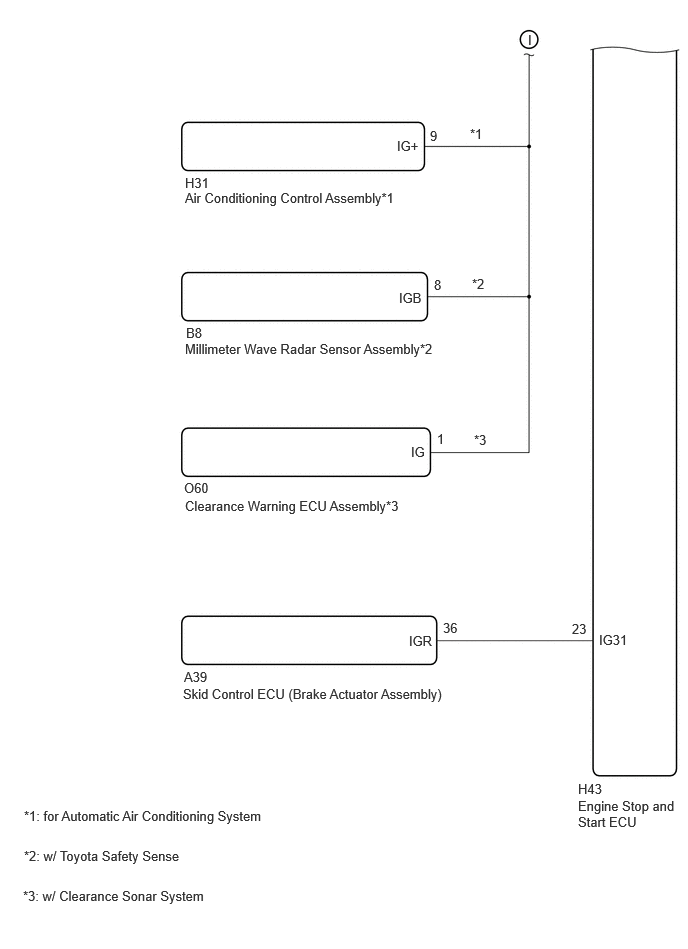
CAUTION / NOTICE / HINT
- NOTICE:
- ·
Before replacing the engine stop and start ECU, read the number of starter operations and write it into a new engine stop and start ECU.
Click hereEngine / Hybrid System>STOP AND START>STOP AND START SYSTEM>REGISTRATION
·After replacing the engine stop and start ECU, perform learning of the external backup boost converter (eco run vehicle converter assembly).
Click hereEngine / Hybrid System>STOP AND START>STOP AND START SYSTEM>REGISTRATION
·After replacing the engine stop and start ECU or air conditioning amplifier assembly, reset and perform learning of the air conditioning information in the engine stop and start ECU.
Click hereEngine / Hybrid System>STOP AND START>STOP AND START SYSTEM>REGISTRATION
·Inspect the fuses for circuits related to this system before performing the following procedure.
- HINT:
- ·
Using the GTS, read the freeze frame data before troubleshooting. System condition information is recorded as freeze frame data the moment a DTC is stored. This information can be useful when troubleshooting.
Click hereEngine / Hybrid System>STOP AND START>STOP AND START SYSTEM>FREEZE FRAME DATA
·If electrical load from additional devices installed to the vehicle (aftermarket audio system, etc.) is applied to the B41, B42, B43, AC42, IG12, IG31 or IG41 terminal in the engine stop and start ECU, the fuse function of the backup boost converter may operate.
If the fuse function of the backup boost converter operates, any systems connected to the B41, B42, B43, AC42, IG12, IG31 or IG41 terminal in the engine stop and start ECU will not operate.
·For wire harness and connector inspection procedures and precautions, refer to "General>INTRODUCTION>HOW TO TROUBLESHOOT ECU CONTROLLED SYSTEMS>ELECTRONIC CIRCUIT INSPECTION PROCEDURE"
·DTCs for the stop and start system are not cleared even if the malfunction has been repaired. After repairing the malfunction, be sure to clear the DTCs.
Click hereEngine / Hybrid System>STOP AND START>STOP AND START SYSTEM>DTC CHECK / CLEAR
PROCEDURE
Pre-procedure1
Disconnect the H43 engine stop and start ECU connector.
Remove the BBC NO. 1 fuse and BBC NO. 2 fuse from the No. 1 engine room relay block.
Procedure1
Measure the resistance according to the value(s) in the table below.
- Standard Resistance:
Tester Connection Condition Specified Condition Click Location & Routing(A66)Location & Routingewd_type=routing;type=c;code=A66
Click Connector(A66)Instrument Panel>Engine Room Main Wire>Engine Stop and Start ECUewd_type=component;type=c;code=A66;pinno=1,3
A66-1 (BIN2) - 2 (BBC NO. 2 fuse) Always Below 1 Ω A66-3 (BIN1) - 2 (BBC NO. 1 fuse) Always Below 1 Ω A66-1 (BIN2) - Body ground and other terminals Always 10 kΩ or higher 2 (BBC NO. 2 fuse holder) - Body ground and other terminals Always 10 kΩ or higher A66-3 (BIN1) - Body ground and other terminals Always 10 kΩ or higher 2 (BBC NO. 1 fuse holder) - Body ground and other terminals Always 10 kΩ or higher
- Result:
Proceed to OK NG
Post-procedure1
None.
OK
NG
Pre-procedure1
Disconnect the H43 engine stop and start ECU connector.
Disconnect the H6 combination meter assembly connector.
Disconnect the A39 skid control ECU (brake actuator assembly) connector.
Procedure1
Measure the resistance according to the value(s) in the table below.
Click hereEngine / Hybrid System>STOP AND START>STOP AND START SYSTEM>TERMINALS OF ECU
- Standard Resistance:
Tester Connection Condition Specified Condition Click Location & Routing(H43,H6,A39)Location & Routingewd_type=routing;type=c,c,c;code=H43,H6,A39
Click Connector(H43)Instrument Panel>Instrument Panel Wire / Speaker Wire>Engine Stop and Start ECUewd_type=component;type=c;code=H43;pinno=10,23
Click Connector(H6)Instrument Panel>Instrument Panel Wire / Speaker Wire>Combination Meter Assemblyewd_type=component;type=c;code=H6;pinno=38
Click Connector(A39)Engine Compartment>Engine Room Main Wire>Brake Actuator Assemblyewd_type=component;type=c;code=A39;pinno=36
H43-10 (IG12) - H6-38 (IG+) Always Below 1 Ω H43-23 (IG31) - A39-36 (IGR) Always Below 1 Ω H43-10 (IG12) - Body ground and other terminals Always 10 kΩ or higher H43-23 (IG31) - Body ground and other terminals Always 10 kΩ or higher
- Result:
Proceed to OK NG
Post-procedure1
None.
OK
NG
Check the vehicle specification
- Result:
Result Proceed to w/ Entry and Start System A w/o Entry and Start System B
A
B
Pre-procedure1
Disconnect the H43 engine stop and start ECU connector.
Disconnect the O34 door control and tire pressure monitoring system receiver assembly connector.
Procedure1
Measure the resistance according to the value(s) in the table below.
Click hereEngine / Hybrid System>STOP AND START>STOP AND START SYSTEM>TERMINALS OF ECU
- Standard Resistance:
Tester Connection Condition Specified Condition Click Location & Routing(H43,O34)Location & Routingewd_type=routing;type=c,c;code=H43,O34
Click Connector(H43)Instrument Panel>Instrument Panel Wire / Speaker Wire>Engine Stop and Start ECUewd_type=component;type=c;code=H43;pinno=2
Click Connector(O34)Body>Floor Wire>Tire Pressure Warning ECU and Receiver (Electrical Key and Tire Pressure Monitoring System Receiver Assembly)ewd_type=component;type=c;code=O34;pinno=7
H43-2 (B41) - O34-7 (+B) Always Below 1 Ω H43-2 (B41) - Body ground and other terminals Always 10 kΩ or higher
- Result:
Proceed to OK NG
Post-procedure1
None.
OK
NG
Check the vehicle specification
- Result:
Result Proceed to w/ Navigation System A w/o Navigation System B
A
B
Pre-procedure1
Disconnect the H43 engine stop and start ECU connector.
Disconnect the H82 navigation ECU connector.
Procedure1
Measure the resistance according to the value(s) in the table below.
Click hereEngine / Hybrid System>STOP AND START>STOP AND START SYSTEM>TERMINALS OF ECU
- Standard Resistance:
Tester Connection Condition Specified Condition Click Location & Routing(H43,H82)Location & Routingewd_type=routing;type=c,c;code=H43,H82
Click Connector(H43)Instrument Panel>Instrument Panel Wire / Speaker Wire>Engine Stop and Start ECUewd_type=component;type=c;code=H43;pinno=11
Click Connector(H82)Instrument Panel>Instrument Panel Wire / Speaker Wire>Navigation ECUewd_type=component;type=c;code=H82;pinno=10
H43-11 (B43) - H82-10 (+B) Always Below 1 Ω H43-11 (B43) - Body ground and other terminals Always 10 kΩ or higher
- Result:
Proceed to OK NG
Post-procedure1
None.
OK
NG
Pre-procedure1
Disconnect the H43 engine stop and start ECU connector.
Disconnect theH79 radio and display receiver assembly connector.
Procedure1
Measure the resistance according to the value(s) in the table below.
Click hereEngine / Hybrid System>STOP AND START>STOP AND START SYSTEM>TERMINALS OF ECU
- Standard Resistance:
Tester Connection Condition Specified Condition Click Location & Routing(H43,H79)Location & Routingewd_type=routing;type=c,c;code=H43,H79
Click Connector(H43)Instrument Panel>Instrument Panel Wire / Speaker Wire>Engine Stop and Start ECUewd_type=component;type=c;code=H43;pinno=12
Click Connector(H79)Instrument Panel>Instrument Panel Wire / Speaker Wire>Radio & Display Receiver Assemblyewd_type=component;type=c;code=H79;pinno=4
H43-12 (B42) - H79-4 (+B1) Always Below 1 Ω H43-12 (B42) - Body ground and other terminals Always 10 kΩ or higher
- Result:
Proceed to OK NG
Post-procedure1
None.
OK
NG
Check the vehicle specification
- Result:
Result Proceed to w/ Headup Display A w/o Headup Display B
A
B
Pre-procedure1
Disconnect the H43 engine stop and start ECU connector.
Disconnect the H61 meter mirror sub-assembly connector.
Procedure1
Measure the resistance according to the value(s) in the table below.
Click hereEngine / Hybrid System>STOP AND START>STOP AND START SYSTEM>TERMINALS OF ECU
- Standard Resistance:
Tester Connection Condition Specified Condition Click Location & Routing(H43,H61)Location & Routingewd_type=routing;type=c,c;code=H43,H61
Click Connector(H43)Instrument Panel>Instrument Panel Wire / Speaker Wire>Engine Stop and Start ECUewd_type=component;type=c;code=H43;pinno=11
Click Connector(H61)Instrument Panel>Instrument Panel Wire / Speaker Wire>Meter Mirror Sub-Assemblyewd_type=component;type=c;code=H61;pinno=2
H43-11 (B43) - H61-2(B) Always Below 1 Ω H43-11 (B43) - Body ground and other terminals Always 10 kΩ or higher
- Result:
Proceed to OK NG
Post-procedure1
None.
OK
NG
Check the vehicle specification
- Result:
Result Proceed to for Automatic Air Conditioning System A for Manual Air Conditioning System B
A
B
Pre-procedure1
Disconnect the H43 engine stop and start ECU connector.
Disconnect the H31 air conditioning control assembly connector.
Procedure1
Measure the resistance according to the value(s) in the table below.
Click hereEngine / Hybrid System>STOP AND START>STOP AND START SYSTEM>TERMINALS OF ECU
- Standard Resistance:
Tester Connection Condition Specified Condition Click Location & Routing(H43,H31)Location & Routingewd_type=routing;type=c,c;code=H43,H31
Click Connector(H43)Instrument Panel>Instrument Panel Wire / Speaker Wire>Engine Stop and Start ECUewd_type=component;type=c;code=H43;pinno=3
Click Connector(H31)Instrument Panel>Instrument Panel Wire / Speaker Wire>Air Conditioning Control Assemblyewd_type=component;type=c;code=H31;pinno=9
H43-3 (IG41) - H31-9 (IG+) Always Below 1 Ω H43-3 (IG41) - Body ground and other terminals Always 10 kΩ or higher
- Result:
Proceed to OK NG
Post-procedure1
None.
OK
NG
Check the vehicle specification
- Result:
Result Proceed to w/ Toyota Safety Sense A w/o Toyota Safety Sense B
A
B
Pre-procedure1
Disconnect the H43 engine stop and start ECU connector.
Disconnect the B8 millimeter wave radar sensor assembly connector.
Procedure1
Measure the resistance according to the value(s) in the table below.
Click hereEngine / Hybrid System>STOP AND START>STOP AND START SYSTEM>TERMINALS OF ECU
- Standard Resistance:
Tester Connection Condition Specified Condition Click Location & Routing(H43,B8)Location & Routingewd_type=routing;type=c,c;code=H43,B8
Click Connector(H43)Instrument Panel>Instrument Panel Wire / Speaker Wire>Engine Stop and Start ECUewd_type=component;type=c;code=H43;pinno=3
Click Connector(B8)Engine Compartment>No. 3 Engine Room Wire>Millimeter Wave Radar Sensor Assemblyewd_type=component;type=c;code=B8;pinno=8
H43-3 (IG41) - B8-8 (IGB) Always Below 1 Ω H43-3 (IG41) - Body ground and other terminals Always 10 kΩ or higher
- Result:
Proceed to OK NG
Post-procedure1
None.
OK
NG
Check the vehicle specification
- Result:
Result Proceed to w/ Clearance Sonar System A w/o Clearance Sonar System B
A
B
Pre-procedure1
Disconnect the H43 engine stop and start ECU connector.
Disconnect the O60 clearance warning ECU assembly connector.
Procedure1
Measure the resistance according to the value(s) in the table below.
Click hereEngine / Hybrid System>STOP AND START>STOP AND START SYSTEM>TERMINALS OF ECU
- Standard Resistance:
Tester Connection Condition Specified Condition Click Location & Routing(H43,O60)Location & Routingewd_type=routing;type=c,c;code=H43,O60
Click Connector(H43)Instrument Panel>Instrument Panel Wire / Speaker Wire>Engine Stop and Start ECUewd_type=component;type=c;code=H43;pinno=3
Click Connector(O60)Body>Floor Wire>Clearance Warning ECU Assemblyewd_type=component;type=c;code=O60;pinno=1
H43-3 (IG41) - O60-1 (IG) Always Below 1 Ω H43-3 (IG41) - Body ground and other terminals Always 10 kΩ or higher
- Result:
Proceed to OK NG
Post-procedure1
None.
OK
NG
Pre-procedure1
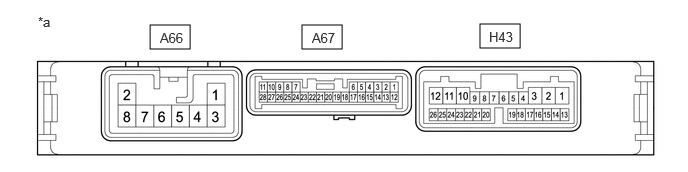
| *a | Component without harness connected
(Engine Stop and Start ECU) |
- | - |
Disconnect the A66, A67 and H43 engine stop and start ECU connectors.
Procedure1
Measure the resistance according to the value(s) in the table below.
Click hereEngine / Hybrid System>STOP AND START>STOP AND START SYSTEM>TERMINALS OF ECU
- Standard Resistance:
Tester Connection Condition Specified Condition Click Location & Routing(H43,A67)Location & Routingewd_type=routing;type=c,c;code=H43,A67
Click Connector(H43)Instrument Panel>Instrument Panel Wire / Speaker Wire>Engine Stop and Start ECUewd_type=component;type=c;code=H43;pinno=2,12,11,3
Click Connector(A67)Instrument Panel>Engine Room Main Wire>Engine Stop and Start ECUewd_type=component;type=c;code=A67;pinno=6
H43-2 (B41) - A67-6 (DGND) Always 10 kΩ or higher H43-12 (B42) - A67-6 (DGND) Always 10 kΩ or higher H43-11 (B43) - A67-6 (DGND) Always 10 kΩ or higher H43-3 (IG41) - A67-6 (DGND) Always 10 kΩ or higher
- Result:
Proceed to OK NG
Post-procedure1
None.
OK
NG
Check that additional devices installed to the vehicle (aftermarket audio system, etc.) are not connected to the B41, B42, B43 or IG41 terminal circuit of the engine stop and start ECU.
- Result:
Result Proceed to Load from an additional device installed to the vehicle (aftermarket audio system, etc.) is not applied. A Load from an additional device installed to the vehicle (aftermarket audio system, etc.) is applied. B
A
B
Pre-procedure1
Disconnect the H43 engine stop and start ECU connector.
Disconnect the O33 door control and tire pressure monitoring system receiver assembly connector.
Procedure1
Measure the resistance according to the value(s) in the table below.
Click hereEngine / Hybrid System>STOP AND START>STOP AND START SYSTEM>TERMINALS OF ECU
- Standard Resistance:
Tester Connection Condition Specified Condition Click Location & Routing(H43,O33)Location & Routingewd_type=routing;type=c,c;code=H43,O33
Click Connector(H43)Instrument Panel>Instrument Panel Wire / Speaker Wire>Engine Stop and Start ECUewd_type=component;type=c;code=H43;pinno=2
Click Connector(O33)Body>Floor Wire>Tire Pressure Warning ECU and Receiver (Door Control and Tire Pressure Monitoring System Receiver Assembly)ewd_type=component;type=c;code=O33;pinno=7
H43-2 (B41) - O33-7 (+B) Always Below 1 Ω H43-2 (B41) - Body ground and other terminals Always 10 kΩ or higher
- Result:
Proceed to OK NG
Post-procedure1
None.
OK
NG
Check the vehicle specification
- Result:
Result Proceed to w/ Clearance Sonar System A w/o Clearance Sonar System B
A
B
Pre-procedure1
Disconnect the H43 engine stop and start ECU connector.
Disconnect the O60 clearance warning ECU assembly connector.
Procedure1
Measure the resistance according to the value(s) in the table below.
Click hereEngine / Hybrid System>STOP AND START>STOP AND START SYSTEM>TERMINALS OF ECU
- Standard Resistance:
Tester Connection Condition Specified Condition Click Location & Routing(H43,O60)Location & Routingewd_type=routing;type=c,c;code=H43,O60
Click Connector(H43)Instrument Panel>Instrument Panel Wire / Speaker Wire>Engine Stop and Start ECUewd_type=component;type=c;code=H43;pinno=3
Click Connector(O60)Body>Floor Wire>Clearance Warning ECU Assemblyewd_type=component;type=c;code=O60;pinno=1
H43-3 (IG41) - O60-1 (IG) Always Below 1 Ω H43-3 (IG41) - Body ground and other terminals Always 10 kΩ or higher
- Result:
Proceed to OK NG
Post-procedure1
None.
OK
NG
Check the vehicle specification
- Result:
Result Proceed to w/ Toyota Safety Sense A w/o Toyota Safety Sense B
A
B
Pre-procedure1
Disconnect the H43 engine stop and start ECU connector.
Disconnect the B8 millimeter wave radar sensor assembly connector.
Procedure1
Measure the resistance according to the value(s) in the table below.
Click hereEngine / Hybrid System>STOP AND START>STOP AND START SYSTEM>TERMINALS OF ECU
- Standard Resistance:
Tester Connection Condition Specified Condition Click Location & Routing(H43,B8)Location & Routingewd_type=routing;type=c,c;code=H43,B8
Click Connector(H43)Instrument Panel>Instrument Panel Wire / Speaker Wire>Engine Stop and Start ECUewd_type=component;type=c;code=H43;pinno=3
Click Connector(B8)Engine Compartment>No. 3 Engine Room Wire>Millimeter Wave Radar Sensor Assemblyewd_type=component;type=c;code=B8;pinno=8
H43-3 (IG41) - B8-8 (IGB) Always Below 1 Ω H43-3 (IG41) - Body ground and other terminals Always 10 kΩ or higher
- Result:
Proceed to OK NG
Post-procedure1
None.
OK
NG
Check the vehicle specification
- Result:
Result Proceed to w/ Clearance Sonar System A w/o Clearance Sonar System B
A
B
Pre-procedure1
Disconnect the H43 engine stop and start ECU connector.
Disconnect the O60 clearance warning ECU assembly connector.
Procedure1
Measure the resistance according to the value(s) in the table below.
Click hereEngine / Hybrid System>STOP AND START>STOP AND START SYSTEM>TERMINALS OF ECU
- Standard Resistance:
Tester Connection Condition Specified Condition Click Location & Routing(H43,O60)Location & Routingewd_type=routing;type=c,c;code=H43,O60
Click Connector(H43)Instrument Panel>Instrument Panel Wire / Speaker Wire>Engine Stop and Start ECUewd_type=component;type=c;code=H43;pinno=3
Click Connector(O60)Body>Floor Wire>Clearance Warning ECU Assemblyewd_type=component;type=c;code=O60;pinno=1
H43-3 (IG41) - O60-1 (IG) Always Below 1 Ω H43-3 (IG41) - Body ground and other terminals Always 10 kΩ or higher
- Result:
Proceed to OK NG
Post-procedure1
None.
OK
NG
Check the vehicle specification
- Result:
Result Proceed to w/ Clearance Sonar System A w/o Clearance Sonar System B
A
B
Pre-procedure1
Disconnect the H43 engine stop and start ECU connector.
Disconnect the O60 clearance warning ECU assembly connector.
Procedure1
Measure the resistance according to the value(s) in the table below.
Click hereEngine / Hybrid System>STOP AND START>STOP AND START SYSTEM>TERMINALS OF ECU
- Standard Resistance:
Tester Connection Condition Specified Condition Click Location & Routing(H43,O60)Location & Routingewd_type=routing;type=c,c;code=H43,O60
Click Connector(H43)Instrument Panel>Instrument Panel Wire / Speaker Wire>Engine Stop and Start ECUewd_type=component;type=c;code=H43;pinno=3
Click Connector(O60)Body>Floor Wire>Clearance Warning ECU Assemblyewd_type=component;type=c;code=O60;pinno=1
H43-3 (IG41) - O60-1 (IG) Always Below 1 Ω H43-3 (IG41) - Body ground and other terminals Always 10 kΩ or higher
- Result:
Proceed to OK NG
Post-procedure1
None.
OK
NG
Check the vehicle specification
- Result:
Result Proceed to for Automatic Air Conditioning System A for Manual Air Conditioning System B
A
B
Pre-procedure1
Disconnect the H43 engine stop and start ECU connector.
Disconnect the H31 air conditioning control assembly connector.
Procedure1
Measure the resistance according to the value(s) in the table below.
Click hereEngine / Hybrid System>STOP AND START>STOP AND START SYSTEM>TERMINALS OF ECU
- Standard Resistance:
Tester Connection Condition Specified Condition Click Location & Routing(H43,H31)Location & Routingewd_type=routing;type=c,c;code=H43,H31
Click Connector(H43)Instrument Panel>Instrument Panel Wire / Speaker Wire>Engine Stop and Start ECUewd_type=component;type=c;code=H43;pinno=3
Click Connector(H31)Instrument Panel>Instrument Panel Wire / Speaker Wire>Air Conditioning Control Assemblyewd_type=component;type=c;code=H31;pinno=9
H43-3 (IG41) - H31-9 (IG+) Always Below 1 Ω H43-3 (IG41) - Body ground and other terminals Always 10 kΩ or higher
- Result:
Proceed to OK NG
Post-procedure1
None.
OK
NG
Check the vehicle specification
- Result:
Result Proceed to w/ Toyota Safety Sense A w/o Toyota Safety Sense B
A
B
Pre-procedure1
Disconnect the H43 engine stop and start ECU connector.
Disconnect the B8 millimeter wave radar sensor assembly connector.
Procedure1
Measure the resistance according to the value(s) in the table below.
Click hereEngine / Hybrid System>STOP AND START>STOP AND START SYSTEM>TERMINALS OF ECU
- Standard Resistance:
Tester Connection Condition Specified Condition Click Location & Routing(H43,B8)Location & Routingewd_type=routing;type=c,c;code=H43,B8
Click Connector(H43)Instrument Panel>Instrument Panel Wire / Speaker Wire>Engine Stop and Start ECUewd_type=component;type=c;code=H43;pinno=3
Click Connector(B8)Engine Compartment>No. 3 Engine Room Wire>Millimeter Wave Radar Sensor Assemblyewd_type=component;type=c;code=B8;pinno=8
H43-3 (IG41) - B8-8 (IGB) Always Below 1 Ω H43-3 (IG41) - Body ground and other terminals Always 10 kΩ or higher
- Result:
Proceed to OK NG
Post-procedure1
None.
OK
NG
Check the vehicle specification
- Result:
Result Proceed to w/ Clearance Sonar System A w/o Clearance Sonar System B
A
B
Pre-procedure1
Disconnect the H43 engine stop and start ECU connector.
Disconnect the O60 clearance warning ECU assembly connector.
Procedure1
Measure the resistance according to the value(s) in the table below.
Click hereEngine / Hybrid System>STOP AND START>STOP AND START SYSTEM>TERMINALS OF ECU
- Standard Resistance:
Tester Connection Condition Specified Condition Click Location & Routing(H43,O60)Location & Routingewd_type=routing;type=c,c;code=H43,O60
Click Connector(H43)Instrument Panel>Instrument Panel Wire / Speaker Wire>Engine Stop and Start ECUewd_type=component;type=c;code=H43;pinno=3
Click Connector(O60)Body>Floor Wire>Clearance Warning ECU Assemblyewd_type=component;type=c;code=O60;pinno=1
H43-3 (IG41) - O60-1 (IG) Always Below 1 Ω H43-3 (IG41) - Body ground and other terminals Always 10 kΩ or higher
- Result:
Proceed to OK NG
Post-procedure1
None.
OK
NG
Check the vehicle specification
- Result:
Result Proceed to w/ Clearance Sonar System A w/o Clearance Sonar System B
A
B
Pre-procedure1
Disconnect the H43 engine stop and start ECU connector.
Disconnect the O60 clearance warning ECU assembly connector.
Procedure1
Measure the resistance according to the value(s) in the table below.
Click hereEngine / Hybrid System>STOP AND START>STOP AND START SYSTEM>TERMINALS OF ECU
- Standard Resistance:
Tester Connection Condition Specified Condition Click Location & Routing(H43,O60)Location & Routingewd_type=routing;type=c,c;code=H43,O60
Click Connector(H43)Instrument Panel>Instrument Panel Wire / Speaker Wire>Engine Stop and Start ECUewd_type=component;type=c;code=H43;pinno=3
Click Connector(O60)Body>Floor Wire>Clearance Warning ECU Assemblyewd_type=component;type=c;code=O60;pinno=1
H43-3 (IG41) - O60-1 (IG) Always Below 1 Ω H43-3 (IG41) - Body ground and other terminals Always 10 kΩ or higher
- Result:
Proceed to OK NG
Post-procedure1
None.
OK
NG
Check the vehicle specification
- Result:
Result Proceed to w/ Toyota Safety Sense A w/o Toyota Safety Sense B
A
B
Pre-procedure1
Disconnect the H43 engine stop and start ECU connector.
Disconnect the B8 millimeter wave radar sensor assembly connector.
Procedure1
Measure the resistance according to the value(s) in the table below.
Click hereEngine / Hybrid System>STOP AND START>STOP AND START SYSTEM>TERMINALS OF ECU
- Standard Resistance:
Tester Connection Condition Specified Condition Click Location & Routing(H43,B8)Location & Routingewd_type=routing;type=c,c;code=H43,B8
Click Connector(H43)Instrument Panel>Instrument Panel Wire / Speaker Wire>Engine Stop and Start ECUewd_type=component;type=c;code=H43;pinno=3
Click Connector(B8)Engine Compartment>No. 3 Engine Room Wire>Millimeter Wave Radar Sensor Assemblyewd_type=component;type=c;code=B8;pinno=8
H43-3 (IG41) - B8-8 (IGB) Always Below 1 Ω H43-3 (IG41) - Body ground and other terminals Always 10 kΩ or higher
- Result:
Proceed to OK NG
Post-procedure1
None.
OK
NG
Check the vehicle specification
- Result:
Result Proceed to w/ Clearance Sonar System A w/o Clearance Sonar System B
A
B
Pre-procedure1
Disconnect the H43 engine stop and start ECU connector.
Disconnect the O60 clearance warning ECU assembly connector.
Procedure1
Measure the resistance according to the value(s) in the table below.
Click hereEngine / Hybrid System>STOP AND START>STOP AND START SYSTEM>TERMINALS OF ECU
- Standard Resistance:
Tester Connection Condition Specified Condition Click Location & Routing(H43,O60)Location & Routingewd_type=routing;type=c,c;code=H43,O60
Click Connector(H43)Instrument Panel>Instrument Panel Wire / Speaker Wire>Engine Stop and Start ECUewd_type=component;type=c;code=H43;pinno=3
Click Connector(O60)Body>Floor Wire>Clearance Warning ECU Assemblyewd_type=component;type=c;code=O60;pinno=1
H43-3 (IG41) - O60-1 (IG) Always Below 1 Ω H43-3 (IG41) - Body ground and other terminals Always 10 kΩ or higher
- Result:
Proceed to OK NG
Post-procedure1
None.
OK
NG
Check the vehicle specification
- Result:
Result Proceed to w/ Clearance Sonar System A w/o Clearance Sonar System B
A
B
Pre-procedure1
Disconnect the H43 engine stop and start ECU connector.
Disconnect the O60 clearance warning ECU assembly connector.
Procedure1
Measure the resistance according to the value(s) in the table below.
Click hereEngine / Hybrid System>STOP AND START>STOP AND START SYSTEM>TERMINALS OF ECU
- Standard Resistance:
Tester Connection Condition Specified Condition Click Location & Routing(H43,O60)Location & Routingewd_type=routing;type=c,c;code=H43,O60
Click Connector(H43)Instrument Panel>Instrument Panel Wire / Speaker Wire>Engine Stop and Start ECUewd_type=component;type=c;code=H43;pinno=3
Click Connector(O60)Body>Floor Wire>Clearance Warning ECU Assemblyewd_type=component;type=c;code=O60;pinno=1
H43-3 (IG41) - O60-1 (IG) Always Below 1 Ω H43-3 (IG41) - Body ground and other terminals Always 10 kΩ or higher
- Result:
Proceed to OK NG
Post-procedure1
None.
OK
NG
Check the vehicle specification
- Result:
Result Proceed to w/ Audio A w/o Audio B
A
B
Pre-procedure1
Disconnect the H43 engine stop and start ECU connector.
Disconnect the H79 radio and display receiver assembly connector.
Procedure1
Measure the resistance according to the value(s) in the table below.
Click hereEngine / Hybrid System>STOP AND START>STOP AND START SYSTEM>TERMINALS OF ECU
- Standard Resistance:
Tester Connection Condition Specified Condition Click Location & Routing(H43,H79)Location & Routingewd_type=routing;type=c,c;code=H43,H79
Click Connector(H43)Instrument Panel>Instrument Panel Wire / Speaker Wire>Engine Stop and Start ECUewd_type=component;type=c;code=H43;pinno=12,26
Click Connector(H79)Instrument Panel>Instrument Panel Wire / Speaker Wire>Radio & Display Receiver Assemblyewd_type=component;type=c;code=H79;pinno=4,15
H43-12 (B42) - H79-4 (+B1) Always Below 1 Ω H43-26 (AC42) - H79-15 (ACC1) Always Below 1 Ω H43-12 (B42) - Body ground and other terminals Always 10 kΩ or higher H43-26 (AC42) - Body ground and other terminals Always 10 kΩ or higher
- Result:
Proceed to OK NG
Post-procedure1
None.
OK
NG
Check the vehicle specification
- Result:
Result Proceed to w/ Headup Display A w/o Headup Display B
A
B
Pre-procedure1
Disconnect the H43 engine stop and start ECU connector.
Disconnect the H61 meter mirror sub-assembly connector.
Procedure1
Measure the resistance according to the value(s) in the table below.
Click hereEngine / Hybrid System>STOP AND START>STOP AND START SYSTEM>TERMINALS OF ECU
- Standard Resistance:
Tester Connection Condition Specified Condition Click Location & Routing(H43,H61)Location & Routingewd_type=routing;type=c,c;code=H43,H61
Click Connector(H43)Instrument Panel>Instrument Panel Wire / Speaker Wire>Engine Stop and Start ECUewd_type=component;type=c;code=H43;pinno=11
Click Connector(H61)Instrument Panel>Instrument Panel Wire / Speaker Wire>Meter Mirror Sub-Assemblyewd_type=component;type=c;code=H61;pinno=2
H43-11 (B43) - H61-2(B) Always Below 1 Ω H43-11 (B43) - Body ground and other terminals Always 10 kΩ or higher
- Result:
Proceed to OK NG
Post-procedure1
None.
OK
NG
Check the vehicle specification
- Result:
Result Proceed to for Automatic Air Conditioning System A for Manual Air Conditioning System B
A
B
Pre-procedure1
Disconnect the H43 engine stop and start ECU connector.
Disconnect the H31 air conditioning control assembly connector.
Procedure1
Measure the resistance according to the value(s) in the table below.
Click hereEngine / Hybrid System>STOP AND START>STOP AND START SYSTEM>TERMINALS OF ECU
- Standard Resistance:
Tester Connection Condition Specified Condition Click Location & Routing(H43,H31)Location & Routingewd_type=routing;type=c,c;code=H43,H31
Click Connector(H43)Instrument Panel>Instrument Panel Wire / Speaker Wire>Engine Stop and Start ECUewd_type=component;type=c;code=H43;pinno=3
Click Connector(H31)Instrument Panel>Instrument Panel Wire / Speaker Wire>Air Conditioning Control Assemblyewd_type=component;type=c;code=H31;pinno=9
H43-3 (IG41) - H31-9 (IG+) Always Below 1 Ω H43-3 (IG41) - Body ground and other terminals Always 10 kΩ or higher
- Result:
Proceed to OK NG
Post-procedure1
None.
OK
NG
Check the vehicle specification
- Result:
Result Proceed to w/ Toyota Safety Sense A w/o Toyota Safety Sense B
A
B
Pre-procedure1
Disconnect the H43 engine stop and start ECU connector.
Disconnect the B8 millimeter wave radar sensor assembly connector.
Procedure1
Measure the resistance according to the value(s) in the table below.
Click hereEngine / Hybrid System>STOP AND START>STOP AND START SYSTEM>TERMINALS OF ECU
- Standard Resistance:
Tester Connection Condition Specified Condition Click Location & Routing(H43,B8)Location & Routingewd_type=routing;type=c,c;code=H43,B8
Click Connector(H43)Instrument Panel>Instrument Panel Wire / Speaker Wire>Engine Stop and Start ECUewd_type=component;type=c;code=H43;pinno=3
Click Connector(B8)Engine Compartment>No. 3 Engine Room Wire>Millimeter Wave Radar Sensor Assemblyewd_type=component;type=c;code=B8;pinno=8
H43-3 (IG41) - B8-8 (IGB) Always Below 1 Ω H43-3 (IG41) - Body ground and other terminals Always 10 kΩ or higher
- Result:
Proceed to OK NG
Post-procedure1
None.
OK
NG
Check the vehicle specification
- Result:
Result Proceed to w/ Clearance Sonar System A w/o Clearance Sonar System B
A
B
Pre-procedure1
Disconnect the H43 engine stop and start ECU connector.
Disconnect the O60 clearance warning ECU assembly connector.
Procedure1
Measure the resistance according to the value(s) in the table below.
Click hereEngine / Hybrid System>STOP AND START>STOP AND START SYSTEM>TERMINALS OF ECU
- Standard Resistance:
Tester Connection Condition Specified Condition Click Location & Routing(H43,O60)Location & Routingewd_type=routing;type=c,c;code=H43,O60
Click Connector(H43)Instrument Panel>Instrument Panel Wire / Speaker Wire>Engine Stop and Start ECUewd_type=component;type=c;code=H43;pinno=3
Click Connector(O60)Body>Floor Wire>Clearance Warning ECU Assemblyewd_type=component;type=c;code=O60;pinno=1
H43-3 (IG41) - O60-1 (IG) Always Below 1 Ω H43-3 (IG41) - Body ground and other terminals Always 10 kΩ or higher
- Result:
Proceed to OK NG
Post-procedure1
None.
OK
NG
Check the vehicle specification
- Result:
Result Proceed to w/ Clearance Sonar System A w/o Clearance Sonar System B
A
B
Pre-procedure1
Disconnect the H43 engine stop and start ECU connector.
Disconnect the O60 clearance warning ECU assembly connector.
Procedure1
Measure the resistance according to the value(s) in the table below.
Click hereEngine / Hybrid System>STOP AND START>STOP AND START SYSTEM>TERMINALS OF ECU
- Standard Resistance:
Tester Connection Condition Specified Condition Click Location & Routing(H43,O60)Location & Routingewd_type=routing;type=c,c;code=H43,O60
Click Connector(H43)Instrument Panel>Instrument Panel Wire / Speaker Wire>Engine Stop and Start ECUewd_type=component;type=c;code=H43;pinno=3
Click Connector(O60)Body>Floor Wire>Clearance Warning ECU Assemblyewd_type=component;type=c;code=O60;pinno=1
H43-3 (IG41) - O60-1 (IG) Always Below 1 Ω H43-3 (IG41) - Body ground and other terminals Always 10 kΩ or higher
- Result:
Proceed to OK NG
Post-procedure1
None.
OK
NG
Check the vehicle specification
- Result:
Result Proceed to w/ Toyota Safety Sense A w/o Toyota Safety Sense B
A
B
Pre-procedure1
Disconnect the H43 engine stop and start ECU connector.
Disconnect the B8 millimeter wave radar sensor assembly connector.
Procedure1
Measure the resistance according to the value(s) in the table below.
Click hereEngine / Hybrid System>STOP AND START>STOP AND START SYSTEM>TERMINALS OF ECU
- Standard Resistance:
Tester Connection Condition Specified Condition Click Location & Routing(H43,B8)Location & Routingewd_type=routing;type=c,c;code=H43,B8
Click Connector(H43)Instrument Panel>Instrument Panel Wire / Speaker Wire>Engine Stop and Start ECUewd_type=component;type=c;code=H43;pinno=3
Click Connector(B8)Engine Compartment>No. 3 Engine Room Wire>Millimeter Wave Radar Sensor Assemblyewd_type=component;type=c;code=B8;pinno=8
H43-3 (IG41) - B8-8 (IGB) Always Below 1 Ω H43-3 (IG41) - Body ground and other terminals Always 10 kΩ or higher
- Result:
Proceed to OK NG
Post-procedure1
None.
OK
NG
Check the vehicle specification
- Result:
Result Proceed to w/ Clearance Sonar System A w/o Clearance Sonar System B
A
B
Pre-procedure1
Disconnect the H43 engine stop and start ECU connector.
Disconnect the O60 clearance warning ECU assembly connector.
Procedure1
Measure the resistance according to the value(s) in the table below.
Click hereEngine / Hybrid System>STOP AND START>STOP AND START SYSTEM>TERMINALS OF ECU
- Standard Resistance:
Tester Connection Condition Specified Condition Click Location & Routing(H43,O60)Location & Routingewd_type=routing;type=c,c;code=H43,O60
Click Connector(H43)Instrument Panel>Instrument Panel Wire / Speaker Wire>Engine Stop and Start ECUewd_type=component;type=c;code=H43;pinno=3
Click Connector(O60)Body>Floor Wire>Clearance Warning ECU Assemblyewd_type=component;type=c;code=O60;pinno=1
H43-3 (IG41) - O60-1 (IG) Always Below 1 Ω H43-3 (IG41) - Body ground and other terminals Always 10 kΩ or higher
- Result:
Proceed to OK NG
Post-procedure1
None.
OK
NG
Check the vehicle specification
- Result:
Result Proceed to w/ Clearance Sonar System A w/o Clearance Sonar System B
A
B
Pre-procedure1
Disconnect the H43 engine stop and start ECU connector.
Disconnect the O60 clearance warning ECU assembly connector.
Procedure1
Measure the resistance according to the value(s) in the table below.
Click hereEngine / Hybrid System>STOP AND START>STOP AND START SYSTEM>TERMINALS OF ECU
- Standard Resistance:
Tester Connection Condition Specified Condition Click Location & Routing(H43,O60)Location & Routingewd_type=routing;type=c,c;code=H43,O60
Click Connector(H43)Instrument Panel>Instrument Panel Wire / Speaker Wire>Engine Stop and Start ECUewd_type=component;type=c;code=H43;pinno=3
Click Connector(O60)Body>Floor Wire>Clearance Warning ECU Assemblyewd_type=component;type=c;code=O60;pinno=1
H43-3 (IG41) - O60-1 (IG) Always Below 1 Ω H43-3 (IG41) - Body ground and other terminals Always 10 kΩ or higher
- Result:
Proceed to OK NG
Post-procedure1
None.
OK
NG
Check the vehicle specification
- Result:
Result Proceed to for Automatic Air Conditioning System A for Manual Air Conditioning System B
A
B
Pre-procedure1
Disconnect the H43 engine stop and start ECU connector.
Disconnect the H31 air conditioning control assembly connector.
Procedure1
Measure the resistance according to the value(s) in the table below.
Click hereEngine / Hybrid System>STOP AND START>STOP AND START SYSTEM>TERMINALS OF ECU
- Standard Resistance:
Tester Connection Condition Specified Condition Click Location & Routing(H43,H31)Location & Routingewd_type=routing;type=c,c;code=H43,H31
Click Connector(H43)Instrument Panel>Instrument Panel Wire / Speaker Wire>Engine Stop and Start ECUewd_type=component;type=c;code=H43;pinno=3
Click Connector(H31)Instrument Panel>Instrument Panel Wire / Speaker Wire>Air Conditioning Control Assemblyewd_type=component;type=c;code=H31;pinno=9
H43-3 (IG41) - H31-9 (IG+) Always Below 1 Ω H43-3 (IG41) - Body ground and other terminals Always 10 kΩ or higher
- Result:
Proceed to OK NG
Post-procedure1
None.
OK
NG
Check the vehicle specification
- Result:
Result Proceed to w/ Toyota Safety Sense A w/o Toyota Safety Sense B
A
B
Pre-procedure1
Disconnect the H43 engine stop and start ECU connector.
Disconnect the B8 millimeter wave radar sensor assembly connector.
Procedure1
Measure the resistance according to the value(s) in the table below.
Click hereEngine / Hybrid System>STOP AND START>STOP AND START SYSTEM>TERMINALS OF ECU
- Standard Resistance:
Tester Connection Condition Specified Condition Click Location & Routing(H43,B8)Location & Routingewd_type=routing;type=c,c;code=H43,B8
Click Connector(H43)Instrument Panel>Instrument Panel Wire / Speaker Wire>Engine Stop and Start ECUewd_type=component;type=c;code=H43;pinno=3
Click Connector(B8)Engine Compartment>No. 3 Engine Room Wire>Millimeter Wave Radar Sensor Assemblyewd_type=component;type=c;code=B8;pinno=8
H43-3 (IG41) - B8-8 (IGB) Always Below 1 Ω H43-3 (IG41) - Body ground and other terminals Always 10 kΩ or higher
- Result:
Proceed to OK NG
Post-procedure1
None.
OK
NG
Check the vehicle specification
- Result:
Result Proceed to w/ Clearance Sonar System A w/o Clearance Sonar System B
A
B
Pre-procedure1
Disconnect the H43 engine stop and start ECU connector.
Disconnect the O60 clearance warning ECU assembly connector.
Procedure1
Measure the resistance according to the value(s) in the table below.
Click hereEngine / Hybrid System>STOP AND START>STOP AND START SYSTEM>TERMINALS OF ECU
- Standard Resistance:
Tester Connection Condition Specified Condition Click Location & Routing(H43,O60)Location & Routingewd_type=routing;type=c,c;code=H43,O60
Click Connector(H43)Instrument Panel>Instrument Panel Wire / Speaker Wire>Engine Stop and Start ECUewd_type=component;type=c;code=H43;pinno=3
Click Connector(O60)Body>Floor Wire>Clearance Warning ECU Assemblyewd_type=component;type=c;code=O60;pinno=1
H43-3 (IG41) - O60-1 (IG) Always Below 1 Ω H43-3 (IG41) - Body ground and other terminals Always 10 kΩ or higher
- Result:
Proceed to OK NG
Post-procedure1
None.
OK
NG
Check the vehicle specification
- Result:
Result Proceed to w/ Clearance Sonar System A w/o Clearance Sonar System B
A
B
Pre-procedure1
Disconnect the H43 engine stop and start ECU connector.
Disconnect the O60 clearance warning ECU assembly connector.
Procedure1
Measure the resistance according to the value(s) in the table below.
Click hereEngine / Hybrid System>STOP AND START>STOP AND START SYSTEM>TERMINALS OF ECU
- Standard Resistance:
Tester Connection Condition Specified Condition Click Location & Routing(H43,O60)Location & Routingewd_type=routing;type=c,c;code=H43,O60
Click Connector(H43)Instrument Panel>Instrument Panel Wire / Speaker Wire>Engine Stop and Start ECUewd_type=component;type=c;code=H43;pinno=3
Click Connector(O60)Body>Floor Wire>Clearance Warning ECU Assemblyewd_type=component;type=c;code=O60;pinno=1
H43-3 (IG41) - O60-1 (IG) Always Below 1 Ω H43-3 (IG41) - Body ground and other terminals Always 10 kΩ or higher
- Result:
Proceed to OK NG
Post-procedure1
None.
OK
NG
Check the vehicle specification
- Result:
Result Proceed to w/ Toyota Safety Sense A w/o Toyota Safety Sense B
A
B
Pre-procedure1
Disconnect the H43 engine stop and start ECU connector.
Disconnect the B8 millimeter wave radar sensor assembly connector.
Procedure1
Measure the resistance according to the value(s) in the table below.
Click hereEngine / Hybrid System>STOP AND START>STOP AND START SYSTEM>TERMINALS OF ECU
- Standard Resistance:
Tester Connection Condition Specified Condition Click Location & Routing(H43,B8)Location & Routingewd_type=routing;type=c,c;code=H43,B8
Click Connector(H43)Instrument Panel>Instrument Panel Wire / Speaker Wire>Engine Stop and Start ECUewd_type=component;type=c;code=H43;pinno=3
Click Connector(B8)Engine Compartment>No. 3 Engine Room Wire>Millimeter Wave Radar Sensor Assemblyewd_type=component;type=c;code=B8;pinno=8
H43-3 (IG41) - B8-8 (IGB) Always Below 1 Ω H43-3 (IG41) - Body ground and other terminals Always 10 kΩ or higher
- Result:
Proceed to OK NG
Post-procedure1
None.
OK
NG
Check the vehicle specification
- Result:
Result Proceed to w/ Clearance Sonar System A w/o Clearance Sonar System B
A
B
Pre-procedure1
Disconnect the H43 engine stop and start ECU connector.
Disconnect the O60 clearance warning ECU assembly connector.
Procedure1
Measure the resistance according to the value(s) in the table below.
Click hereEngine / Hybrid System>STOP AND START>STOP AND START SYSTEM>TERMINALS OF ECU
- Standard Resistance:
Tester Connection Condition Specified Condition Click Location & Routing(H43,O60)Location & Routingewd_type=routing;type=c,c;code=H43,O60
Click Connector(H43)Instrument Panel>Instrument Panel Wire / Speaker Wire>Engine Stop and Start ECUewd_type=component;type=c;code=H43;pinno=3
Click Connector(O60)Body>Floor Wire>Clearance Warning ECU Assemblyewd_type=component;type=c;code=O60;pinno=1
H43-3 (IG41) - O60-1 (IG) Always Below 1 Ω H43-3 (IG41) - Body ground and other terminals Always 10 kΩ or higher
- Result:
Proceed to OK NG
Post-procedure1
None.
OK
NG
Check the vehicle specification
- Result:
Result Proceed to w/ Clearance Sonar System A w/o Clearance Sonar System B
A
B
Pre-procedure1
Disconnect the H43 engine stop and start ECU connector.
Disconnect the O60 clearance warning ECU assembly connector.
Procedure1
Measure the resistance according to the value(s) in the table below.
Click hereEngine / Hybrid System>STOP AND START>STOP AND START SYSTEM>TERMINALS OF ECU
- Standard Resistance:
Tester Connection Condition Specified Condition Click Location & Routing(H43,O60)Location & Routingewd_type=routing;type=c,c;code=H43,O60
Click Connector(H43)Instrument Panel>Instrument Panel Wire / Speaker Wire>Engine Stop and Start ECUewd_type=component;type=c;code=H43;pinno=3
Click Connector(O60)Body>Floor Wire>Clearance Warning ECU Assemblyewd_type=component;type=c;code=O60;pinno=1
H43-3 (IG41) - O60-1 (IG) Always Below 1 Ω H43-3 (IG41) - Body ground and other terminals Always 10 kΩ or higher
- Result:
Proceed to OK NG
Post-procedure1
None.
OK
NG
Check the vehicle specification
- Result:
Result Proceed to w/ Headup Display A w/o Headup Display B
A
B
Pre-procedure1
Disconnect the H43 engine stop and start ECU connector.
Disconnect the H61 meter mirror sub-assembly connector.
Procedure1
Measure the resistance according to the value(s) in the table below.
Click hereEngine / Hybrid System>STOP AND START>STOP AND START SYSTEM>TERMINALS OF ECU
- Standard Resistance:
Tester Connection Condition Specified Condition Click Location & Routing(H43,H61)Location & Routingewd_type=routing;type=c,c;code=H43,H61
Click Connector(H43)Instrument Panel>Instrument Panel Wire / Speaker Wire>Engine Stop and Start ECUewd_type=component;type=c;code=H43;pinno=11
Click Connector(H61)Instrument Panel>Instrument Panel Wire / Speaker Wire>Meter Mirror Sub-Assemblyewd_type=component;type=c;code=H61;pinno=2
H43-11 (B43) - H61-2(B) Always Below 1 Ω H43-11 (B43) - Body ground and other terminals Always 10 kΩ or higher
- Result:
Proceed to OK NG
Post-procedure1
None.
OK
NG
Check the vehicle specification
- Result:
Result Proceed to for Automatic Air Conditioning System A for Manual Air Conditioning System B
A
B
Pre-procedure1
Disconnect the H43 engine stop and start ECU connector.
Disconnect the H31 air conditioning control assembly connector.
Procedure1
Measure the resistance according to the value(s) in the table below.
Click hereEngine / Hybrid System>STOP AND START>STOP AND START SYSTEM>TERMINALS OF ECU
- Standard Resistance:
Tester Connection Condition Specified Condition Click Location & Routing(H43,H31)Location & Routingewd_type=routing;type=c,c;code=H43,H31
Click Connector(H43)Instrument Panel>Instrument Panel Wire / Speaker Wire>Engine Stop and Start ECUewd_type=component;type=c;code=H43;pinno=3
Click Connector(H31)Instrument Panel>Instrument Panel Wire / Speaker Wire>Air Conditioning Control Assemblyewd_type=component;type=c;code=H31;pinno=9
H43-3 (IG41) - H31-9 (IG+) Always Below 1 Ω H43-3 (IG41) - Body ground and other terminals Always 10 kΩ or higher
- Result:
Proceed to OK NG
Post-procedure1
None.
OK
NG
Check the vehicle specification
- Result:
Result Proceed to w/ Toyota Safety Sense A w/o Toyota Safety Sense B
A
B
Pre-procedure1
Disconnect the H43 engine stop and start ECU connector.
Disconnect the B8 millimeter wave radar sensor assembly connector.
Procedure1
Measure the resistance according to the value(s) in the table below.
Click hereEngine / Hybrid System>STOP AND START>STOP AND START SYSTEM>TERMINALS OF ECU
- Standard Resistance:
Tester Connection Condition Specified Condition Click Location & Routing(H43,B8)Location & Routingewd_type=routing;type=c,c;code=H43,B8
Click Connector(H43)Instrument Panel>Instrument Panel Wire / Speaker Wire>Engine Stop and Start ECUewd_type=component;type=c;code=H43;pinno=3
Click Connector(B8)Engine Compartment>No. 3 Engine Room Wire>Millimeter Wave Radar Sensor Assemblyewd_type=component;type=c;code=B8;pinno=8
H43-3 (IG41) - B8-8 (IGB) Always Below 1 Ω H43-3 (IG41) - Body ground and other terminals Always 10 kΩ or higher
- Result:
Proceed to OK NG
Post-procedure1
None.
OK
NG
Check the vehicle specification
- Result:
Result Proceed to w/ Clearance Sonar System A w/o Clearance Sonar System B
A
B
Pre-procedure1
Disconnect the H43 engine stop and start ECU connector.
Disconnect the O60 clearance warning ECU assembly connector.
Procedure1
Measure the resistance according to the value(s) in the table below.
Click hereEngine / Hybrid System>STOP AND START>STOP AND START SYSTEM>TERMINALS OF ECU
- Standard Resistance:
Tester Connection Condition Specified Condition Click Location & Routing(H43,O60)Location & Routingewd_type=routing;type=c,c;code=H43,O60
Click Connector(H43)Instrument Panel>Instrument Panel Wire / Speaker Wire>Engine Stop and Start ECUewd_type=component;type=c;code=H43;pinno=3
Click Connector(O60)Body>Floor Wire>Clearance Warning ECU Assemblyewd_type=component;type=c;code=O60;pinno=1
H43-3 (IG41) - O60-1 (IG) Always Below 1 Ω H43-3 (IG41) - Body ground and other terminals Always 10 kΩ or higher
- Result:
Proceed to OK NG
Post-procedure1
None.
OK
NG
Check the vehicle specification
- Result:
Result Proceed to w/ Clearance Sonar System A w/o Clearance Sonar System B
A
B
Pre-procedure1
Disconnect the H43 engine stop and start ECU connector.
Disconnect the O60 clearance warning ECU assembly connector.
Procedure1
Measure the resistance according to the value(s) in the table below.
Click hereEngine / Hybrid System>STOP AND START>STOP AND START SYSTEM>TERMINALS OF ECU
- Standard Resistance:
Tester Connection Condition Specified Condition Click Location & Routing(H43,O60)Location & Routingewd_type=routing;type=c,c;code=H43,O60
Click Connector(H43)Instrument Panel>Instrument Panel Wire / Speaker Wire>Engine Stop and Start ECUewd_type=component;type=c;code=H43;pinno=3
Click Connector(O60)Body>Floor Wire>Clearance Warning ECU Assemblyewd_type=component;type=c;code=O60;pinno=1
H43-3 (IG41) - O60-1 (IG) Always Below 1 Ω H43-3 (IG41) - Body ground and other terminals Always 10 kΩ or higher
- Result:
Proceed to OK NG
Post-procedure1
None.
OK
NG
Check the vehicle specification
- Result:
Result Proceed to w/ Toyota Safety Sense A w/o Toyota Safety Sense B
A
B
Pre-procedure1
Disconnect the H43 engine stop and start ECU connector.
Disconnect the B8 millimeter wave radar sensor assembly connector.
Procedure1
Measure the resistance according to the value(s) in the table below.
Click hereEngine / Hybrid System>STOP AND START>STOP AND START SYSTEM>TERMINALS OF ECU
- Standard Resistance:
Tester Connection Condition Specified Condition Click Location & Routing(H43,B8)Location & Routingewd_type=routing;type=c,c;code=H43,B8
Click Connector(H43)Instrument Panel>Instrument Panel Wire / Speaker Wire>Engine Stop and Start ECUewd_type=component;type=c;code=H43;pinno=3
Click Connector(B8)Engine Compartment>No. 3 Engine Room Wire>Millimeter Wave Radar Sensor Assemblyewd_type=component;type=c;code=B8;pinno=8
H43-3 (IG41) - B8-8 (IGB) Always Below 1 Ω H43-3 (IG41) - Body ground and other terminals Always 10 kΩ or higher
- Result:
Proceed to OK NG
Post-procedure1
None.
OK
NG
Check the vehicle specification
- Result:
Result Proceed to w/ Clearance Sonar System A w/o Clearance Sonar System B
A
B
Pre-procedure1
Disconnect the H43 engine stop and start ECU connector.
Disconnect the O60 clearance warning ECU assembly connector.
Procedure1
Measure the resistance according to the value(s) in the table below.
Click hereEngine / Hybrid System>STOP AND START>STOP AND START SYSTEM>TERMINALS OF ECU
- Standard Resistance:
Tester Connection Condition Specified Condition Click Location & Routing(H43,O60)Location & Routingewd_type=routing;type=c,c;code=H43,O60
Click Connector(H43)Instrument Panel>Instrument Panel Wire / Speaker Wire>Engine Stop and Start ECUewd_type=component;type=c;code=H43;pinno=3
Click Connector(O60)Body>Floor Wire>Clearance Warning ECU Assemblyewd_type=component;type=c;code=O60;pinno=1
H43-3 (IG41) - O60-1 (IG) Always Below 1 Ω H43-3 (IG41) - Body ground and other terminals Always 10 kΩ or higher
- Result:
Proceed to OK NG
Post-procedure1
None.
OK
NG
Check the vehicle specification
- Result:
Result Proceed to w/ Clearance Sonar System A w/o Clearance Sonar System B
A
B
Pre-procedure1
Disconnect the H43 engine stop and start ECU connector.
Disconnect the O60 clearance warning ECU assembly connector.
Procedure1
Measure the resistance according to the value(s) in the table below.
Click hereEngine / Hybrid System>STOP AND START>STOP AND START SYSTEM>TERMINALS OF ECU
- Standard Resistance:
Tester Connection Condition Specified Condition Click Location & Routing(H43,O60)Location & Routingewd_type=routing;type=c,c;code=H43,O60
Click Connector(H43)Instrument Panel>Instrument Panel Wire / Speaker Wire>Engine Stop and Start ECUewd_type=component;type=c;code=H43;pinno=3
Click Connector(O60)Body>Floor Wire>Clearance Warning ECU Assemblyewd_type=component;type=c;code=O60;pinno=1
H43-3 (IG41) - O60-1 (IG) Always Below 1 Ω H43-3 (IG41) - Body ground and other terminals Always 10 kΩ or higher
- Result:
Proceed to OK NG
Post-procedure1
None.
OK
NG
Check the vehicle specification
- Result:
Result Proceed to for Automatic Air Conditioning System A for Manual Air Conditioning System B
A
B
Pre-procedure1
Disconnect the H43 engine stop and start ECU connector.
Disconnect the H31 air conditioning control assembly connector.
Procedure1
Measure the resistance according to the value(s) in the table below.
Click hereEngine / Hybrid System>STOP AND START>STOP AND START SYSTEM>TERMINALS OF ECU
- Standard Resistance:
Tester Connection Condition Specified Condition Click Location & Routing(H43,H31)Location & Routingewd_type=routing;type=c,c;code=H43,H31
Click Connector(H43)Instrument Panel>Instrument Panel Wire / Speaker Wire>Engine Stop and Start ECUewd_type=component;type=c;code=H43;pinno=3
Click Connector(H31)Instrument Panel>Instrument Panel Wire / Speaker Wire>Air Conditioning Control Assemblyewd_type=component;type=c;code=H31;pinno=9
H43-3 (IG41) - H31-9 (IG+) Always Below 1 Ω H43-3 (IG41) - Body ground and other terminals Always 10 kΩ or higher
- Result:
Proceed to OK NG
Post-procedure1
None.
OK
NG
Check the vehicle specification
- Result:
Result Proceed to w/ Toyota Safety Sense A w/o Toyota Safety Sense B
A
B
Pre-procedure1
Disconnect the H43 engine stop and start ECU connector.
Disconnect the B8 millimeter wave radar sensor assembly connector.
Procedure1
Measure the resistance according to the value(s) in the table below.
Click hereEngine / Hybrid System>STOP AND START>STOP AND START SYSTEM>TERMINALS OF ECU
- Standard Resistance:
Tester Connection Condition Specified Condition Click Location & Routing(H43,B8)Location & Routingewd_type=routing;type=c,c;code=H43,B8
Click Connector(H43)Instrument Panel>Instrument Panel Wire / Speaker Wire>Engine Stop and Start ECUewd_type=component;type=c;code=H43;pinno=3
Click Connector(B8)Engine Compartment>No. 3 Engine Room Wire>Millimeter Wave Radar Sensor Assemblyewd_type=component;type=c;code=B8;pinno=8
H43-3 (IG41) - B8-8 (IGB) Always Below 1 Ω H43-3 (IG41) - Body ground and other terminals Always 10 kΩ or higher
- Result:
Proceed to OK NG
Post-procedure1
None.
OK
NG
Check the vehicle specification
- Result:
Result Proceed to w/ Clearance Sonar System A w/o Clearance Sonar System B
A
B
Pre-procedure1
Disconnect the H43 engine stop and start ECU connector.
Disconnect the O60 clearance warning ECU assembly connector.
Procedure1
Measure the resistance according to the value(s) in the table below.
Click hereEngine / Hybrid System>STOP AND START>STOP AND START SYSTEM>TERMINALS OF ECU
- Standard Resistance:
Tester Connection Condition Specified Condition Click Location & Routing(H43,O60)Location & Routingewd_type=routing;type=c,c;code=H43,O60
Click Connector(H43)Instrument Panel>Instrument Panel Wire / Speaker Wire>Engine Stop and Start ECUewd_type=component;type=c;code=H43;pinno=3
Click Connector(O60)Body>Floor Wire>Clearance Warning ECU Assemblyewd_type=component;type=c;code=O60;pinno=1
H43-3 (IG41) - O60-1 (IG) Always Below 1 Ω H43-3 (IG41) - Body ground and other terminals Always 10 kΩ or higher
- Result:
Proceed to OK NG
Post-procedure1
None.
OK
NG
Check the vehicle specification
- Result:
Result Proceed to w/ Clearance Sonar System A w/o Clearance Sonar System B
A
B
Pre-procedure1
Disconnect the H43 engine stop and start ECU connector.
Disconnect the O60 clearance warning ECU assembly connector.
Procedure1
Measure the resistance according to the value(s) in the table below.
Click hereEngine / Hybrid System>STOP AND START>STOP AND START SYSTEM>TERMINALS OF ECU
- Standard Resistance:
Tester Connection Condition Specified Condition Click Location & Routing(H43,O60)Location & Routingewd_type=routing;type=c,c;code=H43,O60
Click Connector(H43)Instrument Panel>Instrument Panel Wire / Speaker Wire>Engine Stop and Start ECUewd_type=component;type=c;code=H43;pinno=3
Click Connector(O60)Body>Floor Wire>Clearance Warning ECU Assemblyewd_type=component;type=c;code=O60;pinno=1
H43-3 (IG41) - O60-1 (IG) Always Below 1 Ω H43-3 (IG41) - Body ground and other terminals Always 10 kΩ or higher
- Result:
Proceed to OK NG
Post-procedure1
None.
OK
NG
Check the vehicle specification
- Result:
Result Proceed to w/ Toyota Safety Sense A w/o Toyota Safety Sense B
A
B
Pre-procedure1
Disconnect the H43 engine stop and start ECU connector.
Disconnect the B8 millimeter wave radar sensor assembly connector.
Procedure1
Measure the resistance according to the value(s) in the table below.
Click hereEngine / Hybrid System>STOP AND START>STOP AND START SYSTEM>TERMINALS OF ECU
- Standard Resistance:
Tester Connection Condition Specified Condition Click Location & Routing(H43,B8)Location & Routingewd_type=routing;type=c,c;code=H43,B8
Click Connector(H43)Instrument Panel>Instrument Panel Wire / Speaker Wire>Engine Stop and Start ECUewd_type=component;type=c;code=H43;pinno=3
Click Connector(B8)Engine Compartment>No. 3 Engine Room Wire>Millimeter Wave Radar Sensor Assemblyewd_type=component;type=c;code=B8;pinno=8
H43-3 (IG41) - B8-8 (IGB) Always Below 1 Ω H43-3 (IG41) - Body ground and other terminals Always 10 kΩ or higher
- Result:
Proceed to OK NG
Post-procedure1
None.
OK
NG
Check the vehicle specification
- Result:
Result Proceed to w/ Clearance Sonar System A w/o Clearance Sonar System B
A
B
Pre-procedure1
Disconnect the H43 engine stop and start ECU connector.
Disconnect the O60 clearance warning ECU assembly connector.
Procedure1
Measure the resistance according to the value(s) in the table below.
Click hereEngine / Hybrid System>STOP AND START>STOP AND START SYSTEM>TERMINALS OF ECU
- Standard Resistance:
Tester Connection Condition Specified Condition Click Location & Routing(H43,O60)Location & Routingewd_type=routing;type=c,c;code=H43,O60
Click Connector(H43)Instrument Panel>Instrument Panel Wire / Speaker Wire>Engine Stop and Start ECUewd_type=component;type=c;code=H43;pinno=3
Click Connector(O60)Body>Floor Wire>Clearance Warning ECU Assemblyewd_type=component;type=c;code=O60;pinno=1
H43-3 (IG41) - O60-1 (IG) Always Below 1 Ω H43-3 (IG41) - Body ground and other terminals Always 10 kΩ or higher
- Result:
Proceed to OK NG
Post-procedure1
None.
OK
NG
Check the vehicle specification
- Result:
Result Proceed to w/ Clearance Sonar System A w/o Clearance Sonar System B
A
B
Pre-procedure1
Disconnect the H43 engine stop and start ECU connector.
Disconnect the O60 clearance warning ECU assembly connector.
Procedure1
Measure the resistance according to the value(s) in the table below.
Click hereEngine / Hybrid System>STOP AND START>STOP AND START SYSTEM>TERMINALS OF ECU
- Standard Resistance:
Tester Connection Condition Specified Condition Click Location & Routing(H43,O60)Location & Routingewd_type=routing;type=c,c;code=H43,O60
Click Connector(H43)Instrument Panel>Instrument Panel Wire / Speaker Wire>Engine Stop and Start ECUewd_type=component;type=c;code=H43;pinno=3
Click Connector(O60)Body>Floor Wire>Clearance Warning ECU Assemblyewd_type=component;type=c;code=O60;pinno=1
H43-3 (IG41) - O60-1 (IG) Always Below 1 Ω H43-3 (IG41) - Body ground and other terminals Always 10 kΩ or higher
- Result:
Proceed to OK NG
Post-procedure1
None.
OK
NG