MAINTENANCE FRONT DISC BRAKE PAD(for TMC Made) INSTALLATION
CAUTION / NOTICE / HINT
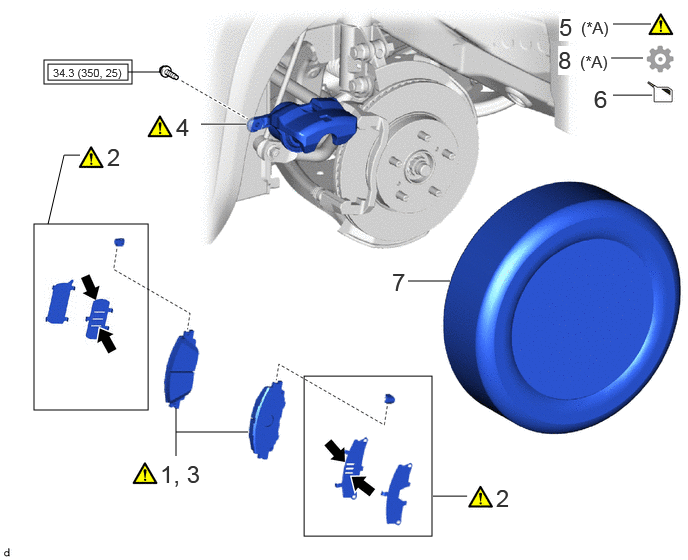
| Procedure | Part Name Code | 
|

|

|
|
|---|---|---|---|---|---|
| 1 | INSPECT FRONT DISC BRAKE PAD | - | ( ) |
- | - |
| 2 | FRONT DISC BRAKE ANTI-SQUEAL SHIM KIT | - | ()
|
- | - |
| 3 | INSTALL FRONT DISC BRAKE PAD | - | ()
|
- | - |
| 4 | FRONT DISC BRAKE CYLINDER ASSEMBLY | - | ()
|
- | - |
| 5 | CABLE TO NEGATIVE AUXILIARY BATTERY TERMINAL | - | ()
|
- | - |
| 6 | BRAKE FLUID LEVEL IN RESERVOIR | - | - | ()
|
- |
| 7 | FRONT WHEEL | - | - | - | - |
| 8 | INITIALIZATION AFTER RECONNECTING AUXILIARY BATTERY TERMINAL | - | - | - | ()
|

|
Tightening torque for "Major areas involving basic vehicle performance such as moving/turning/stopping": N*m (kgf*cm, ft.*lbf) | 
|
Disc Brake Grease |
CAUTION / NOTICE / HINT
- NOTICE:
- ·
Immediately after installing the brake pads, the braking performance may be reduced. Always perform a road test in a safe place while paying attention to the surroundings.
·After replacing the front disc brake pads, the brake pedal may feel soft due to clearance between the front disc brake pads and front disc. Depress the brake pedal several times until the brake pedal feels firm.
·After replacing the front disc brake pads, always perform a road test to check the braking performance and check for vibrations.
·When the brake pedal is first depressed after replacing the brake pads or pushing back the disc brake piston, DTC [C13CD00, C13CE00, C140000] may be stored. As there is no malfunction, clear the DTC. (for HV Model)
·While the auxiliary battery is connected, even if the power switch is off, the brake control system activates when the brake pedal is depressed or any door courtesy switch turns on. Therefore, when servicing the brake system components, do not operate the brake pedal or open/close the doors while the auxiliary battery is connected. (for HV Model)
- HINT:
- ·
Use the same procedure for the RH side and LH side.
·The following procedure is for the LH side.
PROCEDURE

 1.INSPECT FRONT DISC BRAKE PAD
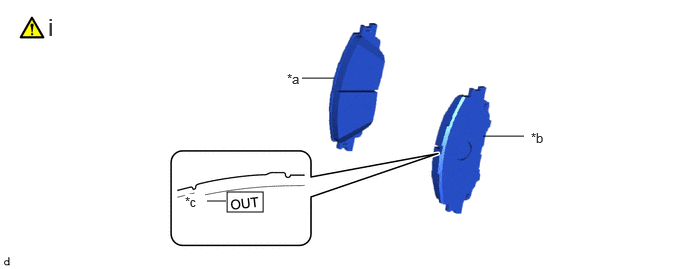
| *a | Inner Side | *b | Outer Side |
| *c | Identification Mark | - | - |
Check the front disc brake pad.
- HINT:
-
If the front disc brake pad has an identification mark, be sure to confirm the installation location.
2.INSTALL FRONT DISC BRAKE ANTI-SQUEAL SHIM KIT
|
|
|
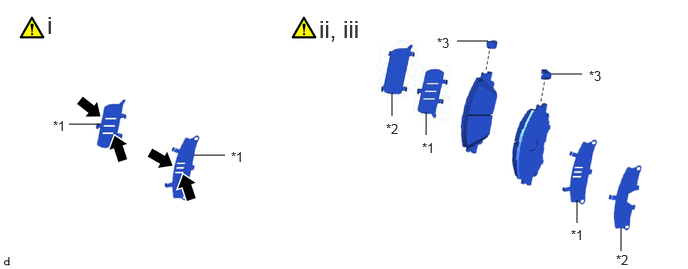
| *1 | Front No. 1 Disc Brake Anti-squeal Shim | *2 | Front No. 2 Disc Brake Anti-squeal Shim |
| *3 | Front Disc Brake Pad Wear Indicator Plate | - | - |
|
|
Disc Brake Grease | - | - |
Apply disc brake grease to both sides of each front No. 1 disc brake anti-squeal shim as shown in the illustration.
Install the front No. 1 disc brake anti-squeal shim and front No. 2 disc brake anti-squeal shim to each front disc brake pad.
Install the front disc brake pad wear indicator plate to each front disc brake pad.
3.INSTALL FRONT DISC BRAKE PAD
|
|
|
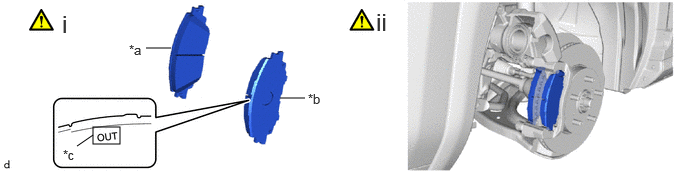
| *a | Inner Side | *b | Outer Side |
| *c | Identification Mark | - | - |
Check the front disc brake pad.
- HINT:
-
If the front disc brake pad has an identification mark, be sure to confirm the installation location.
Install the 2 front disc brake pads to the front disc brake cylinder mounting.
- NOTICE:
- ·
Keep the friction surfaces of the front disc brake pads and front disc free from oil and grease.
·Install the front disc brake pad so that the pad wear indicator plate is mounted on the upper side of the vehicle.
4.INSTALL FRONT DISC BRAKE CYLINDER ASSEMBLY
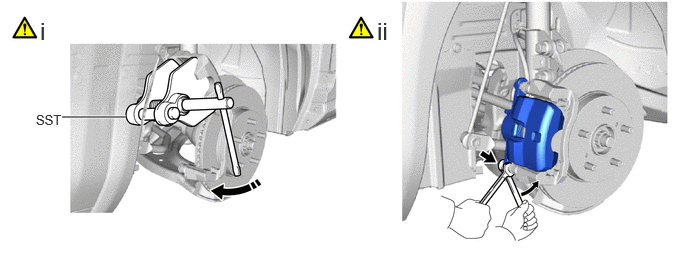
Using SST, push back the front disc brake piston.
- SST
- 09719-77020
- NOTICE:
- ·
Make sure that the brake fluid does not overflow from the reservoir.
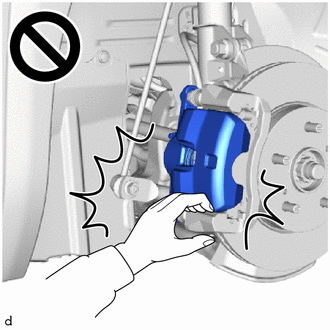
·Do not forcibly push in the front disc brake piston.
Hold the front disc brake cylinder slide pin (lower side) and install the front disc brake cylinder assembly to the front disc brake cylinder mounting with the bolt.
- Torque:
- 34.3 N*m (350 kgf*cm, 25 ft.*lbf)
5.CONNECT CABLE TO NEGATIVE AUXILIARY BATTERY TERMINAL (for HV Model)
|
|
Click here()
|
6.INSPECT BRAKE FLUID LEVEL IN RESERVOIR
for HV Model:
Click hereBrake>BRAKE SYSTEM (OTHER)>BRAKE FLUID (for HV Model TMC Made)>ON-VEHICLE INSPECTION
for Gasoline Model:
Click hereBrake>BRAKE SYSTEM (OTHER)>BRAKE FLUID (for Gasoline Model)>ON-VEHICLE INSPECTION
7.INSTALL FRONT WHEEL
8. INITIALIZATION AFTER RECONNECTING AUXILIARY BATTERY TERMINAL (for HV Model)
Click hereGeneral>SETUP>WHEN DISCONNECTING OR RECONNECTING BATTERY TERMINAL>WORK PROCEDURE
- HINT:
-
When disconnecting and reconnecting the auxiliary battery, there is an automatic learning function that completes learning when the respective system is used.
-
Click hereGeneral>SETUP>WHEN DISCONNECTING OR RECONNECTING BATTERY TERMINAL>AUTOMATIC LEARNING CHART