K320 MULTIDRIVE / CVT CONTINUOUSLY VARIABLE TRANSAXLE SYSTEM Transmission Control Switch Circuit
DESCRIPTION
After moving the shift lever to M, it is possible to change the shift range between M1 and M10 using the shift lever. Moving the shift lever to "+" once raises the shift range by one, and moving the shift lever to "-" lowers the shift range by one.
WIRING DIAGRAM
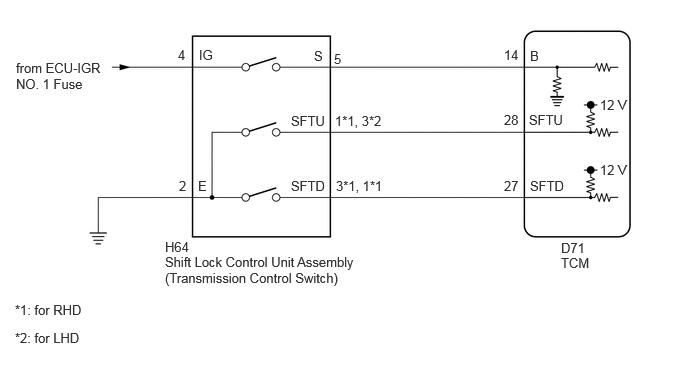
CAUTION / NOTICE / HINT
- NOTICE:
- ·
Perform registration and/or initialization when parts related to the continuously variable transaxle system are replaced.
Click hereDrivetrain>K320 (MULTIDRIVE / CVT)>CONTINUOUSLY VARIABLE TRANSAXLE SYSTEM>PRECAUTION
·Inspect the fuses for circuits related to this system before performing the following procedure.
PROCEDURE
Read the DTCs using the GTS.
- Powertrain > Transmission > Trouble Codes
- 50001 373
- Result:
Result Proceed to DTCs are not output A DTCs are output B
A
B
According to the display on the GTS, read the Data List.
- Powertrain > Transmission > Data List
-
Tester Display Measurement Item Range Normal Condition Diagnostic Note Shift SW Status (S Range) Transmission control switch status ON or OFF ·ON: Shift lever in M, "+" or "-"
·OFF: Shift lever not in M, "+" or "-"
-
- Powertrain > Transmission > Data List
-
Tester Display Shift SW Status (S Range) - 50003 373 27
- Result:
Result Proceed to Data List value is normal A Data List value is not normal B
A
B
According to the display on the GTS, read the Data List.
- Powertrain > Transmission > Data List
-
Tester Display Measurement Item Range Normal Condition Diagnostic Note Sport Shift Up SW Sport shift up switch status ON or OFF ·ON: Shift lever held in "+" or "+" shift paddle switch operated
·OFF: Shift lever not held in "+" and "+" shift paddle switch released
- Sport Shift Down SW Sport shift down switch status ON or OFF ·ON: Shift lever held in "-" or "-" shift paddle switch operated
·OFF: Shift lever not held in "-" and "-" shift paddle switch released
-
- Powertrain > Transmission > Data List
-
Tester Display Sport Shift Up SW Sport Shift Down SW - 50003 373 26,25
- Result:
Result Proceed to Data List values are normal A Data List values are not normal B
A
B
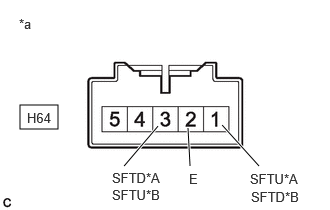
| *A | for RHD |
| *B | for LHD |
| *a | Component without harness connected
(Shift Lock Control Unit Assembly (Transmission Control Switch)) |
Disconnect the shift lock control unit assembly connector.
Measure the resistance according to the value(s) in the table below.
- Standard Resistance (for RHD):
Tester Connection Condition Specified Condition Click Location & Routing(H64)Location & Routingewd_type=routing;type=c;code=H64
Click Connector(H64)Instrument Panel>Instrument Panel Wire / Speaker Wire>Transmission Control Switch (Transmission Floor Shift Assembly)ewd_type=component;type=c;code=H64;pinno=1,2,3
H64-1 (SFTU) - H64-2 (E) Shift lever held in "+" Below 1 Ω H64-1 (SFTU) - H64-2 (E) Shift lever in M 10 kΩ or higher H64-3 (SFTD) - H64-2 (E) Shift lever held in "-" Below 1 Ω H64-3 (SFTD) - H64-2 (E) Shift lever in M 10 kΩ or higher
- Standard Resistance (for LHD):
Tester Connection Condition Specified Condition Click Location & Routing(H64)Location & Routingewd_type=routing;type=c;code=H64
Click Connector(H64)Instrument Panel>Instrument Panel Wire / Speaker Wire>Transmission Control Switch (Transmission Floor Shift Assembly)ewd_type=component;type=c;code=H64;pinno=3,2,1
H64-3 (SFTU) - H64-2 (E) Shift lever held in "+" Below 1 Ω H64-3 (SFTU) - H64-2 (E) Shift lever in M 10 kΩ or higher H64-1 (SFTD) - H64-2 (E) Shift lever held in "-" Below 1 Ω H64-1 (SFTD) - H64-2 (E) Shift lever in M 10 kΩ or higher
Connect the shift lock control unit assembly connector.
- Result:
Proceed to OK NG
OK
NG
for TMC Made: Click hereDrivetrain>K320 (MULTIDRIVE / CVT)>SHIFT LEVER (for TMC Made)>REMOVAL
for TMMF Made: Click hereDrivetrain>K320 (MULTIDRIVE / CVT)>SHIFT LEVER (for TMMF Made)>REMOVAL
Disconnect the shift lock control unit assembly connector.
Measure the resistance according to the value(s) in the table below.
- Standard Resistance:
Tester Connection Condition Specified Condition Click Location & Routing(H64)Location & Routingewd_type=routing;type=c;code=H64
Click Connector(H64)Instrument Panel>Instrument Panel Wire / Speaker Wire>Transmission Control Switch (Transmission Floor Shift Assembly)ewd_type=component;type=c;code=H64;pinno=2
H64-2 (E) - Body ground Always Below 1 Ω
Connect the shift lock control unit assembly connector.
- Result:
Proceed to OK NG
OK
NG
Disconnect the TCM connector.
Measure the resistance according to the value(s) in the table below.
- Standard Resistance:
Tester Connection Condition Specified Condition Click Location & Routing(D71)Location & Routingewd_type=routing;type=c;code=D71
Click Connector(D71)Engine Compartment>Engine Wire>Transmission Control ECUewd_type=component;type=c;code=D71;pinno=28,27
D71-28 (SFTU) - Body ground Shift lever held in "+" Below 1 Ω D71-28 (SFTU) - Body ground Shift lever in M 10 kΩ or higher D71-27 (SFTD) - Body ground Shift lever held in "-" Below 1 Ω D71-27 (SFTD) - Body ground Shift lever in M 10 kΩ or higher
Connect the TCM connector.
- Result:
Proceed to OK NG
OK
NG
NEXT
for Registration: Click hereDrivetrain>K320 (MULTIDRIVE / CVT)>CONTINUOUSLY VARIABLE TRANSAXLE SYSTEM>REGISTRATION
for Initialization: Click hereDrivetrain>K320 (MULTIDRIVE / CVT)>CONTINUOUSLY VARIABLE TRANSAXLE SYSTEM>INITIALIZATION
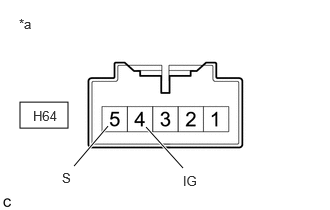
| *a | Component without harness connected
(Shift Lock Control Unit Assembly (Transmission Control Switch)) |
Disconnect the shift lock control unit assembly connector.
Measure the resistance according to the value(s) in the table below.
- Standard Resistance:
Tester Connection Condition Specified Condition Click Location & Routing(H64)Location & Routingewd_type=routing;type=c;code=H64
Click Connector(H64)Instrument Panel>Instrument Panel Wire / Speaker Wire>Transmission Control Switch (Transmission Floor Shift Assembly)ewd_type=component;type=c;code=H64;pinno=4,5
H64-4 (IG) - H64-5 (S) Shift lever in M Below 1 Ω H64-4 (IG) - H64-5 (S) Shift lever not in M 10 kΩ or higher
Connect the shift lock control unit assembly connector.
- Result:
Proceed to OK NG
OK
NG
for TMC Made: Click hereDrivetrain>K320 (MULTIDRIVE / CVT)>SHIFT LEVER (for TMC Made)>REMOVAL
for TMMF Made: Click hereDrivetrain>K320 (MULTIDRIVE / CVT)>SHIFT LEVER (for TMMF Made)>REMOVAL
Disconnect the shift lock control unit assembly connector.
Measure the voltage according to the value(s) in the table below.
- Standard Voltage:
Tester Connection Condition Specified Condition Click Location & Routing(H64)Location & Routingewd_type=routing;type=c;code=H64
Click Connector(H64)Instrument Panel>Instrument Panel Wire / Speaker Wire>Transmission Control Switch (Transmission Floor Shift Assembly)ewd_type=component;type=c;code=H64;pinno=4
H64-4 (IG) - Body ground Ignition switch ON 11 to 14 V H64-4 (IG) - Body ground Ignition switch off Below 1 V
Connect the shift lock control unit assembly connector.
- Result:
Proceed to OK NG
OK
NG
Disconnect the TCM connector.
Disconnect the shift lock control unit assembly connector.
Measure the resistance according to the value(s) in the table below.
- Standard Resistance:
Tester Connection Condition Specified Condition Click Location & Routing(H64,D71)Location & Routingewd_type=routing;type=c,c;code=H64,D71
Click Connector(H64)Instrument Panel>Instrument Panel Wire / Speaker Wire>Transmission Control Switch (Transmission Floor Shift Assembly)ewd_type=component;type=c;code=H64;pinno=5
Click Connector(D71)Engine Compartment>Engine Wire>Transmission Control ECUewd_type=component;type=c;code=D71;pinno=14
H64-5 (S) - D71-14 (B) Always Below 1 Ω H64-5 (S) or D71-14 (B) - Body ground and other terminals Always 10 kΩ or higher
Connect the TCM connector.
Connect the shift lock control unit assembly connector.
- Result:
Proceed to OK NG
OK
NG
NEXT
for Registration: Click hereDrivetrain>K320 (MULTIDRIVE / CVT)>CONTINUOUSLY VARIABLE TRANSAXLE SYSTEM>REGISTRATION
for Initialization: Click hereDrivetrain>K320 (MULTIDRIVE / CVT)>CONTINUOUSLY VARIABLE TRANSAXLE SYSTEM>INITIALIZATION