THEFT DETERRENT / KEYLESS ENTRY IMMOBILISER SYSTEM(for HV Model without Entry and Start System) Security Indicator Light Does not Blink
DESCRIPTION
The transponder key ECU assembly blinks the security indicator light (combination meter assembly) when the immobiliser is set (no key is in the ignition key cylinder).
The main body ECU (multiplex network body ECU) blinks the security indicator light (combination meter assembly) when the theft deterrent system is in the arming preparation state or alarm sounding state.*1
*1: w/ Theft Deterrent System
WIRING DIAGRAM
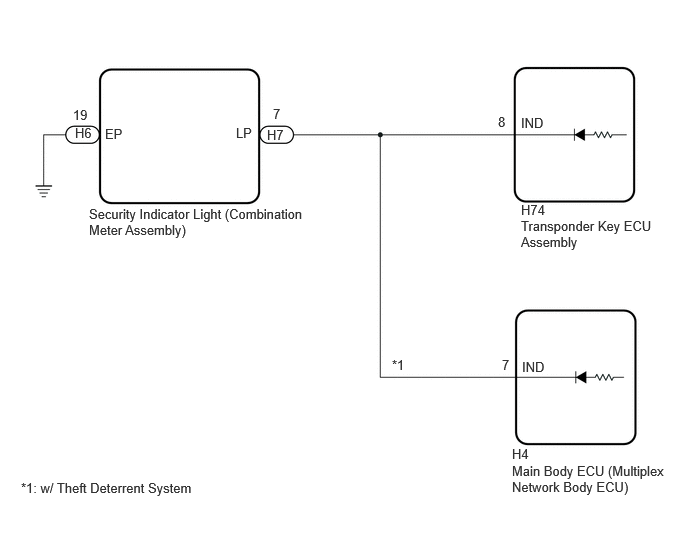
CAUTION / NOTICE / HINT
- NOTICE:
-
If the transponder key ECU assembly is replaced, refer to Service Bulletin.
PROCEDURE
Choose the model to be inspected.
- Result:
Result Proceed to w/o Theft Deterrent System A w/ Theft Deterrent System B
A
B
Perform the Active Test according to the display on the GTS.
- Body Electrical > Immobiliser > Active Test
-
Tester Display Measurement Item Control Range Diagnostic Note Security Indicator Security indicator light (combination meter assembly) ON/OFF -
- Body Electrical > Immobiliser > Active Test
-
Tester Display Security Indicator - 50004 260 1
- OK:
Security indicator light can be turned on and off using the GTS.
- Result:
Proceed to OK NG
OK
NG
Disconnect the H7 security indicator light (combination meter assembly) connector.
Disconnect the H74 transponder key ECU assembly connector.
Measure the resistance according to the value(s) in the table below.
- Standard Resistance:
Tester Connection Condition Specified Condition Click Location & Routing(H74,H7)Location & Routingewd_type=routing;type=c,c;code=H74,H7
Click Connector(H74)Instrument Panel>Instrument Panel Wire / Speaker Wire>Transponder Key ECU Assemblyewd_type=component;type=c;code=H74;pinno=8
Click Connector(H7)Instrument Panel>Instrument Panel Wire / Speaker Wire>Combination Meter Assemblyewd_type=component;type=c;code=H7;pinno=7
H74-8 (IND) - H7-7 (LP) Always Below 1 Ω H74-8 (IND) or H7-7 (LP) - Other terminals and body ground Always 10 kΩ or higher
- Result:
Proceed to OK NG
OK
NG
Connect the H74 transponder key ECU assembly connector.
Measure the resistance according to the value(s) in the table below.
- Standard Resistance:
Tester Connection Condition Specified Condition Click Location & Routing(H74)Location & Routingewd_type=routing;type=c;code=H74
Click Connector(H74)Instrument Panel>Instrument Panel Wire / Speaker Wire>Transponder Key ECU Assemblyewd_type=component;type=c;code=H74;pinno=8
H74-8 (IND) - Body ground Key not in ignition key cylinder Pulse generation Key in ignition key cylinder Below 1 V
- Result:
Proceed to OK NG
OK
NG
Perform the Active Test according to the display on the GTS.
- Body Electrical > Immobiliser > Active Test
-
Tester Display Measurement Item Control Range Diagnostic Note Security Indicator Security indicator light (combination meter assembly) ON/OFF -
- Body Electrical > Immobiliser > Active Test
-
Tester Display Security Indicator - 50004 260 1
- Body Electrical > Main Body > Active Test
-
Tester Display Measurement Item Control Range Diagnostic Note Security Indicator Security indicator light (combination meter assembly) ON/OFF -
- Body Electrical > Main Body > Active Test
-
Tester Display Security Indicator - 50004 449 1
- Result:
Result Proceed to Security indicator light (combination meter assembly) operation is normal when performing the "Main Body" and "Immobiliser" Active Test A ·Security indicator light (combination meter assembly) operation is not normal when performing the "Immobiliser" Active Test
·Security indicator light (combination meter assembly) operation is normal when performing the "Main Body" Active Test
B ·Security indicator light (combination meter assembly) operation is normal when performing the "Immobiliser" Active Test
·Security indicator light (combination meter assembly) operation is not normal when performing the "Main Body" Active Test
C Security indicator light (combination meter assembly) operation is not normal when performing the "Main Body" and "Immobiliser" Active Test D
A
B
C
D
When the immobiliser is set, check that the security indicator light (combination meter assembly) blinks.*1
- OK:
The security indicator light (combination meter assembly) blinks normally.
When the theft deterrent system is in the arming preparation state, check that the security indicator light (combination meter assembly) is on.*2
Click hereVehicle Interior>THEFT DETERRENT / KEYLESS ENTRY>THEFT DETERRENT SYSTEM>SYSTEM DESCRIPTION
- OK:
The security indicator light (combination meter assembly) is on.
- Result:
Result Proceed to Both *1 and *2 are OK A *1 is NG (*2 is OK) B *2 is NG (*1 is OK) C Both *1 and *2 are NG D
A
Click hereGeneral>INTRODUCTION>HOW TO TROUBLESHOOT ECU CONTROLLED SYSTEMS>HOW TO PROCEED WITH TROUBLESHOOTING
B
C
for LHD: Click herePower Source / Network>POWER DISTRIBUTION>MAIN BODY ECU (for LHD)>REMOVAL
for RHD: Click herePower Source / Network>POWER DISTRIBUTION>MAIN BODY ECU (for RHD)>REMOVAL
D
Disconnect the H7 security indicator light (combination meter assembly) connector.
Disconnect the H74 transponder key ECU assembly connector.
Measure the resistance according to the value(s) in the table below.
- Standard Resistance:
Tester Connection Condition Specified Condition Click Location & Routing(H74,H7)Location & Routingewd_type=routing;type=c,c;code=H74,H7
Click Connector(H74)Instrument Panel>Instrument Panel Wire / Speaker Wire>Transponder Key ECU Assemblyewd_type=component;type=c;code=H74;pinno=8
Click Connector(H7)Instrument Panel>Instrument Panel Wire / Speaker Wire>Combination Meter Assemblyewd_type=component;type=c;code=H7;pinno=7
H74-8 (IND) - H7-7 (LP) Always Below 1 Ω H74-8 (IND) or H7-7 (LP) - Other terminals and body ground Always 10 kΩ or higher
- Result:
Proceed to OK NG
OK
NG
Disconnect the H7 security indicator light (combination meter assembly) connector.
Disconnect the H4 main body ECU (multiplex network body ECU) connector.
Measure the resistance according to the value(s) in the table below.
- Standard Resistance:
Tester Connection Condition Specified Condition Click Location & Routing(H4,H7)Location & Routingewd_type=routing;type=c,c;code=H4,H7
Click Connector(H4)Instrument Panel>Instrument Panel Wire / Speaker Wire>Main Body ECUewd_type=component;type=c;code=H4;pinno=7
Click Connector(H7)Instrument Panel>Instrument Panel Wire / Speaker Wire>Combination Meter Assemblyewd_type=component;type=c;code=H7;pinno=7
H4-7 (IND) - H7-7 (LP) Always Below 1 Ω H4-7 (IND) or H7-7 (LP) - Other terminals and body ground Always 10 kΩ or higher
- Result:
Proceed to OK NG
OK
for LHD: Click herePower Source / Network>POWER DISTRIBUTION>MAIN BODY ECU (for LHD)>REMOVAL
for RHD: Click herePower Source / Network>POWER DISTRIBUTION>MAIN BODY ECU (for RHD)>REMOVAL
NG
Disconnect the H7 security indicator light (combination meter assembly) connector.
Disconnect the H4 main body ECU (multiplex network body ECU) connector.
Measure the resistance according to the value(s) in the table below.
- Standard Resistance:
Tester Connection Condition Specified Condition Click Location & Routing(H4,H7)Location & Routingewd_type=routing;type=c,c;code=H4,H7
Click Connector(H4)Instrument Panel>Instrument Panel Wire / Speaker Wire>Main Body ECUewd_type=component;type=c;code=H4;pinno=7
Click Connector(H7)Instrument Panel>Instrument Panel Wire / Speaker Wire>Combination Meter Assemblyewd_type=component;type=c;code=H7;pinno=7
H4-7 (IND) - H7-7 (LP) Always Below 1 Ω H4-7 (IND) or H7-7 (LP) - Other terminals and body ground Always 10 kΩ or higher
- Result:
Proceed to OK NG
OK
NG
Disconnect the H6 security indicator light (combination meter assembly) connector.
Measure the resistance according to the value(s) in the table below.
- Standard Resistance:
Tester Connection Condition Specified Condition Click Location & Routing(H6)Location & Routingewd_type=routing;type=c;code=H6
Click Connector(H6)Instrument Panel>Instrument Panel Wire / Speaker Wire>Combination Meter Assemblyewd_type=component;type=c;code=H6;pinno=19
H6-19 (EP) - Body ground Always Below 1 Ω
- Result:
Proceed to OK NG
OK
NG