Home › Engine / Hybrid System › HYBRID / BATTERY CONTROL › ELECTRIC VEHICLE CONVERTER
RM3700E _51 Engine / Hybrid System _093506 HYBRID / BATTERY CONTROL _0510646 ELECTRIC VEHICLE CONVERTER A

HYBRID / BATTERY CONTROL  ELECTRIC VEHICLE CONVERTER  INSTALLATION  


CAUTION / NOTICE / HINT
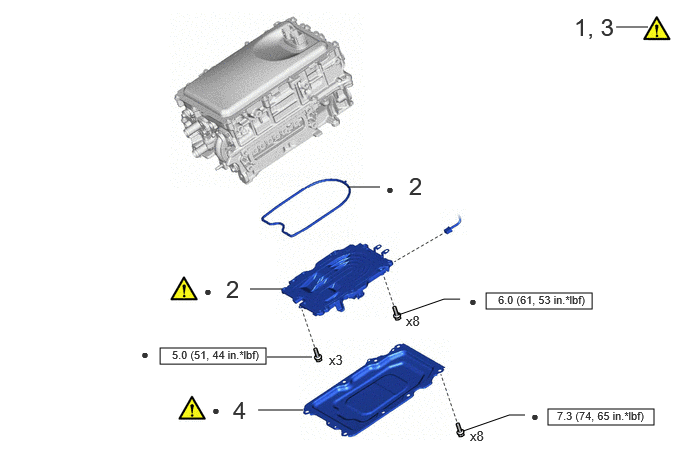
COMPONENTS (INSTALLATION)
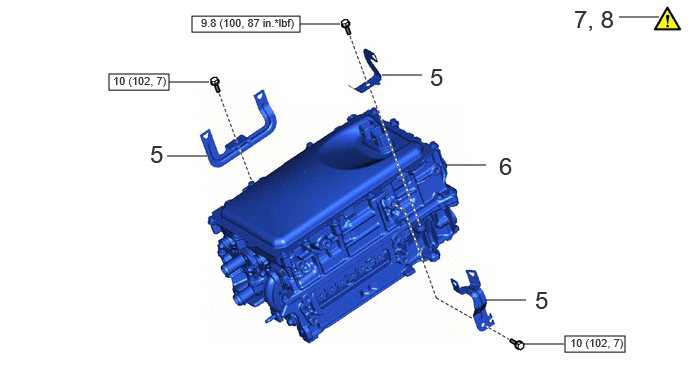
A505409N02
1.667,3.625 2.771,3.792 1.104,0.167 5.063,3.052 6.167,3.219 1.104,0.167 5.708,4.26 6.813,4.427 1.104,0.167 3.625,1.948 3.958,1.948 false 6.417,0.281 6.75,0.281 false 2.604,3.01 2.938,3.01 false 2.688,4.271 3.156,4.271 false 2.781,3.719 3.25,3.719 false 4.146,3.281 4.625,3.115 4.625,3.115 4.792,3.115 false 4.823,4.49 5.302,4.323 5.302,4.323 5.469,4.323 false 5.979,0.135 6.698,0.667 0.719,0.531 18 false 1, 3 2.125,2.948 2.406,3.302 0.281,0.354 10 false ● 2.427,4.125 2.708,4.479 0.281,0.354 18 false 4 3.427,3.667 3.708,4.021 0.281,0.354 10 false x3 4.229,3.26 4.51,3.615 0.281,0.354 10 false x8 4.896,4.458 5.177,4.813 0.281,0.354 10 false x8 2.354,2.865 2.635,3.219 0.281,0.354 18 false 2 2.208,4.188 2.49,4.542 0.281,0.354 10 false ● 5.531,4.25 5.813,4.604 0.281,0.354 10 false ● 4.885,3.052 5.167,3.406 0.281,0.354 10 false ● 1.469,3.604 1.75,3.958 0.281,0.354 10 false ● 5.188,3.052 6.365,3.448 1.177,0.396 8 false 6.0 (61, 53 in.*lbf) 5.802,4.26 6.99,4.563 1.188,0.302 8 false 7.3 (74, 65 in.*lbf) 4.26,1.792 4.542,2.146 0.281,0.354 18 false 2 4.021,1.885 4.302,2.24 0.281,0.354 10 false ● 1.792,3.625 3.438,3.875 1.646,0.25 8 false 5.0 (51, 44 in.*lbf)

Procedure Part Name Code
Z101186

Z101188

Z101187

1 HOW TO PREVENT STATIC ELECTRICITY - (Click here) - -
2 HV CONVERTER KIT - (Click here) - -
3 CHECK FOR AIR LEAK - (Click here) - -
4 CONVERTER COVER - (Click here) - -

V100146

N*m (kgf*cm, ft.*lbf): Specified torque ● Non-reusable part

A504595N14
2,0.167 3.125,0.333 1.125,0.167 1.135,0.771 1.76,0.938 0.625,0.167 5.885,3.5 6.51,3.667 0.625,0.167 4.646,1.719 5.063,1.719 false 3.979,0.781 4.396,0.781 false 1.74,1.625 2.156,1.625 false 5.063,3.125 5.479,3.125 false 6.448,0.177 6.865,0.177 false 5.458,3.583 5.875,3.583 false 1.76,0.854 2.177,0.854 false 3.125,0.25 3.542,0.25 false 5.198,1.583 5.479,1.938 0.281,0.354 18 false 6 5.573,2.979 5.854,3.333 0.281,0.354 18 false 5 5.979,0.052 6.635,0.417 0.656,0.365 18 false 7, 8 4.479,0.656 4.76,1.01 0.281,0.354 18 false 5 1.563,1.458 1.844,1.813 0.281,0.354 18 false 5 2.094,0.167 3.26,0.49 1.167,0.323 8 false 9.8 (100, 87 in.*lbf) 1.177,0.771 1.833,1.01 0.656,0.24 8 false 10 (102, 7) 5.938,3.5 6.594,3.74 0.656,0.24 8 false 10 (102, 7)

Procedure Part Name Code
Z101186

Z101188

Z101187

5 WIRE HARNESS CLAMP BRACKET - - - -
6 HYBRID MOTOR CONTROL INVERTER ASSEMBLY G92A0 - - -
7 INSPECT FOR COOLANT LEAK (for Inverter) - (Click here) - -
8 OPERATION CHECK - (Click here) - -

V100146

N*m (kgf*cm, ft.*lbf): Specified torque - -

CAUTION / NOTICE / HINT

NOTICE:

Do not cross-thread the bolts when installing them.


PROCEDURE

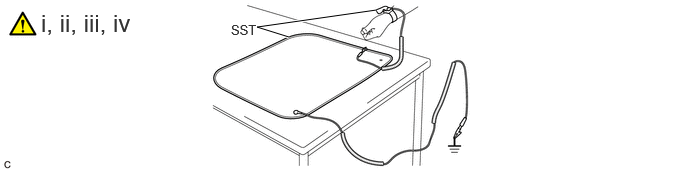
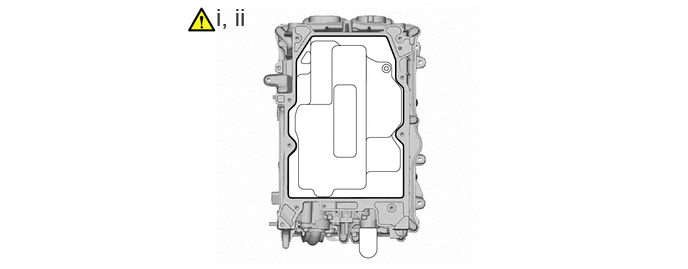
Hide 1. HOW TO PREVENT STATIC ELECTRICITY

Z101186

NOTICE:
·

Static electricity should be eliminated when removing/installing the hybrid motor control inverter assembly.

·

Do not touch the electronic components of a circuit board.

·

Keep clothes away from electronic components.

·

Place the hybrid motor control inverter assembly and any removed electronic components on SST (antistatic mat).


a.
A468986N03
3.01,0.385 2.677,0.281 2.677,0.281 3.917,0.104 true 0.427,0.094 1.719,0.5 1.292,0.406 18 false i, ii, iii, iv 2.406,0.229 2.865,0.427 0.458,0.198 10 false SST

i.

Wear an antistatic wrist strap.

SST
09890-47010  


ii.

Connect the ground clip of the antistatic mat securely to a ground point provided in the workshop or on a workbench (anchor bolt).

HINT:

If the ground clip cable is too short, use an extension cable.


iii.

Connect the ground clip of the antistatic wrist strap securely to the specified point of the antistatic mat.


iv.

When handling internal components of the hybrid motor control inverter assembly, use only antistatic gloves or bare hands to prevent damage from static electricity or the entry of foreign matter.


Hide 2.INSTALL HV CONVERTER KIT

Z101186

CAUTION:
A501102N01
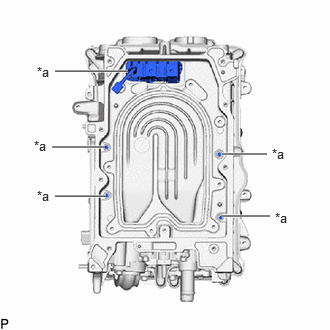
0.573,0.74 1.333,0.74 true 0.542,1.531 1.094,1.531 true 0.573,2.042 1.104,2.042 true 2.313,2.25 2.813,2.25 true 2.313,1.604 2.781,1.604 true 0.385,0.667 0.698,0.865 0.313,0.198 10 false *a 0.354,1.438 0.667,1.635 0.313,0.198 10 false *a 0.385,1.958 0.698,2.156 0.313,0.198 10 false *a 2.833,1.521 3.146,1.719 0.313,0.198 10 false *a 2.865,2.188 3.177,2.385 0.313,0.198 10 false *a

·

As there is a coolant passage underneath the HV converter kit, be careful not to spill any coolant (for inverter) into the filter condenser or the holes around the edge of the hybrid motor control inverter assembly.

·

If any coolant (for inverter) spills into the filter condenser or the holes around the edge of the hybrid motor control inverter assembly, do not reuse the hybrid motor control inverter assembly.

·

If any coolant (for inverter) spills onto any area other than the specified areas, remove it with a clean piece of cloth.


*a Area where coolant (for inverter) must not be allowed to drip


NOTICE:
·

Be careful not to touch any part of the HV converter kit other than the specified areas.

·

Do not allow any moisture to come into contact with the circuit board.


a.
A501844C01
2.865,1.49 3.323,0.896 3.323,0.896 2.833,0.333 false 2.646,1.344 3.323,0.896 3.323,0.896 2.646,0.479 false 3.948,1.51 3.635,0.896 3.635,0.896 3.938,0.323 false 2.781,0.896 3.313,0.896 false 3.406,0.823 3.719,1.021 0.313,0.198 10 false *a 2.052,0.083 2.333,0.438 0.281,0.354 18 false i
*a Press Area - -


i.

Install a new O-ring to the hybrid motor control inverter assembly and then press it at the 7 areas shown in the illustration to ensure it is installed securely.

NOTICE:

Make sure that the O-ring is free of foreign matter.


HINT:

The O-ring is symmetrical.


b.
A505411C01
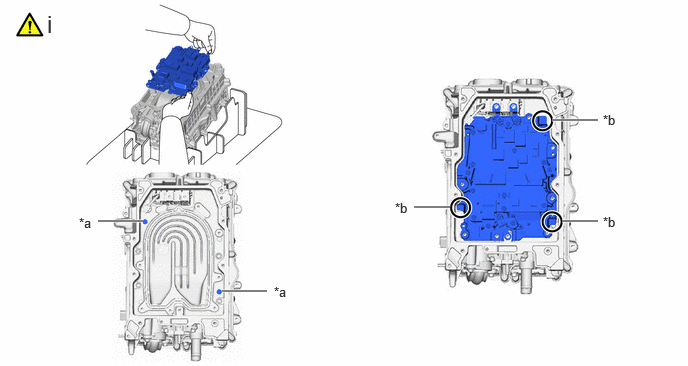
4.313,2.156 4.688,2.156 true 5.75,1.25 6.229,1.25 true 5.854,2.302 6.229,2.302 true 1.021,2.302 1.49,2.302 true 2.313,3.031 2.781,3.031 true 2.854,2.958 3.167,3.156 0.313,0.198 10 false *a 0.823,2.24 1.135,2.438 0.313,0.198 10 false *a 4.115,2.083 4.417,2.281 0.302,0.198 10 false *b 6.281,1.167 6.583,1.365 0.302,0.198 10 false *b 6.281,2.229 6.583,2.427 0.302,0.198 10 false *b 0.49,0.104 0.844,0.479 0.354,0.375 18 false i
*a Guide Pins *b Hold Here


i.

While holding the corners of the new HV converter kit, align it with the guide pins of the hybrid motor control inverter assembly and temporarily install it.

NOTICE:

Make sure that the sealing surfaces and contact surfaces are free of foreign matter.



c.
A504562N02
2.25,0.031 2.531,0.385 0.281,0.354 18 false i

i.

Connect the HV converter kit connector.

NOTICE:
·

Make sure that the inside of the connector is free of foreign matter.

·

Make sure that the connectors are connected securely.

·

Make sure that the wire harness of the connector is engaged to the filter condenser.
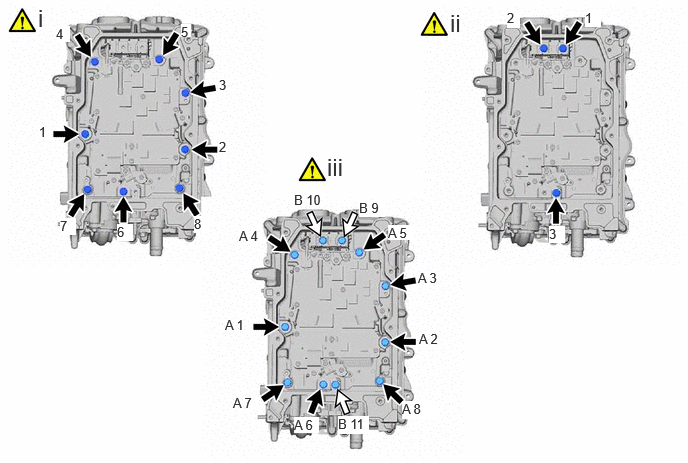


d.
A504563C02
0.406,1.292 0.563,1.49 0.156,0.198 10 false 1 0.583,0.271 0.729,0.438 0.146,0.167 10 true 4 1.885,0.25 1.99,0.385 0.104,0.135 10 true 5 2.281,1.448 2.448,1.625 0.167,0.177 10 false 2 2.281,0.802 2.448,0.979 0.167,0.177 10 false 3 2.021,2.25 2.188,2.427 0.167,0.177 10 true 8 1.219,2.333 1.385,2.51 0.167,0.177 10 true 6 0.625,2.271 0.792,2.448 0.167,0.177 10 true 7 5.281,0.104 5.417,0.292 0.135,0.188 10 true 2 6.094,0.104 6.26,0.281 0.167,0.177 10 true 1 5.719,2.354 5.885,2.531 0.167,0.177 10 true 3 3.063,2 3.427,2.177 0.365,0.177 10 false B 10 3.74,2.083 4.01,2.26 0.271,0.177 10 true B 9 2.49,2.375 2.875,2.563 0.385,0.188 10 false A 4 2.344,3.302 2.729,3.49 0.385,0.188 10 false A 1 2.427,4.115 2.813,4.302 0.385,0.188 10 false A 7 3.063,4.344 3.323,4.51 0.26,0.167 10 true A 6 3.521,4.333 3.844,4.521 0.323,0.188 10 true B 11 4.188,4.177 4.573,4.365 0.385,0.188 10 true A 8 4.365,3.448 4.75,3.635 0.385,0.188 10 false A 2 4.354,2.813 4.74,3 0.385,0.188 10 false A 3 4.042,2.344 4.302,2.5 0.26,0.156 10 true A 5 0.396,0.042 0.573,0.375 0.177,0.333 18 false i 4.688,0.094 4.865,0.427 0.177,0.333 18 false ii 3.406,1.594 3.688,1.927 0.281,0.333 18 false iii
V100135

Bolt (A)
V100136

Bolt (B)


i.

Temporarily install the new 8 bolts evenly in several steps in the order shown in the illustration, and then tighten them to the specified torque.

Torque:
6.0 N*m (61 kgf*cm, 53 in.*lbf)


ii.

Temporarily install the new 3 bolts evenly in several steps in the order shown in the illustration, and then tighten them to the specified torque.

Torque:
5.0 N*m (51 kgf*cm, 44 in.*lbf)


iii.

Check the torque of the 11 bolts in the order shown in the illustration.

Torque:
Bolt (A) : 6.0 N*m (61 kgf*cm, 53 in.*lbf)
Bolt (B) : 5.0 N*m (51 kgf*cm, 44 in.*lbf)


Hide 3.CHECK FOR AIR LEAK

a.
A502577N02
2.115,0.104 2.396,0.458 0.281,0.354 18 false i

i.

Remove the cap from the coolant pipe.

HINT:

Make sure to remove the cap from only the black colored coolant pipe.
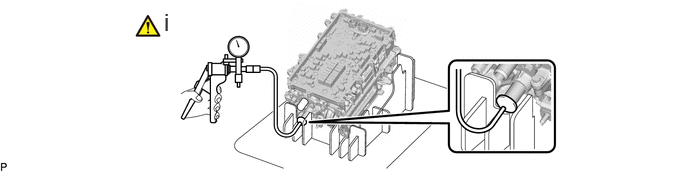


b.
A502578N02
1.708,0.083 1.99,0.438 0.281,0.354 18 false i

i.

Using a vacuum pump, apply a vacuum of 50 kPa (375 mmHg) and check vacuum can be maintained.

Standard:

The vacuum pressure does not decrease for at least 30 seconds.


NOTICE:

If the vacuum pressure decreases, check for a leak between the vacuum pump and coolant pipe. If a leak is not found, remove the HV converter kit and check the installation condition of the O-ring.


Hide 4.INSTALL CONVERTER COVER

Z101186

NOTICE:
·

Do not touch the circuit board.

·

Do not allow any foreign matter or water to enter the hybrid motor control inverter assembly.
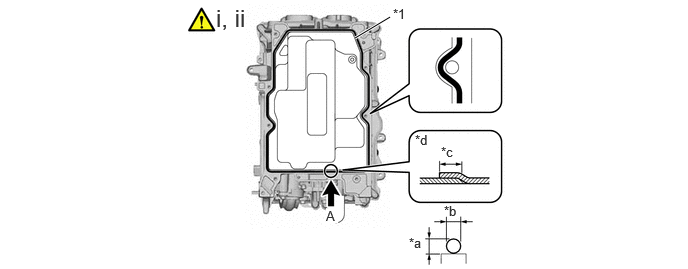
·

Do not touch or allow grease or oil to contact the sealing surfaces of the hybrid motor control inverter assembly.


a.
A504564N02
2.25,0.031 2.688,0.323 0.438,0.292 18 false i, ii

i.

Clean the seal packing removal cover.


ii.

Set the seal packing removal cover on the hybrid motor control inverter assembly.


b.
A504565C02
3.698,0.396 4.063,0.177 true 4.094,0.063 4.406,0.26 0.313,0.198 10 false *1 3.396,2.167 3.521,2.323 0.125,0.156 10 true A 4.323,1.375 4.635,1.573 0.313,0.198 10 false *d 4.594,1.5 4.906,1.698 0.313,0.198 10 false *c 4.625,2.115 4.938,2.313 0.313,0.198 10 false *b 4.26,2.448 4.573,2.646 0.313,0.198 10 false *a 2.25,0.042 2.625,0.333 0.375,0.292 18 false i, ii
*1 Seal Packing - -
*a 3.0 mm (0.118 in.) *b 3.0 mm (0.118 in.)
*c Approximately 20 mm *d View A


i.

Apply seal packing (diameter: 3.0 mm (0.118 in.)) in a continuous line to the locations shown in the illustration.

Seal Packing:

Toyota Genuine Seal Packing 1207F


NOTICE:
·

Install the converter cover with in 3 minutes of applying seal packing.

·

Tighten the bolts within 15 minutes of applying seal packing.


ii.

Remove the seal packing removal cover.

NOTICE:

Slowly remove the seal packing removal cover without touching the seal packing surface.
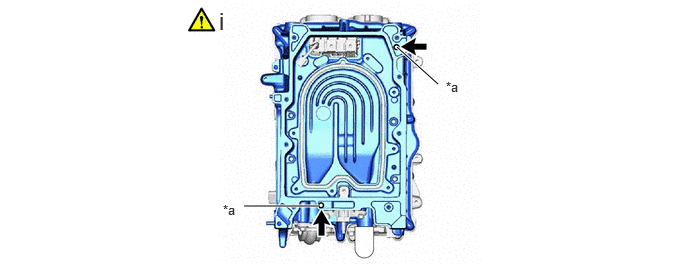


c.
A504566C01
4.135,0.49 4.563,0.875 true 2.542,2.146 3.323,2.146 true 4.646,0.823 4.958,1.021 0.313,0.198 10 false *a 2.323,2.104 2.635,2.302 0.313,0.198 10 false *a 2.281,0.073 2.563,0.427 0.281,0.354 18 false i
*a Guide Pin - -


i.

Align a new converter cover with the guide pins of the hybrid motor control inverter assembly and temporarily install it.

NOTICE:
·

Make sure that the converter cover is free of foreign matter.

·

Make sure to align the HV converter kit with the guide pins correctly.



d.
A505407N02
2.76,0.469 2.917,0.667 0.156,0.198 10 false 1 2.604,0.75 2.76,0.948 0.156,0.198 10 false 7 2.896,0.208 3.052,0.406 0.156,0.198 10 false 4 3.073,0.01 3.229,0.208 0.156,0.198 10 false 5 4.281,0.177 4.438,0.375 0.156,0.198 10 false 6 4.188,0.448 4.323,0.615 0.135,0.167 10 true 3 4.042,0.74 4.177,0.906 0.135,0.167 10 true 2 3.708,1.156 3.844,1.323 0.135,0.167 10 true 8 2.208,0.052 2.635,0.396 0.427,0.344 18 false i, ii

i.

Temporarily install the new 8 bolts evenly in several steps in the order shown in the illustration, and then tighten them to the specified torque.

Torque:
7.3 N*m (74 kgf*cm, 65 in.*lbf)


ii.

Check the torque of the 8 bolts in the order shown in the illustration.

Torque:
7.3 N*m (74 kgf*cm, 65 in.*lbf)

NOTICE:

Make sure that the bolts are securely contacting the converter cover.


Hide G92A0 6.INSTALL HYBRID MOTOR CONTROL INVERTER ASSEMBLY

Hide 7.INSPECT FOR COOLANT LEAK (for Inverter)

Z101186

CAUTION:

To avoid the danger of being burned, do not remove the reserve tank cap while the coolant (for inverter) is still hot. Pressurized, hot coolant (for inverter) and steam may be released and cause serious burns.


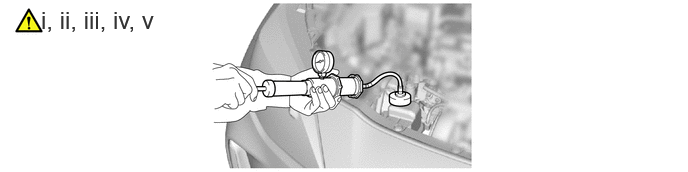
a.
A505412N01
0.427,0.063 1.729,0.375 1.302,0.313 18 false i, ii, iii, iv, v

i.

Remove the reserve tank cap from the inverter reserve tank assembly.


ii.

Add coolant to the FULL line of the inverter reserve tank assembly.


iii.

Install a radiator cap tester to the inverter reserve tank assembly.


iv.

Pump the radiator cap tester to 122 kPa (1.2 kgf/ cm2, 18 psi), and then check that the pressure does not drop.

HINT:

If the pressure drops, check the hoses, radiator assembly, inverter water pump assembly, hybrid vehicle transaxle assembly, and hybrid motor control inverter assembly for leaks.


v.

Reinstall the reserve tank cap to the inverter reserve tank assembly.


Hide 8. OPERATION CHECK

Z101186

HINT:

After the repair, perform the operation checks as follows. Then check for DTCs again.


a.
A461168N01
0.448,0.073 0.729,0.427 0.281,0.354 18 false i

i.

Operation check 1

1. Connect the GTS to the DLC3.

2. Turn the power switch on (IG), turn the GTS on and clear the DTCs.

3. Turn the power switch on (READY).

4. Warm up the engine with the shift lever in P and the A/C turned off until the engine stops.

HINT:

The engine will stop automatically when it is warmed up.


5. Depress the accelerator pedal with the shift lever in P to start the engine.

6. As soon as the engine starts, release the accelerator pedal and wait until the engine stops.

7. Move the shift lever to D and creep the vehicle forward 5 m (16.4 ft.) with the engine stopped and without depressing the accelerator pedal.

NOTICE:

Confirm the safety of the surrounding area before moving the vehicle.


8. Move the shift lever to R and creep the vehicle backward 5 m (16.4 ft.) with the engine stopped and without depressing the accelerator pedal.

NOTICE:

Confirm the safety of the surrounding area before moving the vehicle.


b.

Operation check 2

HINT:

The current at the AMD terminal cannot be measured directly because of space limitations. Measure the current flowing at the auxiliary battery instead.
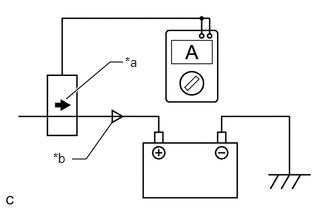

i.
A111747C08
0.688,1.031 1.146,0.646 1.146,0.646 1.281,0.646 true 1.177,1.26 0.896,1.656 0.896,1.656 0.75,1.656 false 1.302,0.563 1.49,0.719 0.188,0.156 10 false *a 0.552,1.563 0.75,1.708 0.198,0.146 10 false *b
*a Probe Direction
*b Current Flowing to Auxiliary Battery


Connect the AC/DC 400 A probe of the tester to the positive (+) auxiliary battery cable.


ii.

Turn the power switch on (READY) and leave the vehicle as it is until the electric current flowing to the auxiliary battery becomes 10 A or less.
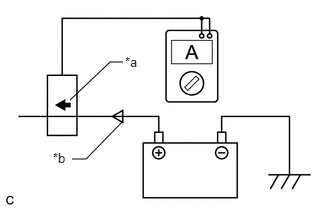

iii.
A111748C08
0.729,1.042 1.146,0.646 1.146,0.646 1.281,0.646 false 1.281,1.26 0.896,1.656 0.896,1.656 0.75,1.656 false 1.302,0.563 1.479,0.719 0.177,0.156 10 false *a 0.552,1.563 0.729,1.719 0.177,0.156 10 false *b
*a Probe Direction
*b Current Flowing from Auxiliary Battery


Change the orientation of the AC/DC 400 A probe.


iv.

Measure the current flowing from the auxiliary battery with the power switch on (READY), the headlight position switch and blower motor switch in the HI position, and the rear window defogger turned on.

Standard Current:
Item Condition Specified Condition
Current flowing from auxiliary battery Power switch on (READY)
(Headlight position switch and blower motor switch in HI position, and rear window defogger on)
0 A or less
(No current from auxiliary battery)


v.

Turn the power switch off.