HYBRID / BATTERY CONTROL MOTOR GENERATOR CONTROL COMPUTER REMOVAL
CAUTION / NOTICE / HINT
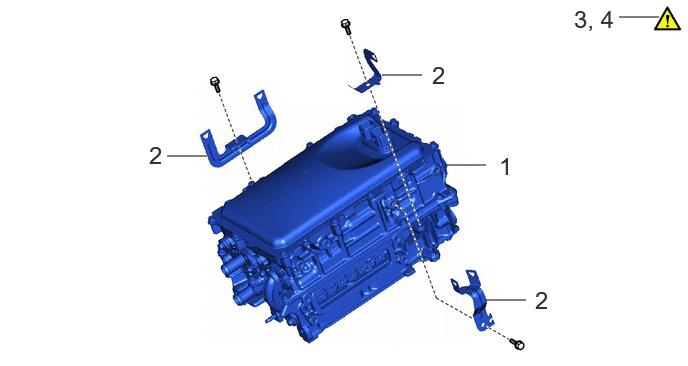
| Procedure | Part Name Code | 
|

|

|
|
|---|---|---|---|---|---|
| 1 | HYBRID MOTOR CONTROL INVERTER ASSEMBLY | G92A0 | - | - | - |
| 2 | WIRE HARNESS CLAMP BRACKET | - | - | - | - |
| 3 | VERIFY THAT VOLTAGE OF HYBRID MOTOR CONTROL INVERTER ASSEMBLY IS 0 V | - | ( ) |
- | - |
| 4 | CLEAN HYBRID MOTOR CONTROL INVERTER ASSEMBLY | G92A0 | ()
|
- | - |
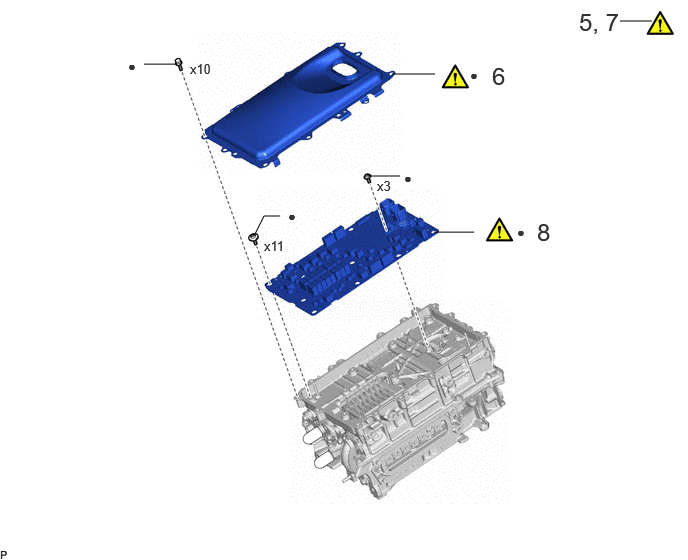
| Procedure | Part Name Code |
|
|
|
|
|---|---|---|---|---|---|
| 5 | HOW TO PREVENT STATIC ELECTRICITY | - | ()
|
- | - |
| 6 | INVERTER UPPER COVER | G9221A | ()
|
- | - |
| 7 | SEAL PACKING FROM HYBRID MOTOR CONTROL INVERTER ASSEMBLY | - | ()
|
- | - |
| 8 | MOTOR GENERATOR CONTROL ECU KIT | - | ()
|
- | - |
| ● | Non-reusable part | - | - |
CAUTION / NOTICE / HINT
The necessary procedures (adjustment, calibration, initialization, or registration) that must be performed after parts are removed and installed, or replaced during motor generator control ECU kit removal/installation are shown below.
| Replaced Part or Performed Procedure | Necessary Procedures | Effect/Inoperative Function when Necessary Procedure not Performed | Link |
|---|---|---|---|
| Auxiliary battery terminal is disconnected/reconnected | Memorize steering angle neutral point | Parking assist monitor system | ()
|
| Panoramic view monitor system | ()
|
- CAUTION:
- ·
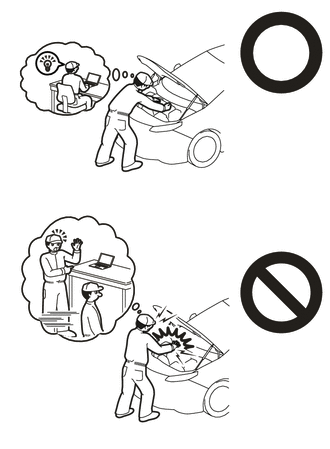
Orange wire harnesses and connectors indicate high-voltage circuits. To prevent electric shock, always follow the procedure described in the repair manual.
Click hereEngine / Hybrid System>HYBRID / BATTERY CONTROL>HYBRID CONTROL SYSTEM>PRECAUTION
·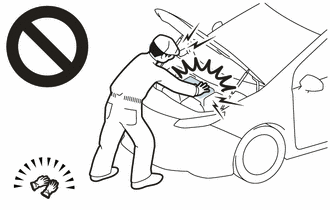
To prevent electric shock, wear insulated gloves when working on wire harnesses and components of the high voltage system.
- NOTICE:
-
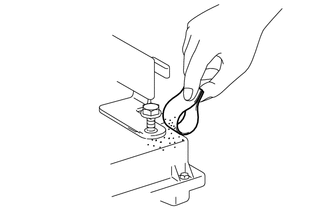
- ·
If metal shavings are created when bolts are removed from the hybrid motor control inverter assembly, remove them using tape or equivalent.
·Use non-residue type tape.
- HINT:
-
When the cable is disconnected / reconnected to the auxiliary battery terminal, systems temporarily stop operating. However, each system has a function that completes learning the first time the system is used.
- ·
Learning completes when vehicle is driven
Effect/Inoperative Function When Necessary Procedures are not Performed Necessary Procedures Link Lane tracing assist system Drive the vehicle straight ahead at 35 km/h (22 mph) or more for 5 seconds or more. ( )
Pre-collision system Parking support brake system
·Learning completes when vehicle is operated normally
Effect/Inoperative Function When Necessary Procedures are not Performed Necessary Procedures Link Power door lock control system
·Back door opener
Perform door unlock operation with door control switch or electrical key transmitter sub-assembly switch. ( )
Power back door system Fully close the back door by hand.
- HINT:
-
Initialization is not necessary if the above procedures are performed while the back door is closed.
( )
Air conditioning system After the ignition switch is turned to ON, the servo motor standard position is recognized. -
- HINT:
-
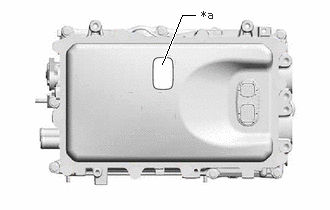 1.688,0.667 1.896,0.156 1.896,0.156 2.031,0.156 true 2.094,0.083 2.406,0.24 0.313,0.156 10 false *a
*a Part Number Label
-
When replacing the motor generator control computer kit, make sure to check the part number label on the inverter upper cover and replace the motor generator control computer kit with the appropriate part.
Part Number Compatibility Table Part Number Motor Generator Control ECU Kit Number If the part number is not listed above, refer to the parts catalog.
G9200-47240
G9200-4726004899-47100(Number of Connectors:21)
PROCEDURE

 G92A0
1.REMOVE HYBRID MOTOR CONTROL INVERTER ASSEMBLY
2.REMOVE WIRE HARNESS CLAMP BRACKET
3. VERIFY THAT VOLTAGE OF INVERTER WITH CONVERTER IS 0 V
|
|
|

| *a | Tape | - | - |
Remove the protective tape from the HV floor under wire opening.
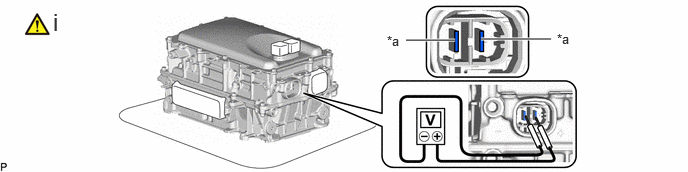
| *a | Voltage Measurement Position | - | - |
Using a voltmeter, measure the voltage between the high voltage cable connector terminals.
- Standard voltage:
0V
- HINT:
- ·
Use measuring range of DC 750 V or more on the voltmeter.
·If it is confirmed that high-voltage is not being applied to the hybrid motor control inverter assembly, the following procedures can be performed without using insulated tools or gloves.

Apply protective tape to the area that was exposed.
- NOTICE:
-
Use non-residue type tape.
G92A0
4.CLEAN HYBRID MOTOR CONTROL INVERTER ASSEMBLY
|
|
|

Using a piece of cloth, clean the outside of the hybrid motor control inverter assembly and around the bolts.
5. HOW TO PREVENT STATIC ELECTRICITY
|
|
|
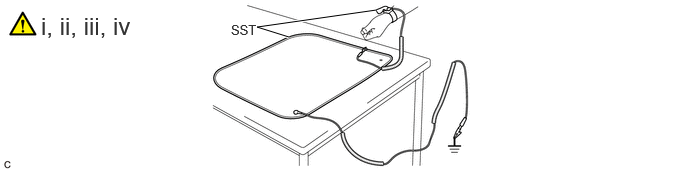
Wear an antistatic wrist strap.
- SST
- 09890-47010
Connect the ground clip of the antistatic mat securely to a ground point provided in the workshop or on a workbench (anchor bolt).
- HINT:
-
If the ground clip cable is too short, use an extension cable.
Connect the ground clip of the antistatic wrist strap securely to the specified point of the antistatic mat.
When handling internal components of the hybrid motor control inverter assembly, use only antistatic gloves or bare hands to prevent damage from static electricity or the entry of foreign matter.
G9221A
6.REMOVE INVERTER UPPER COVER

Remove the 10 bolts.
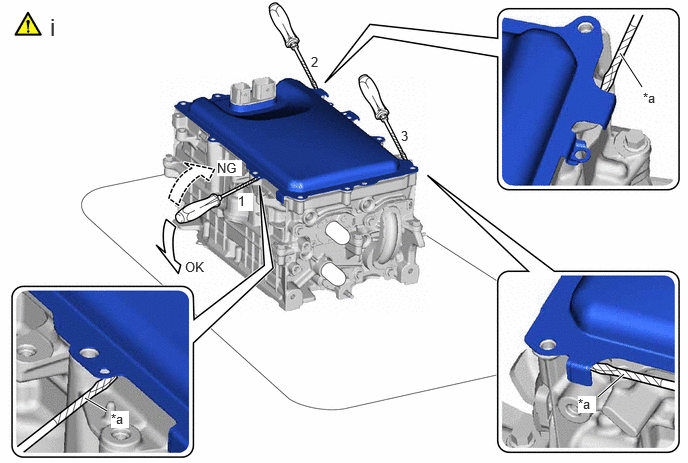
| *a | Protective Tape | - | - |
Using a screwdriver with its tip wrapped with protective tape, remove the inverter upper cover from the hybrid motor control inverter assembly.
- NOTICE:
- ·
Do not damage the sealing surfaces of the hybrid motor control inverter assembly.
·Do not touch or allow grease or oil to contact the sealing surfaces of the hybrid motor control inverter assembly.
·Be careful not to damage the sealing surfaces of the hybrid motor control inverter assembly.
·To prevent internal components of the hybrid motor control inverter assembly from being damaged, do not insert the screwdriver excessively.
7.REMOVE SEAL PACKING FROM INVERTER WITH CONVERTER ASSEMBLY
|
|
|
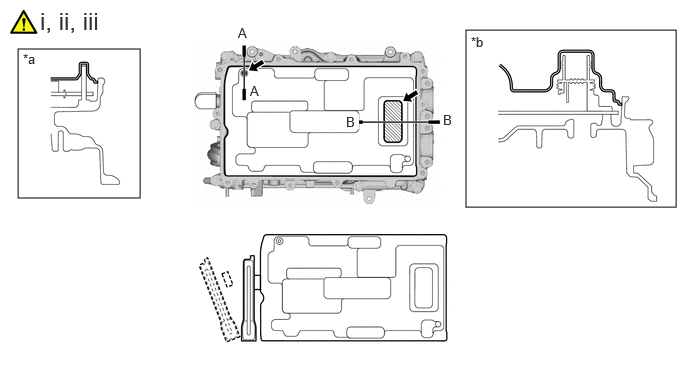
| *a | A-A Cross Section | *b | B-B Cross Section |

|
Push | - | - |
Using a finger, remove any seal packing that has seeped into the hybrid motor control inverter assembly.
- HINT:
-
Make sure to remove any seal packing which has seeped toward the inside of hybrid motor control inverter assembly before installing the seal packing removal cover, otherwise the seal packing may be pushed into the hybrid motor control inverter assembly.
Break off the seal packing removal cover and scraper at each break off line.
Set the seal packing removal cover on the hybrid motor control inverter assembly and secure it by lightly pressing it at the 2 areas shown in the illustration.
- NOTICE:
-
Make sure that the seal packing removal cover is in secure contact with the inside surface of the hybrid motor control inverter assembly without any gaps.

| *a | MG Connector Opening | - | - |
Place the hybrid motor control inverter assembly on its side on an antistatic mat as shown in the illustration.
- NOTICE:
- ·
Make sure that the MG connector opening in the hybrid motor control inverter assembly is facing upward.
·Make sure that the hybrid motor control inverter assembly is oriented correctly, otherwise seal packing may enter the hybrid motor control inverter assembly.
Using a scraper, remove any remaining seal packing from the hybrid motor control inverter assembly.
- NOTICE:
- ·
It is not necessary to remove small amounts of seal packing which are not easily scraped off.
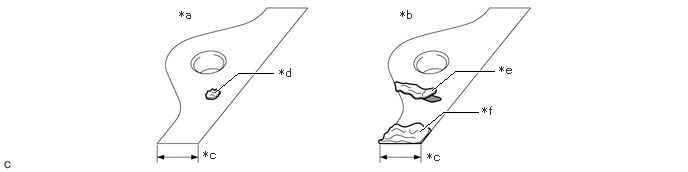 2.24,0.958 2.479,0.76 2.479,0.76 2.844,0.76 true 4.5,0.938 4.74,0.74 4.74,0.74 5.146,0.74 true 4.375,1.365 4.615,1.167 4.615,1.167 4.979,1.167 true 1.865,0.083 2.094,0.24 0.229,0.156 10 false *a 4.167,0.083 4.396,0.24 0.229,0.156 10 false *b 2.115,1.542 2.344,1.698 0.229,0.156 10 false *c 4.448,1.563 4.677,1.719 0.229,0.156 10 false *c 2.906,0.688 3.219,0.885 0.313,0.198 10 false *d 5.198,0.656 5.51,0.854 0.313,0.198 10 false *e 5.021,1.083 5.333,1.281 0.313,0.198 10 false *f
*a Correct *b Incorrect *c Width of Sealing Surface *d Difficult to Remove Seal Packing *e Peeled Off Seal Packing *f Seal Packing Remaining on Full Width of Sealing Surface
·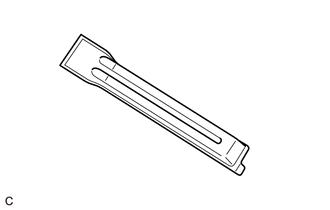
Make sure to use the scraper supplied with the seal packing removal cover.
- HINT:
-
Use the small end of the scraper to remove seal packing from small areas such as bolt holes.
Using a clean piece of cloth, clean the sealing surfaces of the hybrid motor control inverter assembly.
- NOTICE:
- ·
Do not use compressed air or a vacuum cleaner to clean the sealing surfaces of the hybrid motor control inverter assembly.
·Do not use non-residue solvent to clean the sealing surfaces of the hybrid motor control inverter assembly.

Remove the seal packing removal cover.
- NOTICE:
-
Make sure that the hybrid motor control inverter assembly is oriented correctly, otherwise seal packing may enter the hybrid motor control inverter assembly when removing the seal packing removal cover.
Check for and remove any foreign matter which has entered the hybrid motor control inverter assembly.
Set the hybrid motor control inverter assembly upright.
Clean the seal packing removal cover.
- HINT:
-
As the seal packing removal cover will be reused, it is necessary to clean it to prevent foreign matter from entering the hybrid motor control inverter assembly and prevent damage.
8.REMOVE MOTOR GENERATOR CONTROL ECU KIT
|
|
|

Install the seal packing removal cover to the hybrid motor control inverter assembly.
- HINT:
-
The seal packing removal cover is installed to help prevent the motor generator control computer kit from being damaged if a part or tool is dropped on it.
Install the 2 guide pins by hand at the positions shown in the illustration.
- NOTICE:
-
Make sure that the guide pins are tightened securely.

Remove the seal packing removal cover.
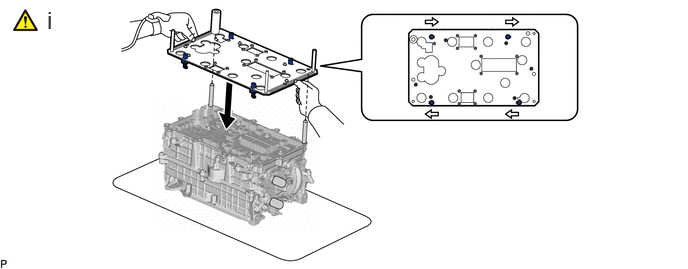

|
Unlock | 
|
Rib |
Check that the 4 clips of the circuit board replacement jig are unlocked, and then while holding the circuit board replacement jig by the ribs, align it with the guide pins and set it on the hybrid motor control inverter assembly.
- HINT:
-
Make sure that circuit board replacement jig is perfectly level with the sealing surface.
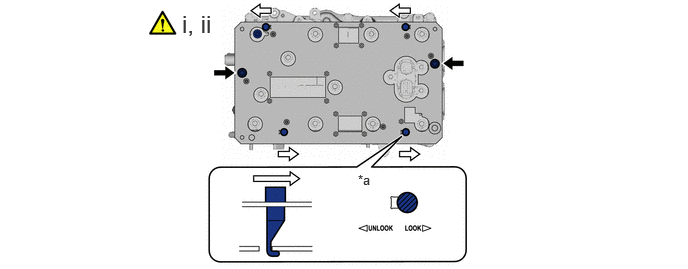
| *a | Locked | - | - |

|
Bolt |
|
Lock |
Secure the circuit board replacement jig with 2 inverter upper cover installation bolts.
Lock the 4 clips as shown in the illustration to secure the circuit board replacement jig to the circuit board.
- NOTICE:
-
When locking the clips of the circuit board replacement jig, do not apply excessive force to the clips, otherwise the circuit board replacement jig may be damaged.
- HINT:
-
Make sure that the clips of the circuit board replacement jig are securely locked.
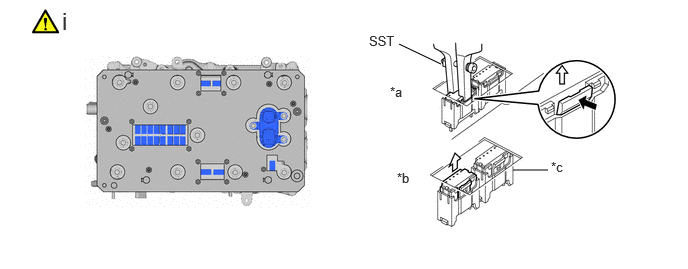
| *a | Connected Vibration Dampening Connector | *b | Disconnected Vibration Dampening Connector |
Using SST, release the lock of each vibration dampening connector and raise the 21 vibration dampening connectors until they reach the stopper of the circuit board replacement jig.
- SST
- 09905-00040
- NOTICE:
-
When disconnecting the vibration dampening connectors, release the lock of each connector with SST and then carefully lift the connector the specified amount.
- HINT:
-
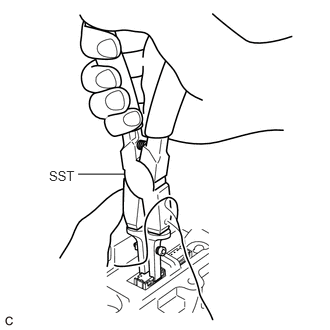 0.813,1.813 1.302,1.813 false 0.51,1.75 0.969,1.948 0.458,0.198 10 false SST
- ·
To prevent the vibration dampening connectors from being pulled up excessively, use both hands to raise them slowly as shown in the illustration.
·The position of the lock will vary depending on the position of the vibration dampening connector. Refer to the arrows on the circuit board replacement jig.

|
|
Bolt (A) |
|
Bolt (B) |
Remove the 3 bolts (A).
- HINT:
-
If the bolts are difficult to remove from the circuit board replacement jig, use a magnet hand.
Remove the 11 bolts (B).
- HINT:
-
If the bolts are difficult to remove from the circuit board replacement jig, use a magnet hand.
Remove the 2 inverter upper cover installation bolts.
|
|
Rib | - | - |
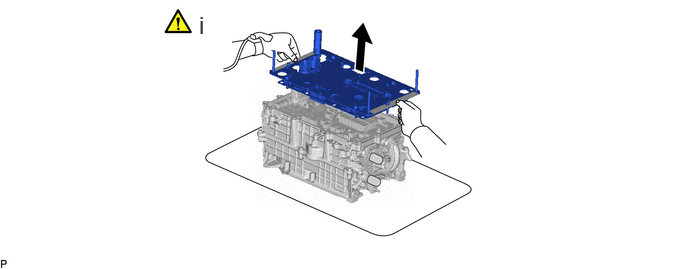
While holding the circuit board replacement jig by the ribs, evenly lift the circuit board replacement jig and circuit board straight up and remove it.
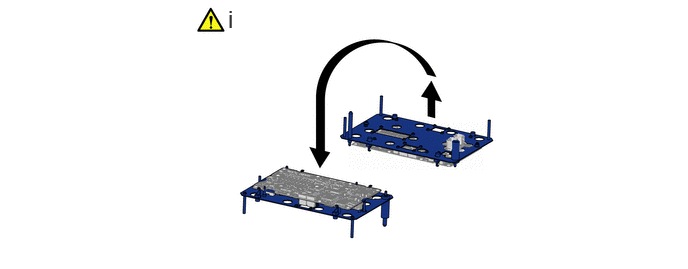
Place the circuit board replacement jig upside down on a clean workbench.
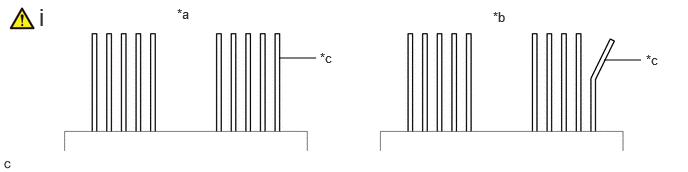
| *a | Correct | *b | Incorrect |
| *c | Terminal | - | - |
Check that the terminals of the hybrid motor control inverter assembly are not bent or damaged and that it is free of foreign matter.
- NOTICE:
- ·
Do not touch the terminals.
·If any of the terminals are bent, replace the hybrid motor control inverter assembly with a new one. Do not attempt to repair the terminals.
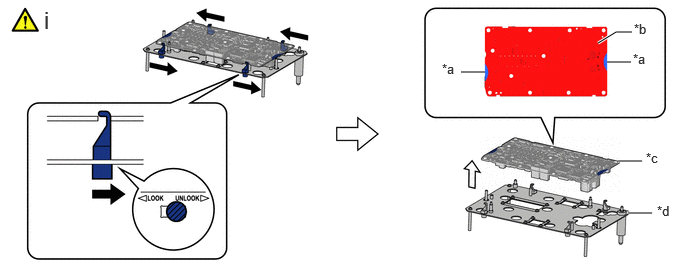
| *a | Hold here | *b | Do not hold here |
| *c | Circuit Board | *d | Circuit Board Replacement Jig |
|
|
Unlock | - | - |
Unlock the 4 circuit board replacement jig clips, and then while holding the sides of the circuit board or the top and bottom of the circuit board at the areas shown in the illustration, lift the circuit board to remove it from the circuit board replacement jig.
- NOTICE:
-
Be careful not to touch any part of the circuit board other than the specified areas.