HYBRID / BATTERY CONTROL MOTOR GENERATOR CONTROL COMPUTER INSTALLATION
CAUTION / NOTICE / HINT
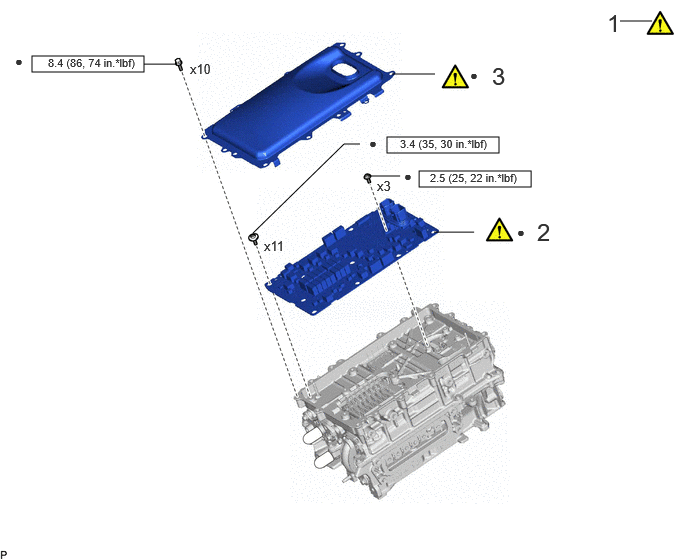
| Procedure | Part Name Code | 
|

|

|
|
|---|---|---|---|---|---|
| 1 | HOW TO PREVENT STATIC ELECTRICITY | - | ( ) |
- | - |
| 2 | MOTOR GENERATOR CONTROL ECU KIT | - | ()
|
- | - |
| 3 | INVERTER UPPER COVER | G9221A | ()
|
- | - |

|
N*m (kgf*cm, ft.*lbf): Specified torque | ● | Non-reusable part |
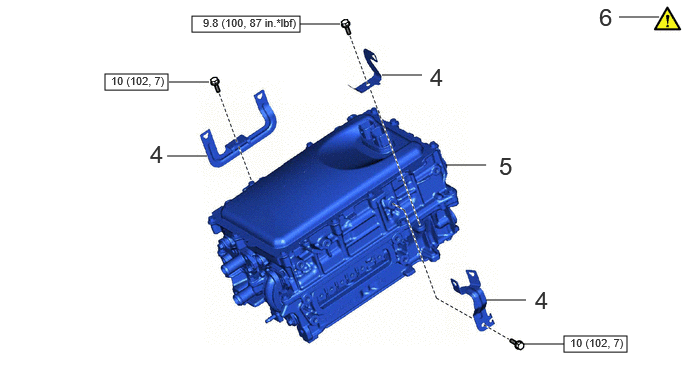
| Procedure | Part Name Code |
|
|
|
|
|---|---|---|---|---|---|
| 4 | WIRE HARNESS CLAMP BRACKET | - | - | - | - |
| 5 | HYBRID MOTOR CONTROL INVERTER ASSEMBLY | G92A0 | - | - | - |
| 6 | OPERATION CHECK | - | ()
|
- | - |
|
|
N*m (kgf*cm, ft.*lbf): Specified torque | - | - |
CAUTION / NOTICE / HINT
- CAUTION:
-
To prevent foreign matter from entering the hybrid motor control inverter assembly, once the seal packing removal cover has been removed, work cannot be suspended until the motor generator control ECU kit is reinstalled.
- NOTICE:
-
Do not cross-thread the bolts when installing them.
PROCEDURE

 1. HOW TO PREVENT STATIC ELECTRICITY
|
|
|

Wear an antistatic wrist strap.
- SST
- 09890-47010
Connect the ground clip of the antistatic mat securely to a ground point provided in the workshop or on a workbench (anchor bolt).
- HINT:
-
If the ground clip cable is too short, use an extension cable.
Connect the ground clip of the antistatic wrist strap securely to the specified point of the antistatic mat.
When handling internal components of the hybrid motor control inverter assembly, use only antistatic gloves or bare hands to prevent damage from static electricity or the entry of foreign matter.
2.INSTALL MOTOR GENERATOR CONTROL ECU KIT
|
|
|
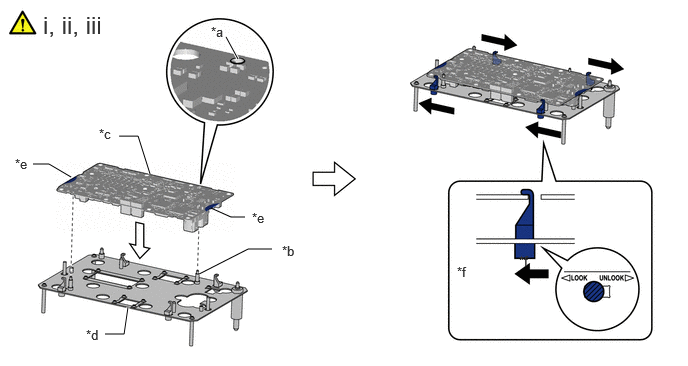
| *a | Guide Hole | *b | Guide Pin |
| *c | Circuit Board | *d | Circuit Board Replacement Jig |
| *e | Hold here | *f | Locked |

|
Lock | - | - |
Check that the 4 clips of the circuit board replacement jig are unlocked, and then while holding the sides of the circuit board, align the guide holes with the guide pins of the circuit board replacement jig and evenly set the circuit board on the circuit board replacement jig.
- NOTICE:
-
Be careful not to touch any part of the circuit board other than the specified areas.
Lock the 4 clips to secure the circuit board replacement jig to the circuit board.
- NOTICE:
-
When locking the clips of the circuit board replacement jig, do not apply excessive force to the clips, otherwise the circuit board replacement jig may be damaged.
- HINT:
-
Make sure that the clips of the circuit board replacement jig are securely locked.
Check that the vibration dampening connectors are released.

| *a | Guides Visible | *b | Guides Not Visible |
Check that the guides of each vibration dampening connector are visible as shown in the illustration.
- NOTICE:
-
When the vibration dampening connectors are connected, the guides will no longer be visible and cannot be returned. Therefore, it any of the guides are not visible, replace the motor generator control computer kit with a new one.
- HINT:
-
The guide on the back of each vibration dampening connector is a mechanism which guides the terminals so they do not bend when installing the circuit board.
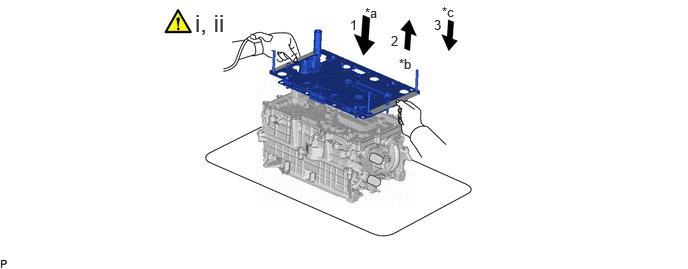
| *a | Align and lower circuit board replacement jig and circuit board | *b | Check terminals |
| *c | Set circuit board replacement jig and circuit board on sealing surface | - | - |

|
Rib | - | - |
While holding the circuit board replacement jig by the ribs, align the circuit board replacement jig and circuit board with the guide pins and lower them evenly onto hybrid motor control inverter assembly, checking that the terminals connect appropriately.
Evenly lift the circuit board replacement jig and circuit board to the top of the guide pins and check the terminals.
- HINT:
-
Be careful not to remove the circuit board replacement jig and circuit board from the guide pins.
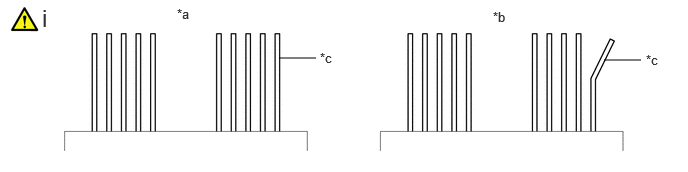
| *a | Correct | *b | Incorrect |
| *c | Terminal | - | - |
After confirming that the terminals are not bent or damaged, lower the circuit board replacement jig and circuit board evenly along the guide pins and set them on the hybrid motor control inverter assembly.
- NOTICE:
- ·
Do not touch the terminals.
·If any of the terminals are bent, replace the hybrid motor control inverter assembly with a new one. Do not attempt to repair the terminals.
- HINT:
-
Make sure that the circuit board replacement jig is evenly and completely contacting the sealing surface of the hybrid motor control inverter assembly.
|
|
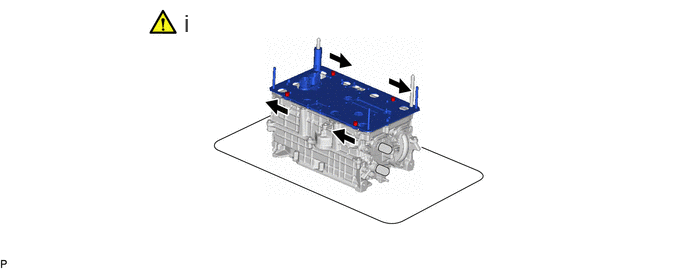
Unlock | - | - |
Unlock the 4 circuit board replacement jig clips as shown in the illustration.
- HINT:
- ·
Make sure that all of the circuit board replacement jig clips are completely unlocked.
·Be careful not to lift the circuit board replacement jig.

|
|
Bolt (A) | 
|
Bolt (B) |
Temporarily install 14 new bolts evenly in several steps in the order shown in the illustration, and then tighten them to the specified torque.
- Torque:
- Bolt (A) : 2.5 N*m (25 kgf*cm, 22 in.*lbf)
- Bolt (B) : 3.4 N*m (35 kgf*cm, 30 in.*lbf)
Check the torque of the 14 bolts in the order shown in the illustration.
- Torque:
- Bolt (A) : 2.5 N*m (25 kgf*cm, 22 in.*lbf)
- Bolt (B) : 3.4 N*m (35 kgf*cm, 30 in.*lbf)
- NOTICE:
-
Make sure that the bolts are securely contacting the circuit board.
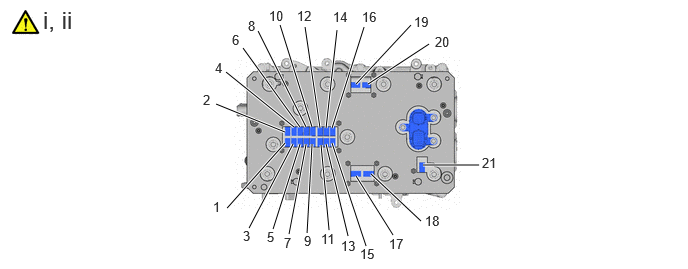
Push the 21 vibration dampening connectors to connect them in the order shown in the illustration.
- HINT:
- ·
Push the center of each vibration dampening connector to connect them.
·Make sure the vibration dampening connectors are connected securely by listening for a click sound and checking that they are level with the circuit board replacement jig.
Visually check that the vibration dampening connectors are securely connected.
- HINT:
-
The vibration dampening connectors can be determined to be connected if they are level with the circuit board replacement jig.
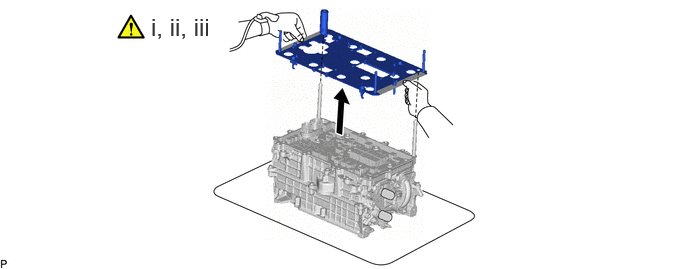
|
|
Rib | - | - |
While holding the circuit board replacement jig by the ribs, evenly lift the circuit board replacement jig straight up and remove it.
- HINT:
-
Make sure that the circuit board replacement jig clips are released before removing the circuit board replacement jig.
Confirm that the following conditions are met before continuing work:
All of the vibration dampening connectors are securely connected.
All of the screws are installed and tightened to the specified torque.
The circuit board is free of foreign matter.
The circuit board is not damaged.
Clean the seal packing removal cover.
- NOTICE:
-
Completely remove any seal packing and foreign matter from the seal packing removal cover using compressed air or a vacuum cleaner.

Install the seal packing removal cover to the hybrid motor control inverter assembly.

Remove the 2 guide pins by hand.
G9221A
3.INSTALL INVERTER UPPER COVER
|
|
|
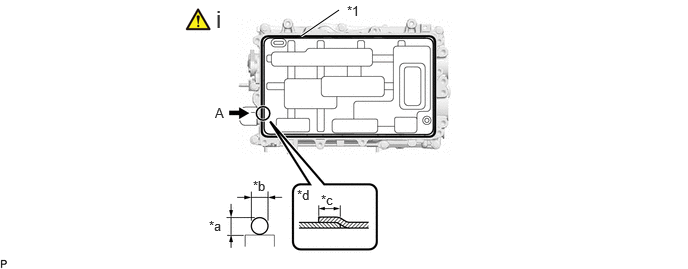
| *1 | Seal Packing | - | - |
| *a | 3.0 mm (0.118 in.) | *b | 3.0 mm (0.118 in.) |
| *c | Approximately 20 mm | *d | View A |
Starting from point A and moving clockwise, apply seal packing (diameter: 3.0 mm (0.118 in.)) in a continuous line as shown in the illustration.
- Seal Packing:
Toyota Genuine Seal Packing 1207F
- NOTICE:
- ·
Install the inverter upper cover with in 3 minutes of applying seal packing.
·Tighten the bolts within 15 minutes of applying seal packing.

Remove the seal packing removal cover.
- NOTICE:
-
Slowly remove the seal packing removal cover without touching the seal packing surface.
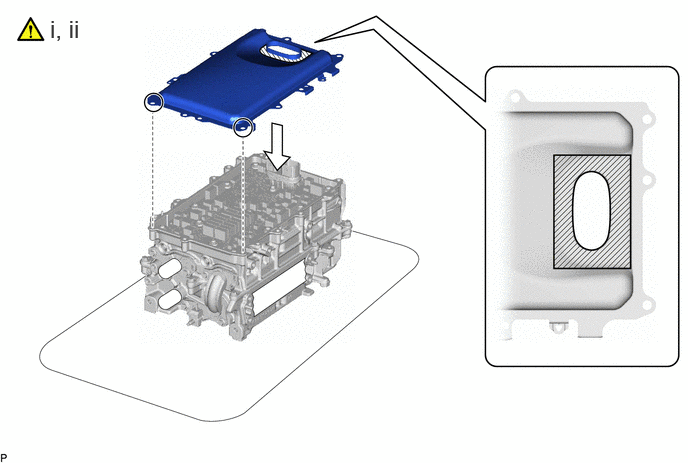

|
Area to Push | - | - |
Using the low voltage connectors of the motor generator control ECU kit as a reference, temporarily install a new inverter upper cover.
- NOTICE:
- ·
Make sure that the inverter upper cover is free of foreign matter.
·Make sure to only press on area of the inverter upper cover shown in the illustration.
·Make sure that the flanges of the inverter upper cover do not get caught on the hybrid motor control inverter assembly.
Cover the low voltage connectors of the motor generator control ECU kit with masking tape.
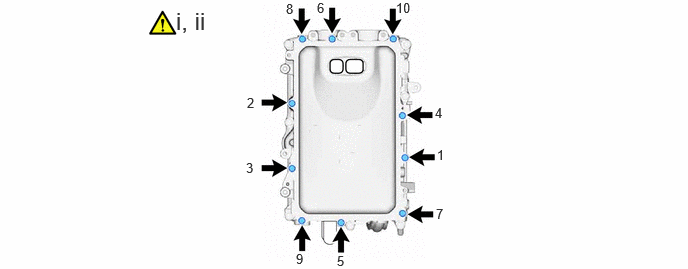
Temporarily install the 10 bolts evenly in several steps in the order shown in the illustration, and then tighten them to the specified torque.
- Torque:
- 8.4 N*m (86 kgf*cm, 74 in.*lbf)
Check the torque of the 10 bolts in the order shown in the illustration.
- Torque:
- 8.4 N*m (86 kgf*cm, 74 in.*lbf)
- NOTICE:
-
Make sure that the bolts are securely contacting the inverter upper cover.
4.INSTALL WIRE HARNESS CLAMP BRACKET
G92A0
5.INSTALL HYBRID MOTOR CONTROL INVERTER ASSEMBLY
6. OPERATION CHECK
- HINT:
-
After the repair, perform the operation checks as follows. Then check for DTCs again.
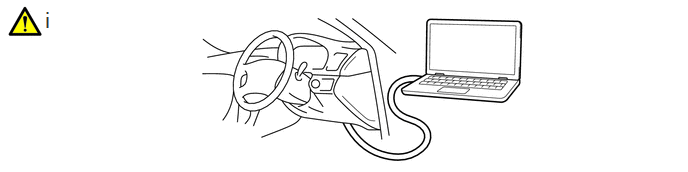
Operation check 1
1. Connect the GTS to the DLC3.
2. Turn the power switch on (IG), turn the GTS on and clear the DTCs.
3. Turn the power switch on (READY).
4. Warm up the engine with the shift lever in P and the A/C turned off until the engine stops.
- HINT:
-
The engine will stop automatically when it is warmed up.
5. Depress the accelerator pedal with the shift lever in P to start the engine.
6. As soon as the engine starts, release the accelerator pedal and wait until the engine stops.
7. Move the shift lever to D and creep the vehicle forward 5 m (16.4 ft.) with the engine stopped and without depressing the accelerator pedal.
- NOTICE:
-
Confirm the safety of the surrounding area before moving the vehicle.
8. Move the shift lever to R and creep the vehicle backward 5 m (16.4 ft.) with the engine stopped and without depressing the accelerator pedal.
- NOTICE:
-
Confirm the safety of the surrounding area before moving the vehicle.
Operation check 2
- HINT:
-
The current at the AMD terminal cannot be measured directly because of space limitations. Measure the current flowing at the auxiliary battery instead.
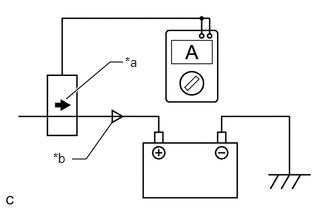
| *a | Probe Direction |
| *b | Current Flowing to Auxiliary Battery |
Connect the AC/DC 400 A probe of the tester to the positive (+) auxiliary battery cable.
Turn the power switch on (READY) and leave the vehicle as it is until the electric current flowing to the auxiliary battery becomes 10 A or less.
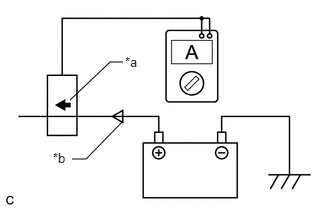
| *a | Probe Direction |
| *b | Current Flowing from Auxiliary Battery |
Change the orientation of the AC/DC 400 A probe.
Measure the current flowing from the auxiliary battery with the power switch on (READY), the headlight position switch and blower motor switch in the HI position, and the rear window defogger turned on.
- Standard Current:
Item Condition Specified Condition Current flowing from auxiliary battery Power switch on (READY)
(Headlight position switch and blower motor switch in HI position, and rear window defogger on)0 A or less
(No current from auxiliary battery)
Turn the power switch off.