1NZ-FE EMISSION CONTROL CANISTER REMOVAL
CAUTION / NOTICE / HINT
- NOTICE:
-
After turning the ignition switch off, waiting time may be required before disconnecting the cable from the battery terminal. Therefore, make sure to read the disconnecting the cable from the battery terminal notice before proceeding with work. (See page General>INTRODUCTION>REPAIR INSTRUCTION>PRECAUTION)
PROCEDURE

 58410B
1.REMOVE DECK BOARD ASSEMBLY
64771F
2.REMOVE SPARE WHEEL COVER
3.REMOVE REAR SEAT ASSEMBLY LH (for 60/40 Split Seat Type)
4.REMOVE REAR SEAT ASSEMBLY RH (for 60/40 Split Seat Type)
5.REMOVE REAR SEAT ASSEMBLY (for Fold Down Seat Type)
71305A
6.REMOVE REAR SEATBACK CENTER HINGE SUB-ASSEMBLY (for 60/40 Split Seat Type)
7. DISCHARGE FUEL SYSTEM PRESSURE
8.DISCONNECT CABLE FROM NEGATIVE BATTERY TERMINAL
77209F
9.DISCONNECT FUEL TANK MAIN TUBE SUB-ASSEMBLY
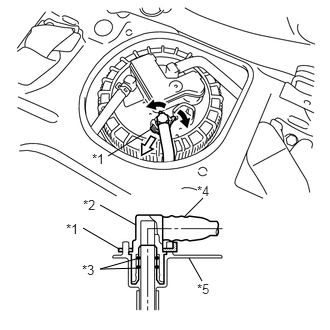
Spread the tip of the tube joint clip, and pull it out in the direction of the arrow.
| *1 | Tube Joint Clip |
| *2 | Fuel Tube Joint |
| *3 | O-Ring |
| *4 | Nylon Tube |
| *5 | Fuel Suction Plate |

|
Widen |

|
Pull Out |
Disconnect the fuel main tube from the fuel tank assembly.
- NOTICE:
- ·
Clean off any dirt or other foreign matter from the clip before beginning work.
·The fuel tube joint is sealed by O-rings to the fuel pump tube and the fuel suction plate, so be careful to prevent damage to and foreign matter sticking to the contact surfaces.
·Perform installation and removal procedures with your hands only. Never use any tools.
·Do not forcibly bend, fold, or twist the nylon tube.
·After disconnecting, protect the contact surfaces by covering them with a plastic bag.
·If the nylon tube and fuel suction plate are stuck together, push them together and pull them apart to release them.
77262
10.SEPARATE NO. 2 FUEL EMISSION TUBE
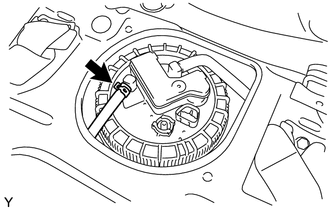
Remove the clip and disconnect the No. 2 fuel emission tube from the fuel suction plate.
77701W
11.SEPARATE NO. 1 CANISTER OUTLET HOSE SUB-ASSEMBLY
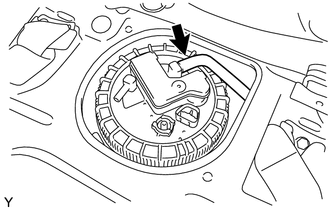
Disconnect the No. 1 canister outlet hose sub-assembly from the fuel suction plate.
77144
12.REMOVE FUEL PUMP GAUGE RETAINER
- NOTICE:
-
Before performing the work, cover the connector of the fuel suction tube assembly and the tube joint with a plastic bag to prevent foreign matter from entering, and then clean off any dirt or other foreign matter.
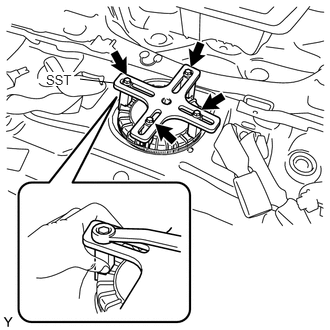
Install SST to the fuel pump gauge retainer.
- SST
- 09808-14030 (09808-01010, 09808-01020, 09808-01030, 09808-01040, 09808-01050)
Temporarily install plate and claw to the fuel pump gauge retainer.
Press claw against the rib of the fuel pump gauge retainer, and tighten bolt.
Install SST handle.
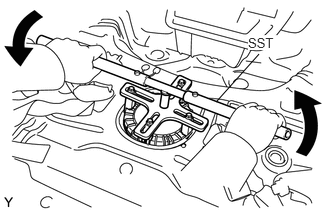
While making sure that SST does not rise up, slowly turn handle and loosen the fuel pump gauge retainer.
- NOTICE:
- ·
Be careful not to apply excessive downward force to SST, as this may damage the fuel pump or fuel tank.
·Turning SST at an angle may cause it to slip off of the fuel pump gauge retainer, so be sure SST is horizontal when turning.
·To prevent damage to parts, do not turn SST too vigorously.
·If SST slips off of the fuel pump gauge retainer, loosen SST (bolt) and install SST again.
While holding down the fuel suction tube assembly, remove the fuel tank pump gauge retainer.
77020A
13.REMOVE FUEL SUCTION TUBE ASSEMBLY WITH PUMP AND GAUGE
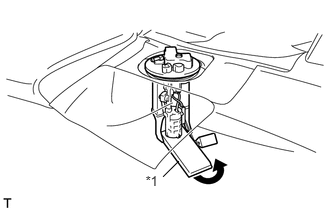
After bending up the tip of the fuel pump filter and pulling it out, pull out the arm of the fuel sender gauge assembly, and remove the fuel suction tube assembly from the fuel tank.
| *1 | Fuel Pump Filter |
|
|
Direction to Bend |
- NOTICE:
- ·
Be careful not to bend the arm of the fuel sender gauge assembly.
·When installing or removing the fuel suction tube assembly, be careful of fuel splashing.
·Do not damage the fuel pump filter.
·When setting down the fuel suction tube assembly, make sure that its weight is not pressing on the fuel pump filter.
77169A
14.REMOVE FUEL SUCTION TUBE SET GASKET
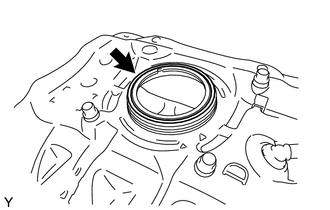
Remove the fuel suction tube set gasket.
15.DRAIN FUEL