FRONT SUSPENSION FRONT SHOCK ABSORBER INSTALLATION
CAUTION / NOTICE / HINT
- HINT:
- ·
Use the same procedure for the RH side as for the LH side.
·The procedure listed below is for the LH side.
PROCEDURE

 48158C
1.INSTALL FRONT COIL SPRING LOWER INSULATOR
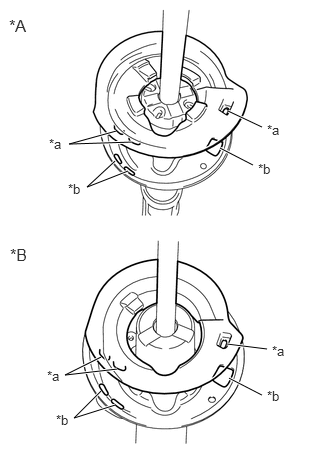
| *A | Shock Absorber Type A |
| *B | Shock Absorber Type B |
| *a | Positioning Pin |
| *b | Hole |
Install the front coil spring lower insulator to the front shock absorber.
- NOTICE:
-
Make sure that the positioning pin of the front coil spring lower insulator is inserted into the hole in the front shock absorber.
48132
2.INSTALL FRONT COIL SPRING
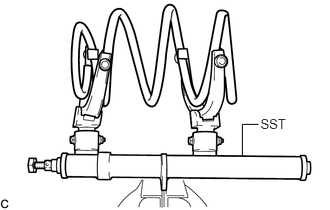
Secure SST in a vise.
- SST
- 09727-30021 (09727-00010, 09727-00021, 09727-00031)
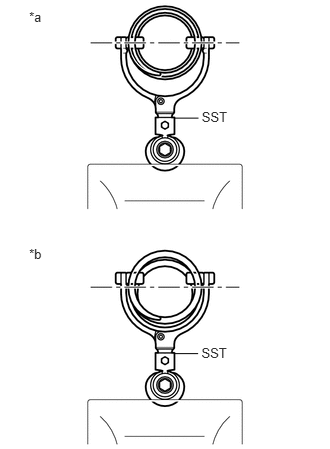
Attach the arm of SST to the diameter of the front coil spring.
| *a | Correct |
| *b | Incorrect |
- CAUTION:
- ·
Make sure that the front coil spring is installed so that the distance between the upper and lower hooks of SST is at the maximum.
·Make sure that the claws of the hooks are securely attached.
Using SST, compress the front coil spring.
- CAUTION:
- ·
If the front coil spring bends during the compression, immediately stop the compression and reinstall SST.
·Do not compress the spring until the coil springs contact each other.
·Do not use an impact wrench. It will damage SST.
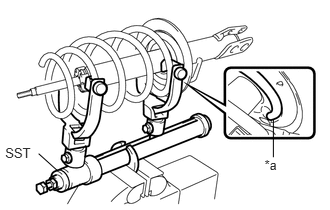
Install the front coil spring to the front shock absorber.
- CAUTION:
-
A spring of a smaller diameter should be installed in the upward direction.
- HINT:
-
Fit the lower end of the front coil spring into the gap of the front coil spring lower insulator.
48157C
3.INSTALL FRONT COIL SPRING UPPER INSULATOR
Shock Absorber Type A:
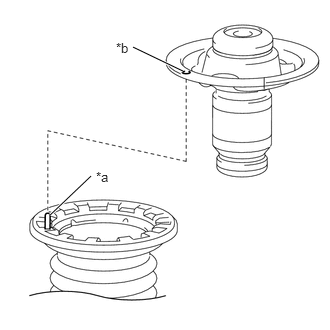
| *a | Positioning Pin |
| *b | Installation Hole |
Install the front coil spring upper insulator to the bumper seat sub-assembly.
- NOTICE:
-
When installing the front coil spring upper insulator, fit the front coil spring upper insulator to the depression of the spring seat and insert the positioning pin into the hole.
Shock Absorber Type B:
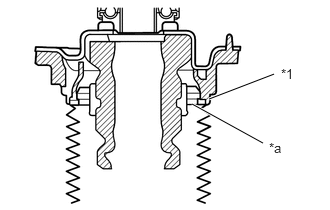
| *1 | Front Coil Spring Upper Insulator |
| *a | Top End of the Insulator (Shock Absorber Dust Cover) |
Install the front coil spring upper insulator to the bumper seat sub-assembly.
- NOTICE:
-
Make sure that the top end of the insulator (shock absorber dust cover) and the front coil spring upper insulator are securely attached.
48304B
4.INSTALL BUMPER SEAT SUB-ASSEMBLY
Install the bumper seat sub-assembly with the front coil spring upper insulator to the front shock absorber.
Temporarily tighten a new nut.
Remove SST from the front coil spring.
- NOTICE:
-
Do not use an impact wrench. It will damage SST.
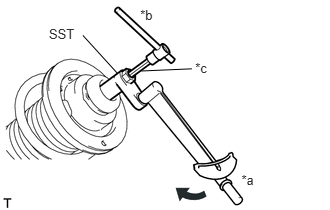
Using SST and a 6 mm long hexagon socket wrench, fix the front shock absorber rod and tighten the nut.
| *a | Turn |
| *b | Hold |
| *c | 6 mm Long Hexagon Socket Wrench |
- SST
- 09729-97202
- Torque:
- without SST : 33 N*m (340 kgf*cm, 25 ft.*lbf)
- with SST : 27 N*m (278 kgf*cm, 20 ft.*lbf)
- HINT:
- ·
This torque value is effective when SST is parallel to the torque wrench.
·This torque value can be obtained by using a torque wrench with a fulcrum length of 300 mm (11.8 in.) and a SST with a fulcrum length of 40 mm (1.57 in.).
·If using a torque wrench with a length that is not 300 mm (11.8 in.), calculate the torque specification for the torque wrench and SST based on the "without SST" torque specification (See page General>INTRODUCTION>REPAIR INSTRUCTION>PRECAUTION).
5.CONNECT FRONT COIL SPRING UPPER INSULATOR (Shock Absorber Type B)
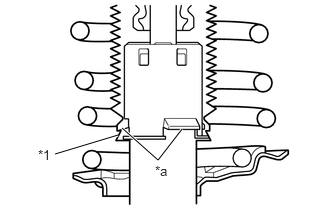
| *1 | Front Spring Bumper Sub-assembly |
| *a | Claw |
Connect the end of the insulator of the front spring bumper sub-assembly with the claws of the front shock absorber assembly.
- NOTICE:
- ·
Make sure that the end of the insulator is securely attached to the claws of the front shock absorber assembly.
·Make sure there is no excessive damage to the bellows of the insulator.
·Do not allow oil, grease, etc., to contact the insulator.
·If oil or grease has adhered, wipe clean with a cloth. Do not use an alcoholic cleaner.
48609
6.INSTALL FRONT SUSPENSION SUPPORT SUB-ASSEMBLY
48520
7.TEMPORARILY TIGHTEN FRONT SHOCK ABSORBER WITH COIL SPRING
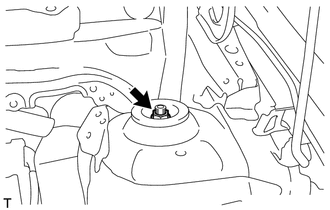
Temporarily tighten a new nut through the front No. 2 suspension support.
Install the front shock absorber with coil spring onto the steering knuckle.
Install the 2 bolts and 2 nuts.
- Torque:
- 164 N*m (1672 kgf*cm, 121 ft.*lbf)
- HINT:
-
Keep the bolt from rotating while installing and tightening the nuts.
47313A
8.INSTALL FRONT FLEXIBLE HOSE (w/ ABS)
Install the front flexible hose and front speed sensor with the bolt.
- Torque:
- 29 N*m (300 kgf*cm, 22 ft.*lbf)
- NOTICE:
-
Install the front flexible hose and front speed sensor without twisting them.
47313A
9.INSTALL FRONT FLEXIBLE HOSE (w/o ABS)
Install the front flexible hose with the bolt.
- Torque:
- 29 N*m (300 kgf*cm, 22 ft.*lbf)
- NOTICE:
-
Install the front flexible hose without twisting them.
48810
10.INSTALL FRONT STABILIZER LINK ASSEMBLY
Install the front stabilizer link assembly with the nut.
- Torque:
- 74 N*m (755 kgf*cm, 55 ft.*lbf)
- HINT:
-
Using a socket hexagon wrench 6 to hold the stud.
11.INSTALL FRONT WHEEL
- Torque:
- 103 N*m (1050 kgf*cm, 76 ft.*lbf)
48520
12.FULLY TIGHTEN FRONT SHOCK ABSORBER WITH COIL SPRING
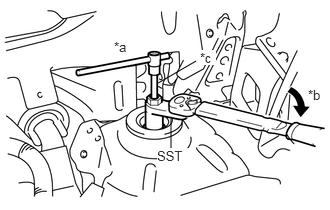
Using SST and socket hexagon wrench 6, fix the front shock absorber rod and tighten the nut.
| *a | Hold |
| *b | Turn |
| *c | 6 mm Long Hexagon Socket Wrench |
- SST
- 09729-97202
- Torque:
- with SST : 55 N*m (561 kgf*cm, 41 ft.*lbf)
- without SST : 48 N*m (485 kgf*cm, 35 ft.*lbf)
- HINT:
- ·
This torque value is effective when SST is parallel to the torque wrench.
·This torque value can be obtained by using a torque wrench with a fulcrum length of 345 mm (13.6 in.) and SST with a fulcrum length of 40 mm (1.57 in.).
·If using a torque wrench with a length that is not 345 mm (1.13 ft.), calculate the torque specification for the torque wrench and SST based on the "without SST" torque specification (See page General>INTRODUCTION>REPAIR INSTRUCTION>PRECAUTION).
48684B
13.INSTALL FRONT SUSPENSION SUPPORT DUST COVER
55711
14.INSTALL OUTER COWL TOP PANEL
55722C
15.INSTALL INNER COWL TOP TO COWL BRACE
55815E
16.INSTALL FRONT NO. 1 VENTILATOR SEAL
55735D
17.INSTALL FRONT AIR SHUTTER SEAL RH
85110
18.INSTALL WINDSHIELD WIPER MOTOR ASSEMBLY
19.INSPECT AND ADJUST FRONT WHEEL ALIGNMENT