SUPPLEMENTAL RESTRAINT SYSTEMS CURTAIN SHIELD AIRBAG ASSEMBLY(for 5 Door) INSTALLATION
CAUTION / NOTICE / HINT
- CAUTION:
-
Some of these service operations affect the SRS airbag system. Read the precautionary notices concerning the SRS airbag system before servicing (See page Vehicle Interior>SUPPLEMENTAL RESTRAINT SYSTEMS>AIRBAG SYSTEM (w/ VSC/Built-in Type Yaw Rate Sensor)>PRECAUTION).
- HINT:
-
The procedure described below is for the RH side. Use the same procedure for both the RH and LH sides, unless otherwise specified.
PROCEDURE

 62170A
1.INSTALL CURTAIN SHIELD AIRBAG ASSEMBLY
Check that the ignition switch is off.
Check that the cable is disconnected from the negative (-) battery terminal.
- CAUTION:
-
Wait at least 90 seconds after disconnecting the cable from the negative (-) battery terminal to disable the SRS system.
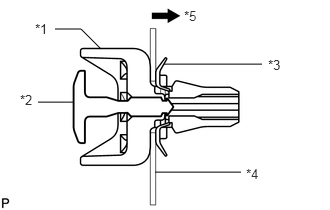
Install 6 new clips and 6 new spacers to the curtain shield airbag assembly as shown in the illustration.
| *1 | Clip |
| *2 | Pin |
| *3 | Spacer |
| *4 | Airbag |
| *5 | Body Side |
- HINT:
- ·
Do not push in the pin.
·Make sure that the clips are installed in the correct direction.
·Make sure that the spacers are installed properly, in the correct direction, and that they are not damaged.
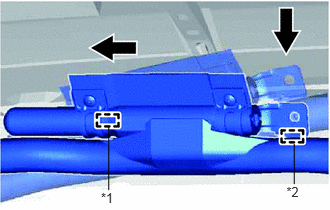
Engage hook A by inserting it while sliding in the direction shown in the illustration, then engage hook B by inserting it from the direction shown in the illustration, and temporarily install the curtain shield airbag RH with the bolt.
| *1 | Hook A |
| *2 | Hook B |
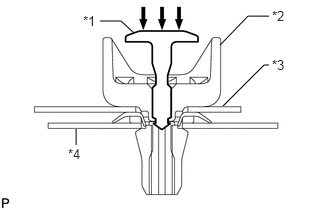
Push in the 6 pins to install the 6 clips and the curtain shield airbag assembly to the body panel as shown in the illustration.
| *1 | Pin |
| *2 | Clip |
| *3 | Airbag |
| *4 | Body Panel |
- NOTICE:
-
Make sure that the pins of the clips are pushed in firmly.
Mark the clips.
- HINT:
-
Mark the clips to make sure that they are not reused.
Tighten the bolt.
- Torque:
- 14 N*m (143 kgf*cm, 10 ft.*lbf)
- NOTICE:
-
Do not twist the curtain shield airbag assembly when installing it.
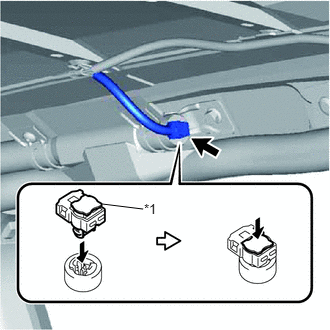
Connect the airbag connector.
| *1 | Locking Button |
Push in the locking button.
- NOTICE:
- ·
Do not damage the airbag wire harness when connecting the airbag connector.
·Securely lock the locking button.
63310
2.INSTALL ROOF HEADLINING ASSEMBLY
3.CONNECT CABLE TO NEGATIVE BATTERY TERMINAL
- Torque:
- 5.4 N*m (55 kgf*cm, 48 in.*lbf)
4.INSPECT SRS WARNING LIGHT