WINDOW / GLASS POWER WINDOW CONTROL SYSTEM B2312 Driver Side Door Master Switch Malfunction
DESCRIPTION
The power window regulator motor consists of the motor, regulator and ECU. The power window regulator motor is driven by operating the power window switch. This DTC is output when the ECU built into the regulator motor determines that the power window switch is stuck.
| DTC No. | DTC Detection Condition | Trouble Area |
|---|---|---|
| B2312 | ·
The power window regulator master switch assembly is stuck. ·
The power window regulator master switch assembly is held in the same position for more than 20 seconds. |
·
Power window regulator master switch assembly ·
Power window regulator motor assembly LH or RH (driver side) ·
Harness or connector |
WIRING DIAGRAM
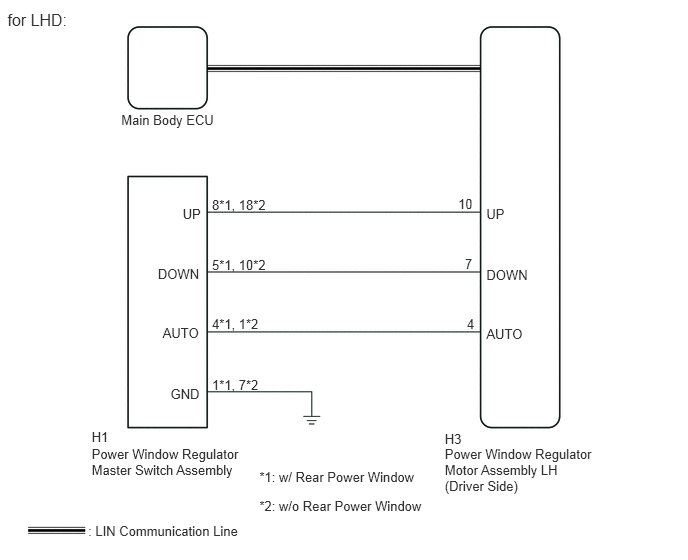
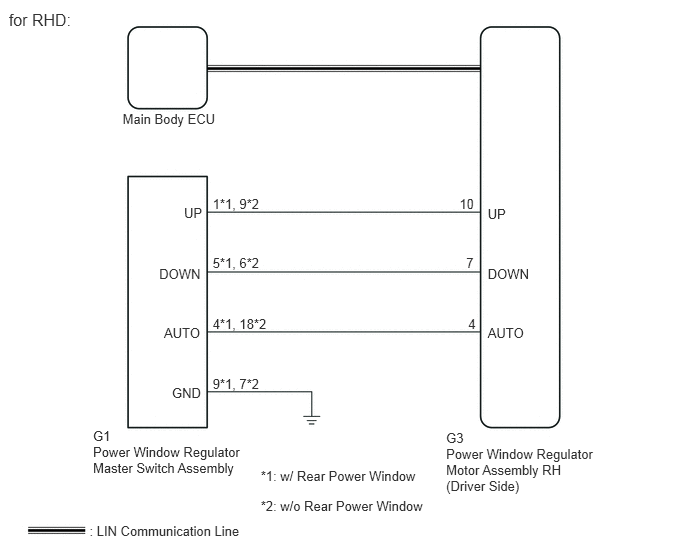
CAUTION / NOTICE / HINT
- NOTICE:
- ·
The power window control system uses a LIN communication system. Inspect the communication function by following How to Proceed with Troubleshooting (See page Power Source / Network>NETWORKING>LIN COMMUNICATION SYSTEM>HOW TO PROCEED WITH TROUBLESHOOTING). Troubleshoot the power window control system after confirming that the communication system is functioning properly.
·When the power window regulator motor assembly LH or RH (driver side) is reinstalled or replaced, the power window control system must be initialized.
·After a door glass or a door glass run has been replaced, the jam protection function may operate unexpectedly when the auto up function is used. In such cases, the auto up function can be resumed by repeating the following operations at least 5 times:
(a)Close the power window by fully pulling up the power window regulator master switch assembly and holding it in the auto up position.
(b)Open the power window by fully pushing down the power window regulator master switch assembly.
PROCEDURE
Connect the intelligent tester to the DLC3.
Turn the ignition switch to ON.
Turn the intelligent tester on.
Enter the following menus: Body / D-Door Motor / Data List.
According to the display on the intelligent tester, read the Data List.
| Tester Display | Measurement Item/Range | Normal Condition | Diagnostic Note |
|---|---|---|---|
| D Door P/W Auto SW | Driver side power window auto switch signal /
OFF or ON |
OFF: Driver side door power window auto switch not operated
ON: Driver side door power window auto switch operated |
- |
| D Door P/W Up SW | Driver side power window manual up switch signal /
OFF or ON |
OFF: Driver side door power window manual up switch not operated
ON: Driver side door power window manual up switch operated |
- |
| D Door P/W Down SW | Driver side power window manual down switch signal /
OFF or ON |
OFF: Driver side door power window manual down switch not operated
ON: Driver side door power window manual down switch operated |
- |
- OK:
Normal conditions listed above are displayed.
OK
NG
Inspect the power window regulator master switch assembly (See page Vehicle Exterior>WINDOW / GLASS>POWER WINDOW MASTER SWITCH>INSPECTION).
OK
NG
for LHD
Disconnect the H1 power window regulator master switch assembly connector.
Disconnect the H3 power window regulator motor assembly LH (driver side) connector.
Measure the resistance according to the value(s) in the table below.
- Standard Resistance:
w/ Rear Power Window Tester Connection Condition Specified Condition H1-8 (UP) - H3-10 (UP) Always Below 1 Ω H1-5 (DOWN) - H3-7 (DOWN) Always Below 1 Ω H1-4 (AUTO) - H3-4 (AUTO) Always Below 1 Ω H1-1 (GND) - Body ground Always Below 1 Ω H1-8 (UP) - Body ground Always 10 kΩ or higher H1-5 (DOWN) - Body ground Always 10 kΩ or higher H1-4 (AUTO) - Body ground Always 10 kΩ or higher
w/o Rear Power Window Tester Connection Condition Specified Condition H1-18 (UP) - H3-10 (UP) Always Below 1 Ω H1-10 (DOWN) - H3-7 (DOWN) Always Below 1 Ω H1-1 (AUTO) - H3-4 (AUTO) Always Below 1 Ω H1-7 (GND) - Body ground Always Below 1 Ω H1-18 (UP) - Body ground Always 10 kΩ or higher H1-10 (DOWN) - Body ground Always 10 kΩ or higher H1-1 (AUTO) - Body ground Always 10 kΩ or higher
for RHD
Disconnect the G1 power window regulator master switch assembly connector.
Disconnect the G3 power window regulator motor assembly RH (driver side) connector.
Measure the resistance according to the value(s) in the table below.
- Standard Resistance:
w/ Rear Power Window Tester Connection Condition Specified Condition G1-1 (UP) - G3-10 (UP) Always Below 1 Ω G1-5 (DOWN) - G3-7 (DOWN) Always Below 1 Ω G1-4 (AUTO) - G3-4 (AUTO) Always Below 1 Ω G1-9 (GND) - Body ground Always Below 1 Ω G1-1 (UP) - Body ground Always 10 kΩ or higher G1-5 (DOWN) - Body ground Always 10 kΩ or higher G1-4 (AUTO) - Body ground Always 10 kΩ or higher
w/o Rear Power Window Tester Connection Condition Specified Condition G1-9 (UP) - G3-10 (UP) Always Below 1 Ω G1-6 (DOWN) - G3-7 (DOWN) Always Below 1 Ω G1-18 (AUTO) - G3-4 (AUTO) Always Below 1 Ω G1-7 (GND) - Body ground Always Below 1 Ω G1-9 (UP) - Body ground Always 10 kΩ or higher G1-6 (DOWN) - Body ground Always 10 kΩ or higher G1-18 (AUTO) - Body ground Always 10 kΩ or higher
OK
NG