DOOR / HATCH FUEL LID LOCK CONTROL CABLE ASSEMBLY(for 3 Door) REMOVAL
PROCEDURE

 58410B
1.REMOVE DECK BOARD ASSEMBLY
64771G
2.REMOVE SPARE WHEEL COVER
3.REMOVE FRONT SEAT ASSEMBLY (for Driver Side)
4.REMOVE FRONT SEAT ASSEMBLY (for Front Passenger Side)
5.REMOVE REAR SEAT ASSEMBLY (for 60/40 Split Seat Type LH Side)
6.REMOVE REAR SEAT ASSEMBLY (for 60/40 Split Seat Type RH Side)
7.REMOVE REAR SEAT ASSEMBLY (for Fold Down Seat Type)
58912A
8.REMOVE REAR CONSOLE BOX
67913
9.REMOVE FRONT DOOR SCUFF PLATE RH
67914
10.REMOVE FRONT DOOR SCUFF PLATE LH
- HINT:
-
Use the same procedure as for the RH side.
62111C
11.REMOVE COWL SIDE TRIM BOARD RH
62112
12.REMOVE COWL SIDE TRIM BOARD LH
- HINT:
-
Use the same procedure as for the RH side.
62311B
13.SEPARATE FRONT DOOR OPENING TRIM WEATHERSTRIP RH
Separate the front door opening trim weatherstrip.
62312B
14.SEPARATE FRONT DOOR OPENING TRIM WEATHERSTRIP LH
Separate the front door opening trim weatherstrip.
73201C
15.REMOVE FRONT SEAT OUTER BELT BAR SUB-ASSEMBLY RH
73202B
16.REMOVE FRONT SEAT OUTER BELT BAR SUB-ASSEMBLY LH
- HINT:
-
Use the same procedure as for the RH side.
62511
17.REMOVE FRONT QUARTER TRIM PANEL ASSEMBLY RH
62520P
18.REMOVE FRONT QUARTER TRIM PANEL ASSEMBLY LH
- HINT:
-
Use the same procedure as for the RH side.
58387B
19.REMOVE REAR FLOOR FINISH PLATE
73360
20.SEPARATE REAR SEAT 3 POINT TYPE OUTER BELT ASSEMBLY RH
73370
21.SEPARATE REAR SEAT 3 POINT TYPE OUTER BELT ASSEMBLY LH
- HINT:
-
Use the same procedure as for the RH side.
81250
22.REMOVE NO. 2 ROOM LIGHT ASSEMBLY (w/ Luggage Compartment Room Light)
64740C
23.REMOVE DECK TRIM SIDE PANEL ASSEMBLY LH
- HINT:
-
Use the same procedure as for the RH side (See page Vehicle Interior>INTERIOR PANELS / TRIM>ROOF HEADLINING(for 3 Door)>REMOVAL).
58442F
24.REMOVE JACK COVER
09110
25.REMOVE JACK ASSEMBLY
58510D
26.REMOVE FRONT FLOOR CARPET ASSEMBLY
Disengage the 6 clamps.
Remove the clip and front floor carpet.
77306
27.REMOVE FUEL LID LOCK OPEN LEVER SUB-ASSEMBLY
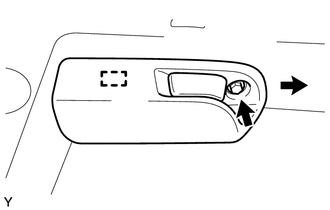
Remove the bolt.
Slide the fuel lid lock open lever as indicated by the arrow as shown in the illustration.
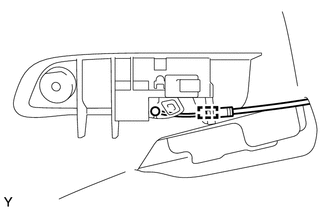
Disengage the guide and separate the fuel lid lock control cable.
77035
28.REMOVE FUEL LID LOCK CONTROL CABLE SUB-ASSEMBLY (for LHD)
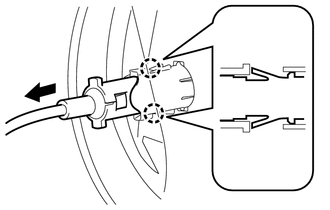
Disengage the 2 claws and separate the fuel lid lock control cable.
Disengage the 4 clamps and remove the fuel lid lock control cable as shown in the illustration.
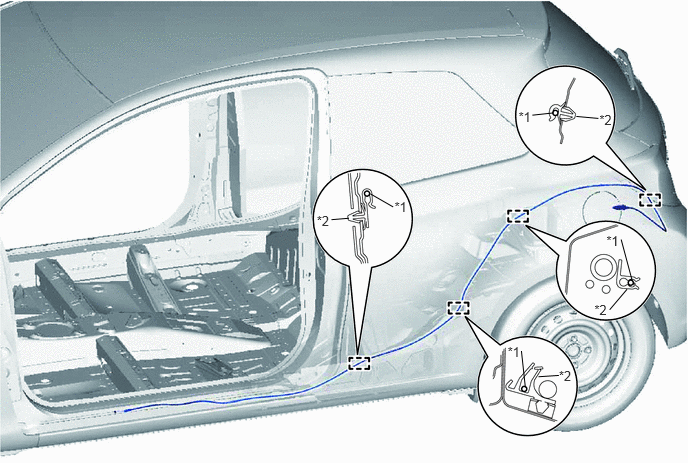
| *1 | Fuel Lid Lock Control Cable Sub-assembly | *2 | Wire Harness Clamp |
77035
29.REMOVE FUEL LID LOCK CONTROL CABLE SUB-ASSEMBLY (for RHD)
Disengage the 2 claws and separate the fuel lid lock control cable.
Disengage the 7 clamps and remove the fuel lid lock control cable as shown in the illustration.
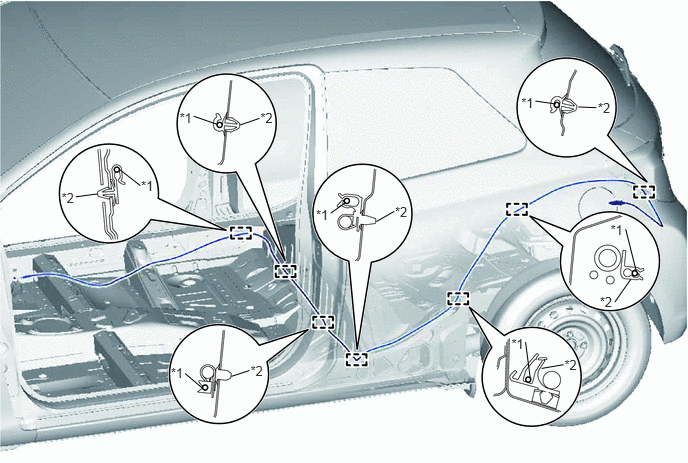
| *1 | Fuel Lid Lock Control Cable Sub-assembly | *2 | Wire Harness Clamp |
77377
30.REMOVE FUEL FILLER OPENING LID LOCK RETAINER
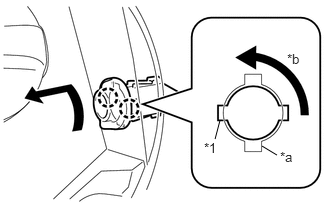
Rotate the fuel filler opening lid lock retainer by 90° and disengage the 2 claws A from the 2 slits as shown in the illustration.
| *1 | Claw A |
| *a | Slit |
| *b | Rotate |
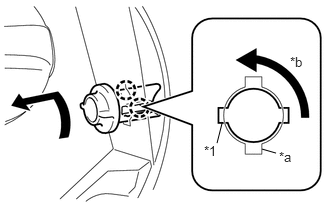
Rotate the fuel filler opening lid lock retainer by another 90° and remove it by disengaging the 2 claws B from the 2 slits as shown in the illustration.
| *1 | Claw B |
| *a | Slit |
| *b | Rotate |