EXTERIOR PANELS / TRIM BACK DOOR OUTSIDE GARNISH(w/ Power Door Lock) INSTALLATION
PROCEDURE

 76824
1.INSTALL BACK DOOR GARNISH MOULDING PROTECTOR LH
Wipe off any tape adhesive residue with cleaner.
Remove the release paper from a new back door outside garnish moulding protector LH.
- HINT:
-
After removing the release paper, keep the exposed adhesive free from foreign matter.
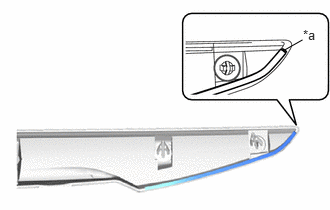
Install the back door garnish moulding protector LH as shown in the illustration.
| *a | Line Mark |
- HINT:
- ·
Use the same procedure as for the opposite side.
·Stick the back door garnish moulding protector LH on the line marked on the back door outside garnish sub-assembly.
76822B
2.INSTALL BACK DOOR GARNISH SIDE PROTECTOR LH
Wipe off any tape adhesive residue with cleaner.
Remove the release paper from a new back door outside garnish side protector LH.
- HINT:
-
After removing the release paper, keep the exposed adhesive free from foreign matter.
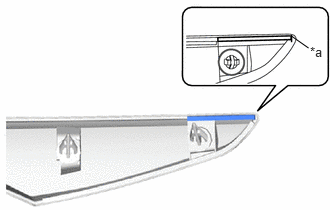
Install the back door outside garnish side protector LH as shown in the illustration.
| *a | Line Mark |
- HINT:
- ·
Use the same procedure as for the opposite side.
·Stick the back door outside garnish side protector LH on the line marked on the back door outside garnish sub-assembly.
76825
3.INSTALL BACK DOOR OUTSIDE GARNISH PROTECTOR
Wipe off any tape adhesive residue with cleaner.
Remove the release paper from a new back door outside garnish protector.
- HINT:
-
After removing the release paper, keep the exposed adhesive free from foreign matter.
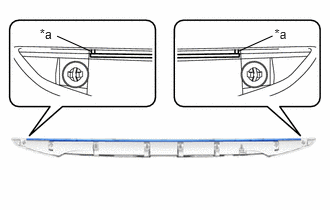
Install the back door outside garnish protector as shown in the illustration.
| *a | Line Mark |
- HINT:
- ·
Use the same procedure as for the opposite side.
·Stick the back door outside garnish protector on the line marked on the back door outside garnish sub-assembly.
84840G
4.INSTALL BACK DOOR OPENER SWITCH ASSEMBLY
76801
5.INSTALL BACK DOOR OUTSIDE GARNISH SUB-ASSEMBLY
Engage the 4 clips to install the back door outside garnish sub-assembly.
Install the 3 nuts.
- Torque:
- 4.9 N*m (50 kgf*cm, 43 in.*lbf)
Connect the connector.
76827A
6.INSTALL NO. 2 BACK DOOR GARNISH RETAINER (w/o Rear View Monitor System)
86790D
7.INSTALL REAR TELEVISION CAMERA ASSEMBLY (w/ Rear View Monitor System)
85110R
8.INSTALL REAR WIPER MOTOR ASSEMBLY