DOOR / HATCH BACK DOOR REASSEMBLY
PROCEDURE

 75442
1.INSTALL NO. 2 LUGGAGE COMPARTMENT DOOR NAME PLATE
75446A
2.INSTALL NO. 6 BACK DOOR NAME PLATE
75741E
3.INSTALL SYMBOL EMBLEM
64381A
4.INSTALL PACKAGE TRAY TRIM HANGER
- HINT:
-
Use the same procedures for the opposite side.
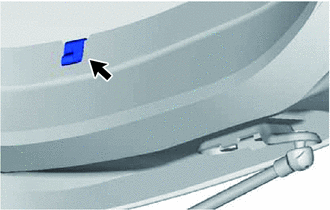
Install the package tray trim hanger.
82185
5.INSTALL BACK DOOR NO. 2 WIRE
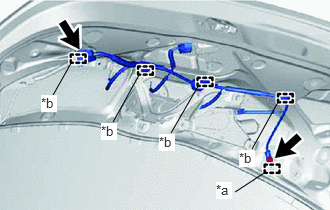
Engage the 4 clamps.
| *a | Hook |
| *b | Clamp |
Connect the connector.
Engage the hook.
Install the back door No. 2 wire with the bolt.
- Torque:
- 8.4 N*m (85 kgf*cm, 74 in.*lbf)
82186
6.INSTALL REAR WINDOW NO. 1 WIRE (w/ Rear Window Defogger)
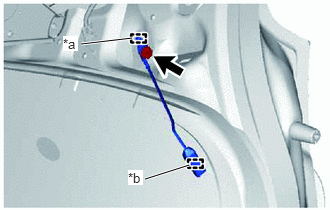
Engage the clamp to install the rear window No. 1 wire.
| *a | Hook |
| *b | Clamp |
Engage the hook.
Install the bolt.
- Torque:
- 8.4 N*m (85 kgf*cm, 74 in.*lbf)
81270
7.INSTALL LICENSE PLATE LIGHT ASSEMBLY
67005B
8.INSTALL BACK DOOR PANEL CUSHION
- HINT:
-
Use the same procedures for the opposite side.
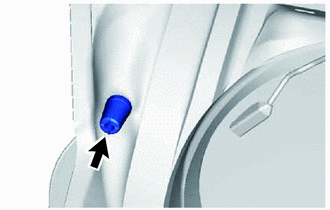
Install a new back door panel cushion.
67894B
9.INSTALL BACK DOOR PANEL NO. 2 PROTECTOR
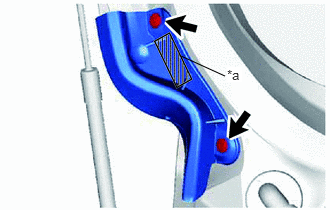
Using a piece of cloth or similar material, rub off any double-sided tape remaining on the back door panel.
| *a | Double-sided Tape |
- NOTICE:
-
Installing the back door panel protector with any double-sided tape remaining on the back door panel may cause adhesion failure. Therefore, completely remove the double-sided tape.
Using a non-residue solvent, clean the attachment surface.
Remove the double-sided tape backing of the new back door panel protector.
Install the back door panel protector with the 2 clips.
- NOTICE:
-
Thoroughly press the back door panel protector to ensure that it adheres.
67893A
10.INSTALL BACK DOOR PANEL NO. 1 PROTECTOR
- HINT:
-
Use the same procedures as for the back door panel No. 2 protector.
85345R
11.INSTALL REAR WASHER NOZZLE
81570
12.INSTALL CENTER STOP LIGHT ASSEMBLY
81952D
13.INSTALL REAR LIGHT COVER
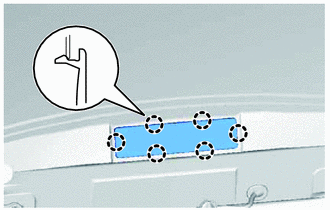
Engage the 6 claws to install the rear light cover.
84840G
14.INSTALL BACK DOOR OPENER SWITCH ASSEMBLY
76801
15.INSTALL BACK DOOR OUTSIDE GARNISH SUB-ASSEMBLY
86790D
16.INSTALL REAR TELEVISION CAMERA ASSEMBLY (w/ Rear View Monitor System)
76827A
17.INSTALL BACK DOOR GARNISH NO. 2 RETAINER (w/o Rear View Monitor System)
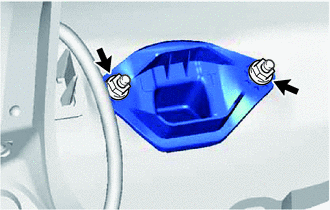
Install the back door garnish No. 2 retainer with the 2 nuts.
- Torque:
- 4.9 N*m (50 kgf*cm, 43 in.*lbf)
74811D
18.INSTALL DOOR PULL HANDLE
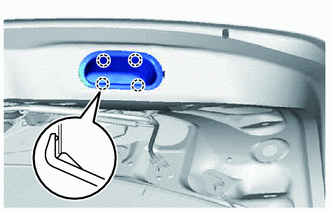
Engage the 4 claws to install the door pull handle.
69350
19.INSTALL BACK DOOR LOCK ASSEMBLY
85143R
20.INSTALL REAR WIPER MOTOR GROMMET
85110R
21.INSTALL REAR WIPER MOTOR ASSEMBLY
22.INSTALL REAR WIPER ARM AND BLADE ASSEMBLY
85292A
23.INSTALL REAR WIPER ARM HEAD CAP
67751
24.INSTALL BACK DOOR TRIM BOARD
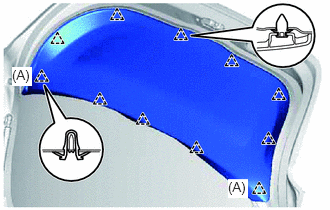
When reusing the back door trim board:
Replace the 2 clips A with new ones.
Engage the 11 clips to install the back door trim board.
76085
25.INSTALL REAR SPOILER SUB-ASSEMBLY (w/ Rear Spoiler)
76894
26.INSTALL REAR SPOILER COVER LH (w/ Rear Spoiler)
76893A
27.INSTALL REAR SPOILER COVER RH (w/ Rear Spoiler)
- HINT:
-
Use the same procedure as for the LH side.