1NZ-FE INTAKE / EXHAUST EXHAUST MANIFOLD INSTALLATION
PROCEDURE

 17173
1.INSTALL EXHAUST MANIFOLD TO HEAD GASKET
Install the new exhaust manifold to head gasket to the cylinder head assembly.
17141
2.INSTALL EXHAUST MANIFOLD
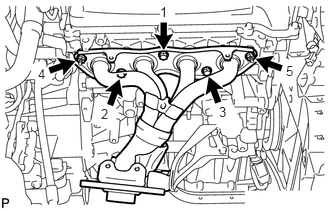
Install the exhaust manifold with the 3 bolts and 2 nuts in the order shown in the illustration.
- Torque:
- 27 N*m (275 kgf*cm, 20 ft.*lbf)
25591
3.INSTALL MANIFOLD SUPPORT BRACKET
Install the manifold support bracket with the 3 bolts.
- Torque:
- 44 N*m (449 kgf*cm, 32 ft.*lbf)
17167
4.INSTALL NO. 1 EXHAUST MANIFOLD HEAT INSULATOR
Install the No. 1 exhaust manifold heat insulator with the 4 bolts.
- Torque:
- 8.0 N*m (82 kgf*cm, 71 in.*lbf)
Install the wire harness bracket with the bolt.
- Torque:
- 61 N*m (622 kgf*cm, 45 ft.*lbf)
Engage the 2 wire harness clamps and install the wire harness.
12363A
5.INSTALL ENGINE MOVING CONTROL ROD
Install the engine moving control rod with the bolt.
- Torque:
- 120 N*m (1224 kgf*cm, 89 ft.*lbf)
17451
6.INSTALL EXHAUST PIPE GASKET
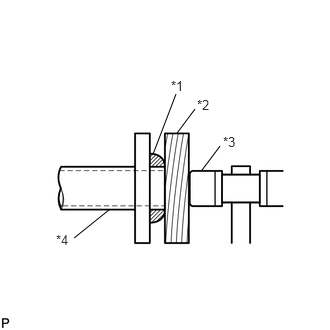
Using a plastic hammer and a wooden block, tap in a new exhaust pipe gasket until its surface is flush with the exhaust manifold.
| *1 | Exhaust pipe gasket |
| *2 | Wooden Block |
| *3 | Plastic Hammer |
| *4 | Exhaust Manifold |
- NOTICE:
- ·
Install the gasket in the correct direction.
·Do not reuse the gasket.
·Do not damage the gasket by dropping it, etc.
·Do not damage the outer surface of the gasket.
·Do not push in the gasket with the exhaust pipe when connecting it.
17451A
7.INSTALL NO. 2 EXHAUST PIPE GASKET
Using a plastic hammer and a wooden block, tap in a new No. 2 exhaust pipe gasket until its surface is flush with the front exhaust pipe assembly.
| *1 | No. 2 Exhaust Pipe Gasket |
| *2 | Wooden Block |
| *3 | Plastic Hammer |
| *4 | Front Exhaust Pipe Assembly |
- NOTICE:
- ·
Install the gasket in the correct direction.
- ·
Do not reuse the gasket.
- ·
Do not damage the gasket by dropping it, etc.
- ·
Do not damage the outer surface of the gasket.
- ·
Do not push in the gasket with the exhaust pipe when connecting it.
17410
8.INSTALL FRONT EXHAUST PIPE ASSEMBLY
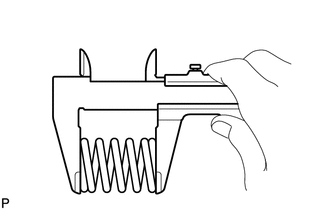
Using a vernier caliper, measure the free length of the compression spring.
- Minimum Length:
41.5 mm (1.634 in.)
If the length is not as specified, replace the compression spring.
Hang the front exhaust pipe assembly with the 3 exhaust pipe supports.
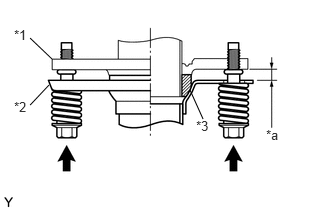
Install the front exhaust pipe sub-assembly onto the exhaust manifold converter sub-assembly with the 2 compression springs and 2 bolts.
- Torque:
- 43 N*m (438 kgf*cm, 32 ft.*lbf)
| *1 | Exhaust Manifold |
| *2 | Front Exhaust Pipe Assembly |
| *3 | Gasket |
| *a | Space between flanges: 8.5 mm (0.335 in.) |
- HINT:
-
After the installation, check that the gaps between the flanges of the exhaust manifold converter subassembly and front exhaust pipe assembly are consistent front-to-rear and left-to-right.
Using a vernier caliper, measure the free length of the compression spring.
- Minimum Length:
38.5 mm (1.516 in.)
- HINT:
-
If the length is not as specified, replace the compression spring.
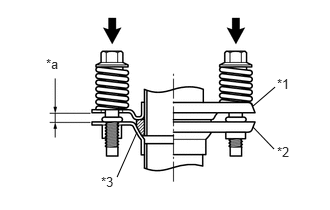
Connect the tail exhaust pipe assembly onto the front exhaust pipe assembly with the 2 compression springs and 2 bolts.
- Torque:
- 43 N*m (438 kgf*cm, 32 ft.*lbf)
| *1 | Front Exhaust Pipe Assembly |
| *2 | Tail Exhaust Pipe Assembly |
| *3 | Gasket |
| *a | Space between flanges: 6.5 mm (0.256 in.) |
- HINT:
-
After the installation, check that the gaps between the flanges of the exhaust manifold converter subassembly and front exhaust pipe assembly are consistent front-to-rear and left-to-right.
Pass the connector through the hole into the inside of the vehicle and install the oxygen sensor wire grommet.
Install the grommet and connect the oxygen sensor connector.
57533B
9.INSTALL FRONT FLOOR CENTER BRACE
Install the front floor center brace to the vehicle with the 4 bolts.
- Torque:
- 30 N*m (307 kgf*cm, 22 ft.*lbf)
58910C
10.INSTALL REAR CONSOLE BOX ASSEMBLY
89467B
11.INSTALL AIR FUEL RATIO SENSOR
12.INSPECT FOR EXHAUST GAS LEAK
- HINT:
-
Perform "Inspection After Repairs" after repairing gas leaks in the exhaust system.
-
Click hereEngine / Hybrid System>1NZ-FE ENGINE CONTROL>1NZ-FE SFI SYSTEM>INITIALIZATION