SUPPLEMENTAL RESTRAINT SYSTEMS FRONT SEAT SIDE AIRBAG ASSEMBLY(for Driver Side) INSTALLATION
CAUTION / NOTICE / HINT
- CAUTION:
- ·
Some of these service operations affect the SRS airbag system. Read the precautionary notices concerning the SRS airbag system before servicing (See page Vehicle Interior>SUPPLEMENTAL RESTRAINT SYSTEMS>AIRBAG SYSTEM (w/ VSC/Built-in Type Yaw Rate Sensor)>PRECAUTION).
·If the side airbag was deployed, replace the front seat airbag assembly, separate type front seatback spring assembly, separate type front seatback cover and separate type front seatback pad with a new one.
·Wear protective gloves. Sharp areas on the parts may injure your hands.
- NOTICE:
-
Always use "TORX" socket wrench E10 when removing the front seat.
PROCEDURE

 1.INSTALL FRONT SEAT SIDE AIRBAG ASSEMBLY
- CAUTION:
- ·
The nuts must not be reused.
·Make sure that the separate type front seatback spring assembly is not deformed. If it is, replace it with a new one.
Install the front seat side airbag assembly with 2 new nuts.
- Torque:
- 5.5 N*m (56 kgf*cm, 49 in.*lbf)
Engage the 2 clamps.
Engage the 7 clamps to install the front seat side airbag wire harness.
2.INSTALL FRONT SEATBACK COVER WITH PAD
Temporary install the front seatback cover with pad.
Install the front seatback cover bracket with the 2 nuts.
- Torque:
- : 5.5 N*m (56 kgf*cm, 49 in.*lbf)
- NOTICE:
- ·
For vehicles with side airbags, the side airbags may not be activated normally unless the front seatback cover is securely installed.
·Check that the strap is not twisted after installing the bracket.
·Install the bracket securely.
Fasten the 2 zippers. (for Sport Package)
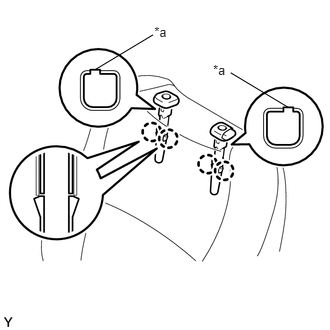
Align the protruding portion of the front seat headrest support with the installation groove of the front seat adjuster frame.
| *a | Protruding |
Engage the 4 claws to install the 2 front seat headrest supports.
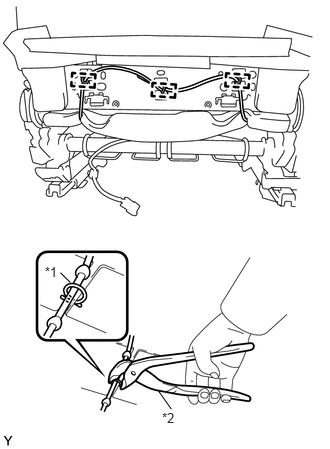
Using hog ring pliers, install 3 new hog rings.
| *1 | New Hog Ring |
| *2 | Hog Ring Pliers |
- NOTICE:
-
Do not soil or scratch the front seatback cover.
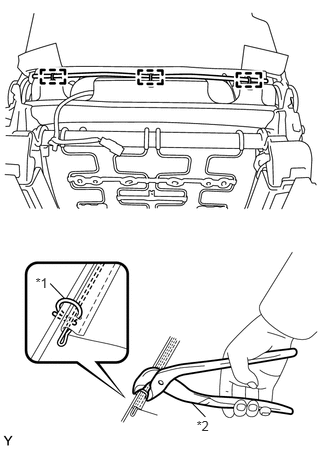
Using hog ring pliers, install 3 new hog rings.
| *1 | New Hog Ring |
| *2 | Hog Ring Pliers |
- NOTICE:
-
Do not soil or scratch the front seatback cover.
Fasten the hook and loop fastener.
Connect the seatback cover band.
71861
3.INSTALL FRONT SEAT CUSHION INNER SHIELD
- HINT:
-
Use the same procedure as for the LHD (See page Vehicle Interior>SEAT>FRONT SEAT ASSEMBLY(for Driver Side)>REASSEMBLY).
71811D
4.INSTALL FRONT SEAT CUSHION SHIELD
- HINT:
-
Use the same procedure as for the LHD (See page Vehicle Interior>SEAT>FRONT SEAT ASSEMBLY(for Driver Side)>REASSEMBLY).
72494
5.INSTALL VERTICAL ADJUSTING HANDLE (w/ Vertical Adjuster)
- HINT:
-
Use the same procedure as for the LHD (See page Vehicle Interior>SEAT>FRONT SEAT ASSEMBLY(for Driver Side)>REASSEMBLY).
72525A
6.INSTALL RECLINING ADJUSTER RELEASE HANDLE
- HINT:
-
Use the same procedure as for the LHD (See page Vehicle Interior>SEAT>FRONT SEAT ASSEMBLY(for Driver Side)>REASSEMBLY).
71910A
7.INSTALL FRONT SEAT HEADREST ASSEMBLY
- HINT:
-
Use the same procedure as for the LHD (See page Vehicle Interior>SEAT>FRONT SEAT ASSEMBLY(for Driver Side)>REASSEMBLY).
73230
8.INSTALL FRONT SEAT INNER BELT ASSEMBLY
9.CONNECT CABLE TO NEGATIVE BATTERY TERMINAL
- Torque:
- 5.4 N*m (55 kgf*cm, 48 in.*lbf)
- NOTICE:
-
When disconnecting the cable, some systems need to be initialized after the cable is reconnected.
-
Click hereGeneral>INTRODUCTION>REPAIR INSTRUCTION>INITIALIZATION
10.INSPECT SRS WARNING LIGHT