1NZ-FE ENGINE MECHANICAL CAMSHAFT INSTALLATION
PROCEDURE

 13050
1.INSTALL CAMSHAFT TIMING GEAR ASSEMBLY
- NOTICE:
-
Install the camshaft timing gear assembly onto the camshaft with the lock pin of the camshaft timing gear assembly released.
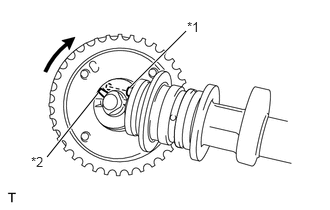
Put the camshaft timing gear assembly and camshaft together with the straight pin of the groove.
| *1 | Straight Pin |
| *2 | Groove |
Turn the camshaft timing gear assembly clockwise while pushing it gently toward the camshaft. Push further at the position where the pin fits into the groove.
- NOTICE:
-
Do not turn the camshaft timing gear to the retard angle (to the right).
Check that there is no clearance between the gear flange and the camshaft.
Tighten the flange bolt with the camshaft timing gear fixed.
- Torque:
- 64 N*m (653 kgf*cm, 47 ft.*lbf)
- NOTICE:
- ·
Do not lock the camshaft timing gear assembly when tightening the bolt.
·Release the lock pin of the camshaft timing gear assembly first, and tighten the bolt when the lock pin is locked in the most retarded position.
·Tightening the bolts with the lock pin locked could cause breakage of the lock pin.
Check that the camshaft timing gear assembly can move to the retard angle (to the right) and is locked in the most retarded position.
- HINT:
-
Perform "Inspection After Repair" after replacing the camshaft timing gear assembly.
-
Click hereEngine / Hybrid System>1NZ-FE ENGINE CONTROL>1NZ-FE SFI SYSTEM>INITIALIZATION
13511
2.INSTALL CAMSHAFT
Apply a light coat of engine oil to the camshaft and camshaft journals.
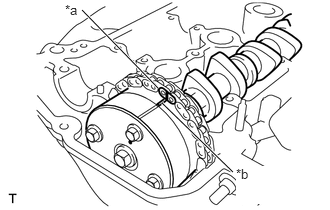
Install the chain onto the camshaft timing gear with the paint mark and the timing mark aligned as shown in the illustration.
| *a | Paint Mark |
| *b | Timing Mark |
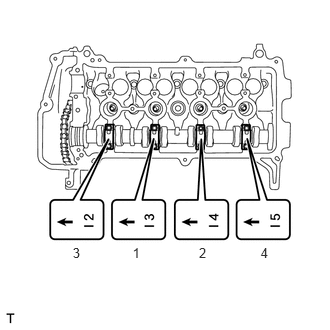
Examine the front marks and numbers on the No. 2 camshaft bearing cap and check that the sequence is as shown in the illustration. Then uniformly tighten the bolts, in several steps, in the sequence shown in the illustration.
- Torque:
- 13 N*m (129 kgf*cm, 9 ft.*lbf)
- NOTICE:
-
Tighten each bolt uniformly while keeping the camshaft level.
- HINT:
-
Perform "Inspection After Repair" after replacing the camshaft.
-
Click hereEngine / Hybrid System>1NZ-FE ENGINE CONTROL>1NZ-FE SFI SYSTEM>INITIALIZATION
13512
3.INSTALL NO. 2 CAMSHAFT
Install the No. 2 camshaft.
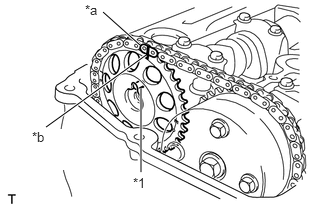
Hold the chain and align the timing mark on the camshaft timing sprocket with the paint mark of the chain.
| *1 | Pin |
| *a | Paint Mark |
| *b | Timing Mark |
Align the alignment pin hole in the camshaft timing sprocket with the alignment pin of the camshaft, and install the sprocket onto the camshaft.
Provisionally install the flange bolt.
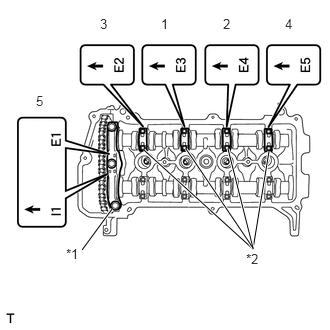
Examine the front marks and numbers on the No. 1 and No. 2 camshaft bearing caps and check that the order is as shown in the illustration. Then uniformly tighten the bolts, in several steps, in the sequence shown in the illustration.
| *1 | No. 1 Bearing Cap |
| *2 | No. 2 Bearing Cap |
- Torque:
- 13 N*m (129 kgf*cm, 9 ft.*lbf)
for No. 2 bearing cap
- 23 N*m (235 kgf*cm, 17 ft.*lbf)
for No. 1 bearing cap
- NOTICE:
-
Tighten each bolt uniformly while keeping the camshaft level.
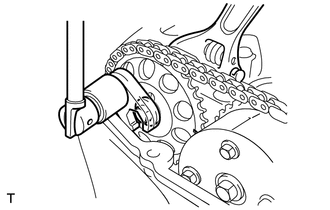
Using a union nut wrench, hold the hexagonal lobe of the No. 2 camshaft and install the flange bolt.
- Torque:
- 64 N*m (653 kgf*cm, 47 ft.*lbf)
- HINT:
-
Use the formula to calculate special torque values for situations where a union nut wrench is combined with a torque wrench.
-
Click hereGeneral>INTRODUCTION>REPAIR INSTRUCTION>PRECAUTION
Remove the bar from the timing chain tensioner.
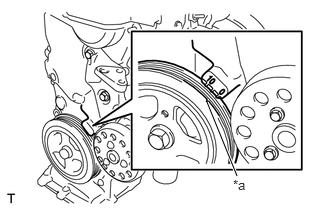
Turn the crankshaft damper and align the timing notch with the timing mark "0" of the oil pump.
| *a | Timing Notch |
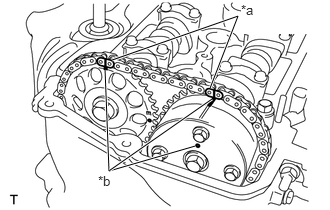
Check that all the pairs of timing marks are aligned.
| *a | Paint Mark |
| *b | Timing Mark |
Apply adhesive to 2 or 3 threads of the screw plug end.
- Adhesive:
Toyota Genuine Adhesive 1324, Three Bond 1324 or equivalent
Using an 8 mm (0.31 in.) hexagon wrench, install the screw plug.
- Torque:
- 15 N*m (153 kgf*cm, 11 ft.*lbf)
12305
4.INSTALL ENGINE MOUNTING INSULATOR SUB-ASSEMBLY RH
11201
5.INSTALL CYLINDER HEAD COVER SUB-ASSEMBLY
19500D
6.INSTALL NO. 1 IGNITION COIL
23820
7.CONNECT FUEL VAPOR FEED HOSE ASSEMBLY
12261
8.CONNECT VENTILATION HOSE
9.INSPECT FOR OIL LEAK
51441C
10.INSTALL ENGINE UNDER COVER RH (for Plastic Type)
11.INSTALL ENGINE UNDER COVER SUB-ASSEMBLY (for Metal Type)
11212
12.INSTALL NO. 2 CYLINDER HEAD COVER