1NZ-FE LUBRICATION OIL PUMP INSTALLATION
PROCEDURE

 15100
1.INSTALL OIL PUMP ASSEMBLY (for Oil Pump Type A)
- HINT:
-
The oil pump type A and oil pump type B listed in this section are differentiated based on the number of installation bolts for the oil pump assembly.
Oil Pump Type Number of Oil Pump Assembly Installation Bolts A 15 bolts B 16 bolts
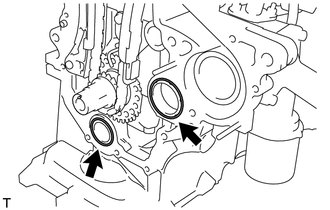
Install 2 new O-rings onto the 2 locations shown in the illustration.
Apply seal packing to the oil pump assembly, cylinder head sub-assembly and cylinder block sub-assembly as shown in the illustration.
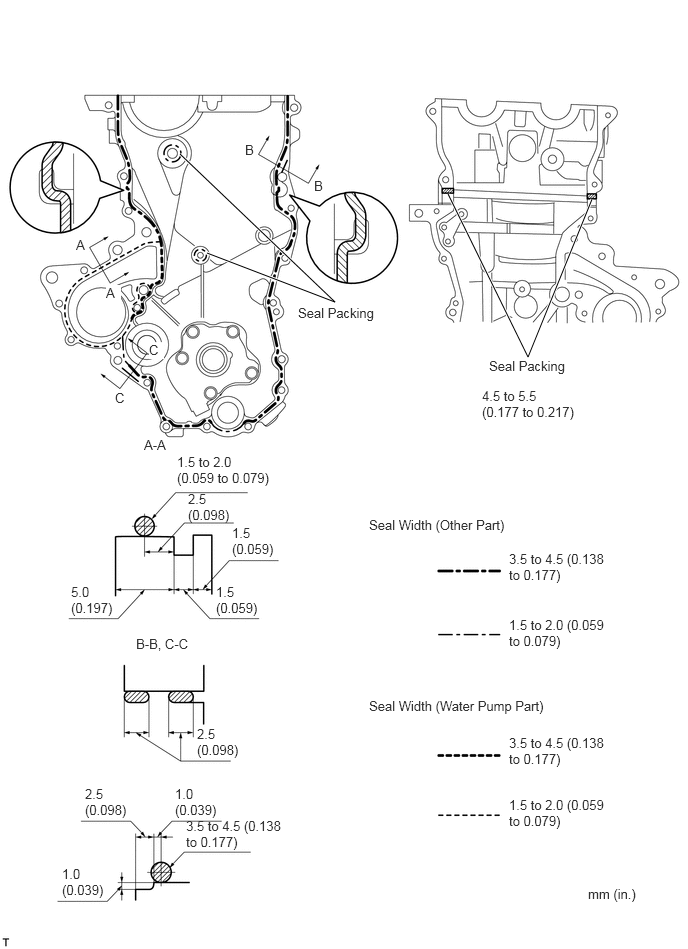
- Seal packing:
- Water pump part:
Toyota Genuine Seal Packing 1282B, Three Bond 1282B or equivalent
- Other part:
Toyota Genuine Seal Packing Black, Three Bond 1207B or equivalent
- NOTICE:
- ·
Remove any oil from the contact surface.
·Install the oil pump assembly within 3 minutes and tighten the bolts and nut within 15 minutes of applying the seal packing.
·Do not expose the seal to engine oil for at least 2 hours after the installation.
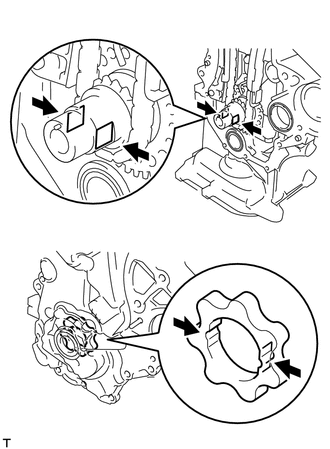
Align the keyway of the oil pump rotor with the rectangular portion of the crankshaft, and slide the oil pump into place.
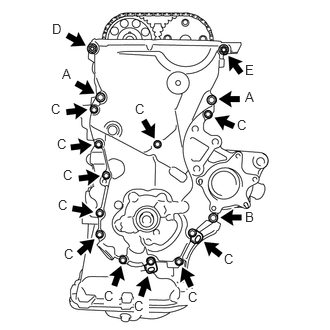
Install the oil pump assembly and 2 wire harness clamp brackets with the 15 bolts and nut. Tighten the bolts and nut uniformly in several steps.
- Torque:
- Bolt A : 32 N*m (326 kgf*cm, 24 ft.*lbf)
- Bolt B : 12 N*m (122 kgf*cm, 9 ft.*lbf)
- Bolt C : 12 N*m (122 kgf*cm, 9 ft.*lbf)
- Nut D : 24 N*m (245 kgf*cm, 18 ft.*lbf)
- Bolt E : 24 N*m (245 kgf*cm, 18 ft.*lbf)
- NOTICE:
-
Install the mounting bracket and water pump within 15 minutes of installing the oil pump assembly.
- HINT:
-
Each bolt length is as follows.
-
A: 30 mm (1.181 in.)
-
B: 35 mm (1.378 in.)
-
C: 20 mm (0.787 in.)
-
E: 14 to 22 mm (0.551 to 0.866 in.), Double ended bolt
15100
2.INSTALL OIL PUMP ASSEMBLY (for Oil Pump Type B)
- HINT:
-
The oil pump type A and oil pump type B listed in this section are differentiated based on the number of installation bolts for the oil pump assembly.
Oil Pump Type Number of Oil Pump Assembly Installation Bolts A 15 bolts B 16 bolts
Install 2 new O-rings onto the 2 locations shown in the illustration.
Apply seal packing to the oil pump assembly, cylinder head sub-assembly and cylinder block sub-assembly as shown in the illustration.
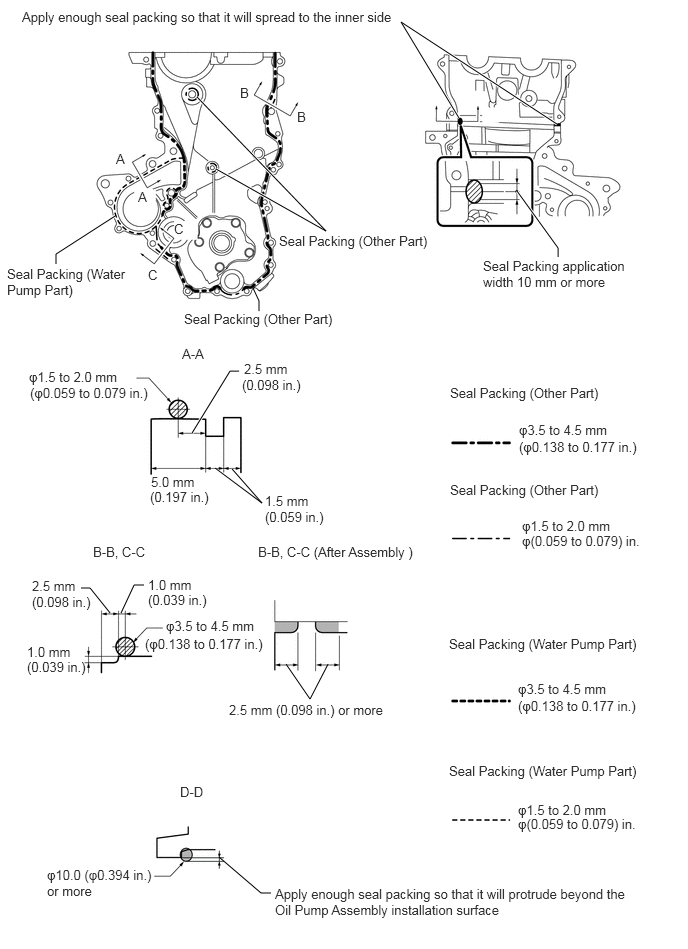
- Seal packing:
Water pump part Toyota Genuine Seal Packing 1282B, Three Bond 1282B or equivalent
Other part Toyota Genuine Seal Packing Black, Three Bond 1207B or equivalent
- NOTICE:
- ·
Remove any oil from the contact surfaces.
·Install the oil pump assembly within 3 minutes and tighten the bolts and nut within 15 minutes of applying seal packing.
·Do not expose the seal to engine oil for at least 2 hours after the installation.
Align the keyway of the oil pump rotor with the rectangular portion of the crankshaft, and slide the oil pump into place.
Temporarily install the oil pump assembly and 2 wire harness clamp brackets with the 16 bolts and nut.
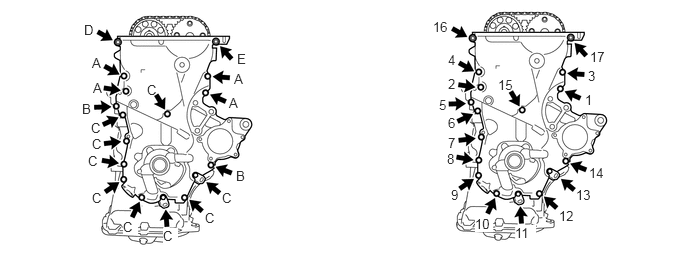
- NOTICE:
-
Do not apply oil to the bolt A.
- HINT:
-
Each bolt length is as follows.
-
A: 30 mm (1.181 in.)
-
B: 35 mm (1.378 in.)
-
C: 20 mm (0.787 in.)
-
E: 14 to 22 mm (0.551 to 0.866 in.), Double ended bolt
Tighten the 16 bolts and nut in the sequence shown in the illustration.
- Torque:
- Bolt A : 41 N*m (418 kgf*cm, 30 ft.*lbf)
- Bolt B : 12 N*m (122 kgf*cm, 9 ft.*lbf)
- Bolt C : 12 N*m (122 kgf*cm, 9 ft.*lbf)
- Nut D : 24 N*m (245 kgf*cm, 18 ft.*lbf)
- Bolt E : 24 N*m (245 kgf*cm, 18 ft.*lbf)
- NOTICE:
- ·
Be careful not to disturb the seal packing.
·After installing the oil pump assembly, install the transverse engine engine mounting bracket within 10 minutes.
12315A
3.INSTALL TRANSVERSE ENGINE ENGINE MOUNTING BRACKET
Install the transverse engine engine mounting bracket with the 4 bolts.
- Torque:
- 55 N*m (561 kgf*cm, 41 ft.*lbf)
16100
4.INSTALL WATER PUMP ASSEMBLY
16173
5.INSTALL WATER PUMP PULLEY
11101J
6.INSTALL CAMSHAFT TIMING OIL CONTROL VALVE ASSEMBLY
15100Q
7.INSTALL CRANKSHAFT POSITION SENSOR
13407
8.INSTALL CRANKSHAFT DAMPER SUB-ASSEMBLY
Align the pin hole of the crankshaft damper with the pin and install the crankshaft damper sub-assembly.
Provisionally install the bolt.
Using 2 SST, tighten the bolt while holding the crankshaft damper sub-assembly.
- SST
- 09213-14010 (91651-60865)
09330-00021
- Torque:
- 128 N*m (1305 kgf*cm, 95 ft.*lbf)
- NOTICE:
-
Check the SST installation positions when installing them, to avoid the SST fixing bolts from coming into contact with the oil pump assembly.
12305
9.INSTALL ENGINE MOUNTING INSULATOR SUB-ASSEMBLY RH
Install the engine mounting insulator sub-assembly RH with the 4 bolts and 2 nuts.
- Torque:
- 52 N*m (530 kgf*cm, 38 ft.*lbf)
11201
10.INSTALL CYLINDER HEAD COVER SUB-ASSEMBLY
23820
11.INSTALL FUEL VAPOR FEED HOSE ASSEMBLY
12261
12.INSTALL VENTILATION HOSE
19500D
13.INSTALL NO. 1 IGNITION COIL
27020
14.INSTALL GENERATOR ASSEMBLY
15.CONNECT CABLE TO NEGATIVE BATTERY TERMINAL
- Torque:
- 5.4 N*m (55 kgf*cm, 48 in.*lbf)
16.ADD ENGINE OIL
17.ADD COOLANT
18.INSPECT ENGINE OIL LEVEL
19.INSPECT FOR OIL LEAK
20.INSPECT FOR COOLANT LEAK
11212
21.INSTALL NO. 2 CYLINDER HEAD COVER
51442C
22.INSTALL ENGINE UNDER COVER LH (for Plastic Type)
51441C
23.INSTALL ENGINE UNDER COVER RH (for Plastic Type)
51405A
24.INSTALL NO. 1 ENGINE UNDER COVER SUB-ASSEMBLY (for Metal Type)
25.INSTALL FRONT WHEEL RH
- Torque:
- 103 N*m (1050 kgf*cm, 76 ft.*lbf)