INTERIOR PANELS / TRIM ROOF HEADLINING(for 5 Door) INSTALLATION
PROCEDURE

 1.INSTALL ROOF HEADLINING ASSEMBLY
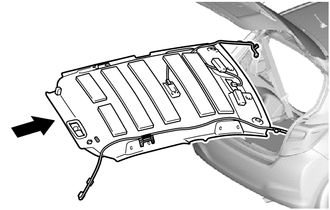
Pull the roof headlining back into the vehicle through the back door.
- NOTICE:
-
Do not damage the roof headlining assembly or body interior.
Engage the 2 hooks and install the roof headlining assembly.
Install the clip.
Engage the 2 claws.
w/ pre-crash safety system:
Connect the connector.
for front pillar RH side:
Engage the 4 clamps.
Connect the connector.
for front pillar LH side:
Engage the 4 clamps.
Connect the connector.
for rear pillar RH side:
Engage the 3 clamps.
Connect the connector.
73350C
2.INSTALL REAR CENTER SEAT OUTER BELT ASSEMBLY
Install the rear center seat outer belt with the bolt.
- Torque:
- 42 N*m (428 kgf*cm, 31 ft.*lbf)
Engage the 2 claws to close the slip joint cover.
88183
3.INSTALL PRE-CRASH SAFETY CITY COVER (w/ Pre-crash Safety System)
88184
4.INSTALL PRE-CRASH SAFETY CITY COVER 2ND (w/ Pre-crash Safety System)
81260A
5.INSTALL MAP LIGHT ASSEMBLY
81240
6.INSTALL NO. 1 ROOM LIGHT ASSEMBLY
74610S
7.INSTALL ASSIST GRIP ASSEMBLY
- HINT:
-
Use the same procedure to install all assist grips.
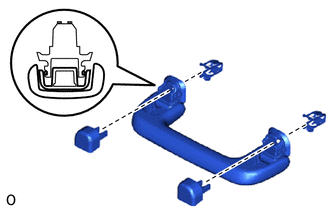
Install the 2 clips and 2 assist grip covers to the assist grip as shown in the illustration.
74348
8.INSTALL VISOR HOLDER
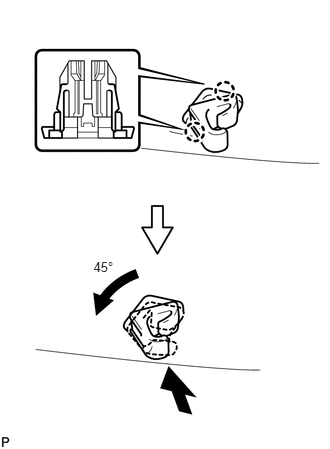
Engage the 2 claws and turn the visor holder counterclockwise 45° to install it.
- HINT:
-
Use the same procedure for the RH side and LH side.
74310
9.INSTALL VISOR ASSEMBLY RH
Install the visor assembly RH with the 2 screws.
Install the visor shaft into the visor holder.
74320
10.INSTALL VISOR ASSEMBLY LH
- HINT:
-
Use the same procedure as for the RH side.
62471A
11.INSTALL ROOF SIDE INNER GARNISH RH
Pass the rear seat 3 point type outer belt through the slit in the roof side inner garnish RH.
Engage the 4 clips to install the roof side inner garnish RH.
62472A
12.INSTALL ROOF SIDE INNER GARNISH LH
- HINT:
-
Use the same procedure as for the RH side.
64730B
13.INSTALL DECK TRIM SIDE PANEL ASSEMBLY RH
Engage the 3 clips.
Engage the guide and 4 claws to install the deck trim side panel assembly RH.
Install the 3 screws.
64740C
14.INSTALL DECK TRIM SIDE PANEL ASSEMBLY LH
- HINT:
-
Use the same procedure as for the RH side.
73360
15.INSTALL REAR SEAT 3 POINT TYPE OUTER BELT ASSEMBLY RH
Engage the 2 claws to install the rear seat 3 point type outer belt assembly RH.
Install the bolt.
- Torque:
- 42 N*m (428 kgf*cm, 31 ft.*lbf)
73370
16.INSTALL REAR SEAT 3 POINT TYPE OUTER BELT ASSEMBLY LH
- HINT:
-
Use the same procedure as for the RH side.
58387B
17.INSTALL REAR FLOOR FINISH PLATE
Engage the 4 guides and the 4 claws to install the rear floor finish plate.
09113
18.INSTALL JACK HANDLE
81330
19.INSTALL NO. 2 ROOM LIGHT ASSEMBLY
62211
20.INSTALL FRONT PILLAR GARNISH RH
Remove the piece of cloth or nylon.
for 6 speakers:
Connect the connector.
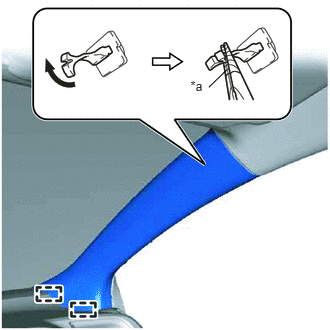
Make sure that the front pillar garnish clip is not damaged.
| *a | Protective Tape |
- NOTICE:
- ·
If there is any damage, replace the garnish clip with a new one.
·When a garnish clip is being replaced, make sure to install it in the direction shown in the illustration.
Engage the 2 guides.
Turn the end of the front pillar garnish clip 90° with needle-nosed pliers to install it to the front pillar garnish RH.
- HINT:
-
Tape the needle-nosed pliers tip before use.
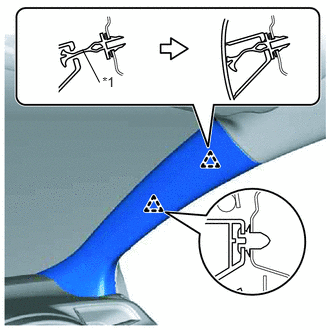
Engage the clip and front pillar garnish clip to install the front pillar garnish RH.
| *1 | Front Pillar Garnish Clip |
62212
21.INSTALL FRONT PILLAR GARNISH LH
- HINT:
-
Use the same procedure as for the RH side.
62411B
22.INSTALL CENTER PILLAR UPPER GARNISH RH
Pass the front seat outer belt through the slit in the center pillar upper garnish RH.
Engage the clip to install the center pillar upper garnish RH.
Install the 2 screws.
62412B
23.INSTALL CENTER PILLAR UPPER GARNISH LH
- HINT:
-
Use the same procedure as for the RH side.
62413A
24.INSTALL CENTER PILLAR LOWER GARNISH RH
Engage the 2 clips and the 2 claws.
Engage the 2 guides to install the center pillar lower garnish RH.
62414A
25.INSTALL CENTER PILLAR LOWER GARNISH LH
- HINT:
-
Use the same procedure as for the RH side.
73210
26.INSTALL FRONT SEAT OUTER BELT ASSEMBLY RH
Install the floor end of the front seat outer belt assembly RH with the bolt.
- Torque:
- 42 N*m (428 kgf*cm, 31 ft.*lbf)
Engage the 2 claws and install the anchor cover.
73220
27.INSTALL FRONT SEAT OUTER BELT ASSEMBLY LH
- HINT:
-
Use the same procedure as for the RH side.
62331A
28.INSTALL REAR DOOR OPENING TRIM WEATHERSTRIP RH
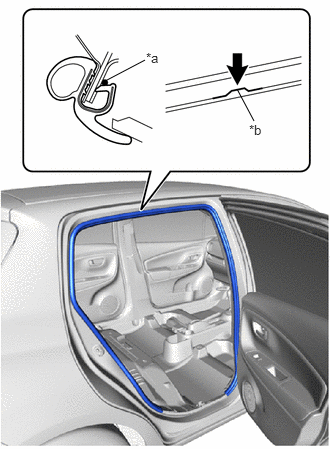
Align the paint mark on the rear door opening trim weatherstrip with the flange position on the vehicle body to install the rear door opening trim weatherstrip RH.
| *a | Paint Mark |
| *b | Flange Position |
- Paint Mark:
Area Color RH Side Purple LH Side Pink
- NOTICE:
-
After installation, check that the corners fit correctly.
62332A
29.INSTALL REAR DOOR OPENING TRIM WEATHERSTRIP LH
- HINT:
-
Use the same procedure as for the RH side.
67917A
30.INSTALL REAR DOOR SCUFF PLATE RH
Engage the guide and 5 claws to install the rear door scuff plate RH.
67918A
31.INSTALL REAR DOOR SCUFF PLATE LH
- HINT:
-
Use the same procedure as for the RH side.
62311B
32.INSTALL FRONT DOOR OPENING TRIM WEATHERSTRIP RH
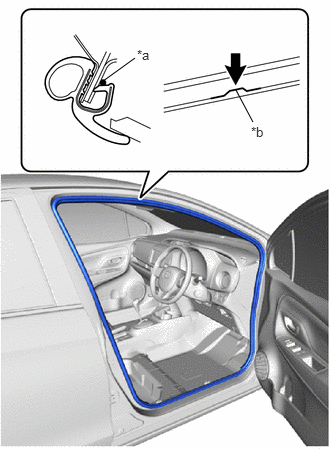
Align the paint mark on the front door opening trim weatherstrip with the flange position on the vehicle body to install the front door opening trim weatherstrip RH.
| *a | Paint Mark |
| *b | Flange Position |
- Paint Mark:
Area Color RH Side Red LH Side Blue
- NOTICE:
-
After installation, check that the corners fit correctly.
62312B
33.INSTALL FRONT DOOR OPENING TRIM WEATHERSTRIP LH
- HINT:
-
Use the same procedure as for the RH side.
62111C
34.INSTALL COWL SIDE TRIM BOARD RH
Engage the clip.
Install the cowl side trim board RH with clip.
62112
35.INSTALL COWL SIDE TRIM BOARD LH
- HINT:
-
Use the same procedure as for the RH side.
67913
36.INSTALL FRONT DOOR SCUFF PLATE RH
Engage the 8 claws to install the front door scuff plate RH.
67914
37.INSTALL FRONT DOOR SCUFF PLATE LH
- HINT:
-
Use the same procedure as for the RH side.
38.INSTALL REAR SEAT ASSEMBLY (for 60/40 Split Seat Type RH Side)
39.INSTALL REAR SEAT ASSEMBLY (for 60/40 Split Seat Type LH Side)
40.INSTALL REAR SEAT ASSEMBLY (for Fold Down Seat Type)
64771G
41.INSTALL SPARE WHEEL COVER
Install the spare wheel cover.
58410B
42.INSTALL DECK BOARD ASSEMBLY
Install the deck board assembly.