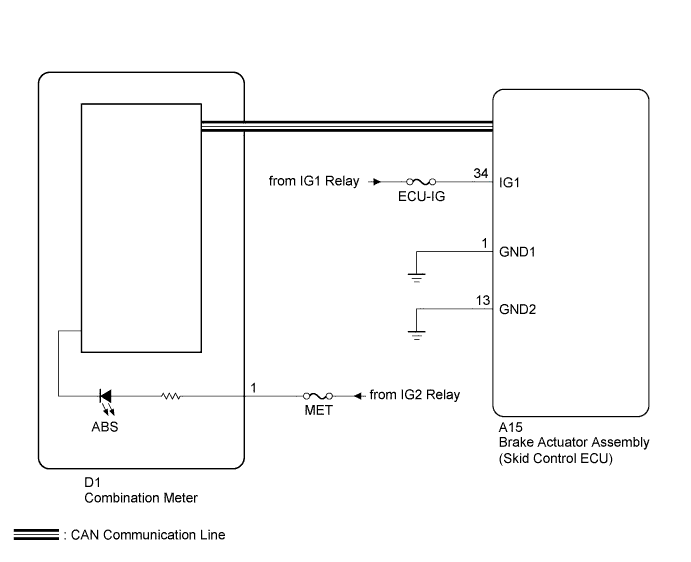
ANTI-LOCK BRAKE SYSTEM (for Sedan) > ABS Warning Light Remains ON |
| 1.INSPECT BATTERY |
Inspect the battery voltage.
|
| ||||
| OK | |
 |
| 2.CHECK IF SKID CONTROL ECU CONNECTOR IS SECURELY CONNECTED |
Check if the brake actuator assembly (skid control ECU) connector is securely connected.
|
| ||||
| OK | |
|
| 3.CHECK DTC |
Check for DTCs (Click here).
| Result | Proceed to |
| DTC is not output | A |
| DTC is output | B |
|
| ||||
| A | |
|
| 4.CHECK CAN COMMUNICATION SYSTEM |
Check if CAN communication system DTCs are output (Click here).
| Result | Proceed to |
| DTC is not output | A |
| DTC is output | B |
|
| ||||
| A | |
|
| 5.PERFORM ACTIVE TEST USING TECHSTREAM (Indicat. Lamp ABS) |
Turn the ignition switch off.
Connect the Techstream to the DLC3.
Turn the ignition switch to ON.
Turn the Techstream on.
Enter the following menus: Body Electrical / Combination Meter / Active Test.
According to the display on the Techstream, perform the Active Test.
| Tester Display | Test Part | Control Range | Diagnostic Note |
| Indicat. Lamp ABS | ABS warning light | OFF/ON | Perform the test with the vehicle stopped and the engine idling |
Check that the ABS warning light on the combination meter turns on or off in accordance with the tester operation.
|
| ||||
| OK | |
|
| 6.CHECK HARNESS AND CONNECTOR (IG1 TERMINAL) |
Turn the ignition switch off.
Make sure that there is no looseness at the locking part and the connecting part of the connectors.
Disconnect the A15 brake actuator assembly (skid control ECU) connector.
Check the connector case and terminals for deformation and corrosion.
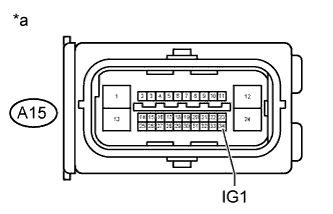 |
Measure the voltage according to the value(s) in the table below.
| Tester Connection | Switch Condition | Specified Condition |
| A15-34 (IG1) - Body ground | Ignition switch ON | 11 to 14 V |
| *a | Front view of wire harness connector (to Brake Actuator Assembly (Skid Control ECU)) |
|
| ||||
| OK | |
|
| 7.CHECK HARNESS AND CONNECTOR (GND1, GND2 TERMINAL) |
Turn the ignition switch off.
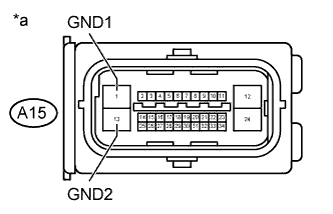 |
Measure the resistance according to the value(s) in the table below.
| Tester Connection | Condition | Specified Condition |
| A15-1 (GND1) - Body ground | Always | Below 1 Ω |
| A15-13 (GND2) - Body ground | Always | Below 1 Ω |
| *a | Front view of wire harness connector (to Brake Actuator Assembly (Skid Control ECU)) |
Reconnect the A15 brake actuator assembly (skid control ECU) connector.
|
| ||||
| OK | ||
 | ||
| ||
