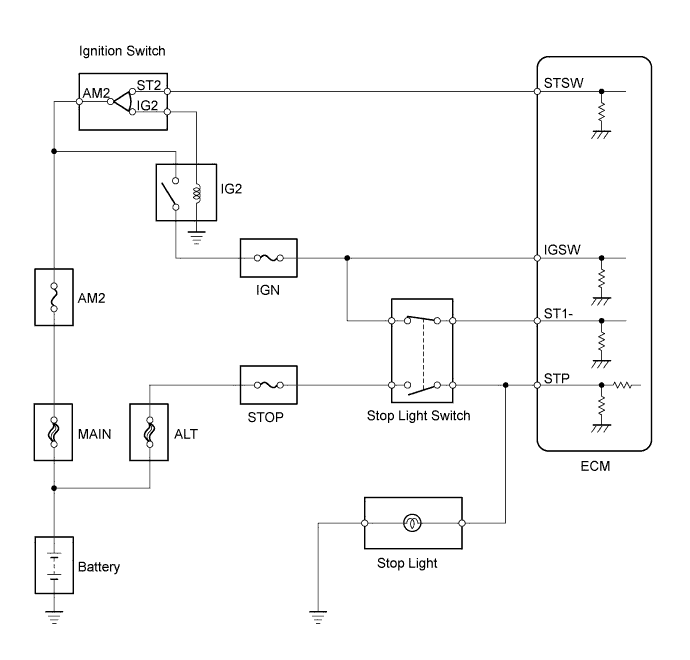
DTC P0724 Brake Switch "B" Circuit High |
| DTC No. | DTC Detection Condition | Trouble Area |
| P0724 | Stop light switch remains ON even when vehicle repeats 5 cycles of STOP (less than 3 km/h (1.86 mph)) and GO (30 km/h (18.65 mph) or more) (2 trip detection logic) |
|
| 1.READ VALUE USING TECHSTREAM (STOP LIGHT SWITCH) |
Connect the Techstream to the DLC3.
Turn the ignition switch to ON.
Turn the Techstream on.
Enter the following menus: Powertrain / Engine and ECT / Data List / Stop Light Switch.
Read the values displayed on the Techstream.
| Item | Measurement Item: Range (display) | Normal Condition |
| Stop Light Switch | Stop light switch status: ON or OFF |
|
|
| ||||
| OK | ||
 | ||
| ||
| 2.CHECK STOP LIGHT SWITCH INSTALLATION |
Check the stop light switch installation (Click here).
| Result | Proceed to |
| OK | A |
| NG | B |
|
| ||||
| A | |
 |
| 3.INSPECT STOP LIGHT SWITCH ASSEMBLY |
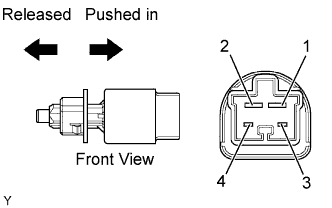 |
Remove the stop light switch assembly.
Check the resistance.
| Tester Connections | Switch Positions | Specified Conditions |
| 1 - 2 | Switch pin released | Below 1 Ω |
| Switch pin pushed in | 10 kΩ or higher | |
| 3 - 4 | Switch pin released | 10 kΩ or higher |
| Switch pin pushed in | Below 1 Ω |
Reinstall the stop light switch assembly.
| Result | Proceed to |
| OK | A |
| NG | B |
|
| ||||
| A | |
|
| 4.CHECK HARNESS AND CONNECTOR (STOP LIGHT SWITCH - ECM) |
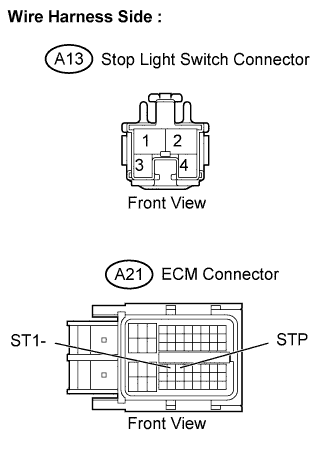 |
Disconnect the A21 ECM connector.
Disconnect the A13 stop light switch connector.
Check the resistance.
| Tester Connections | Specified Conditions |
| STP (A21-36) - Stop light switch (A13-1) | Below 1 Ω |
| ST1- (A21-35) - Stop light switch (A13-4) |
| Tester Connections | Specified Conditions |
| STP (A21-36) or Stop light switch (A13-1) - Body ground | 10 kΩ or higher |
| ST1- (A21-35) or Stop light switch (A13-4) - Body ground |
Reconnect the ECM connector.
Reconnect the stop light switch connector.
|
| ||||
| OK | ||
| ||
| ||

