Home › Engine / Hybrid System › 1NZ-FE ENGINE CONTROL › SFI SYSTEM (for Hatchback)

DTC    P219A    Bank 1 Air-Fuel Ratio Imbalance


DESCRIPTION

Refer to P0300 .
Refer to P2195 .

DTC No.
DTC Detection Condition
Trouble Area
P219A
The difference in air fuel ratios between the cylinders exceeds the threshold (2 trip detection logic).
  1. Fuel injector assembly
  2. Intake system
  3. Gas leak from exhaust system
  4. Ignition system
  5. Compression pressure
  6. Air fuel ratio sensor (bank 1 sensor 1)
  7. ECM

MONITOR DESCRIPTION

  1. Fuel System Air Fuel Ratio Cylinder Imbalance Monitor
    The ECM uses the air fuel ratio sensor and crankshaft position sensor to monitor the difference in air fuel ratios between the cylinders caused by differences in injection volumes between the cylinders, leakage in the intake or exhaust system, etc.
    When the air fuel ratios of the cylinders are lean or rich with respect to each other, the ECM determines that a problem is present and stores the DTC.
  1. Air Fuel Ratio Sensor Monitoring Method
    When the system detects a difference in air fuel ratios between the cylinders due to fluctuation in the air fuel ratio sensor output over 1 engine cycle (2 crankshaft revolutions), the system determines that there is a problem.
  1. Crankshaft Position Sensor Monitoring Method
    The system monitors the engine speed variation and when the variation becomes large, the system determines that there is a difference in air fuel ratios between the cylinders, which it determines to be a problem.

MONITOR STRATEGY


Related DTCs
P219A: Air Fuel Ratio Cylinder Imbalance Monitor
Required Sensors/Components (Main)
Air fuel ratio sensor
Crankshaft position sensor
Required Sensors/Components (Related)
Mass air flow meter
Engine coolant temperature sensor
Vehicle speed sensor
Frequency of Operation
Once per driving cycle
Duration
10 seconds: Air fuel ratio sensor monitoring method
30 seconds: Crankshaft position sensor monitoring method
MIL Operation
2 driving cycles
Sequence of Operation
None

TYPICAL ENABLING CONDITIONS


All 
Monitor runs whenever following DTCs not present
P0010 (Camshaft Timing Oil Control Valve)
P0011 (VVT System - Advance)
P0012 (VVT System - Retard)
P0016 (VVT System - Misalignment)
P0031, P0032, P101D (Air Fuel Ratio Sensor Heater)
P0102, P0103 (Mass Air Flow Meter)
P0115, P0117, P0118 (Engine Coolant Temperature Sensor)
P0120, P0121, P0122, P0123, P0220, P0222, P0223, P2135 (Throttle Position Sensor)
P0125 (Insufficient Coolant Temperature for Closed Loop Fuel Control)
P0335 (Crankshaft Position Sensor)
P0340 (Camshaft Position Sensor)
P0351 - P0354 (Igniter)
P0500 (Vehicle Speed Sensor)

Air Fuel Ratio Sensor Monitoring Method 
Air fuel ratio sensor status
Activated
Engine speed
1400 rpm or more, and less than 2600 rpm
Engine coolant temperature
75°C (167°F) or higher
Mass air flow
18 g/sec. or more, and less than 27 g/sec.
Fuel system status
Closed loop
Atmospheric pressure
76 kPa (570 mmHg) or higher

Crankshaft Position Sensor Monitoring Method 
Vehicle speed
Less than 3 km/h (1.875 mph)
Engine speed
450 rpm or more, and less than 1000 rpm
Engine coolant temperature
75°C (167°F) or higher
Air fuel ratio sensor status
Activated
Battery voltage
11 V or higher
Fuel system status
Closed loop

TYPICAL MALFUNCTION THRESHOLDS


Air Fuel Ratio Sensor Monitoring Method 
Air fuel ratio sensor monitoring method criteria
(rich side imbalance)
0.06424 or more

Crankshaft Position Sensor Monitoring Method 
Crankshaft position sensor monitoring method criteria
(lean side imbalance)
1 or more

MONITOR RESULT

Refer to detailed information in Checking Monitor Status (Click here).

P219A: Fuel System / A/F SENSOR DETERMINATION B1 
Monitor ID
Test ID
Scaling
Unit
Description
$81
$81
Multiply by 0.00003
No dimension
Monitoring method using Air fuel ratio sensor

P219A: Fuel System / ENGINE SPEED FLUCTUATION AVERAGE B1 
Monitor ID
Test ID
Scaling
Unit
Description
$81
$82
Multiply by 0.001
No dimension
Monitoring method using crank angle sensor

CONFIRMATION DRIVING PATTERN


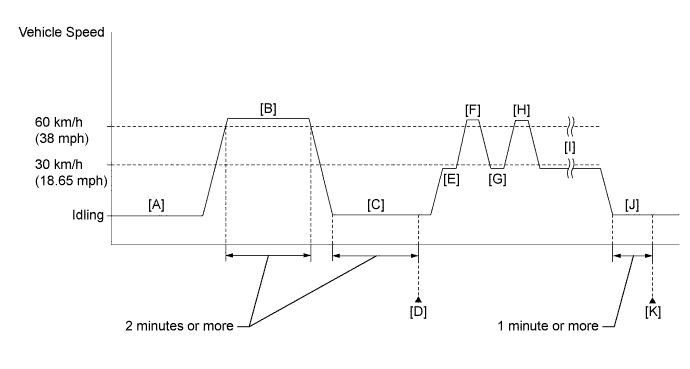
A240420E12

  1. Connect the Techstream to the DLC3.
  2. Start the engine and warm it up until the engine coolant temperature reaches 75°C (167°F) or higher [A].

    HINT:
    The A/C switch and all accessory switches should be off and the shift lever should be in P or N (neutral).

  3. Turn the Techstream on.
  4. Clear DTCs (even if no DTCs are stored, perform the clear DTC operation).
  5. Drive the vehicle at 60 km/h (38 mph) or higher for 2 minutes or more [B].

    CAUTION:
    When performing the confirmation driving pattern, obey all speed limits and traffic laws.

    HINT:
    It is acceptable to turn electrical loads on while driving.

  6. Idle the engine for 2 minutes or more [C].

    HINT:
    The A/C switch and all accessory switches should be off and the shift lever should be in P or N (neutral).

  7. Enter the following menus: Powertrain / Engine and ECT / Trouble Codes [D].
  8. Read pending DTCs.

    HINT:
    1. If a pending DTC is output, the system is malfunctioning.
    2. If a pending DTC is not output, perform the following procedure.

  9. Drive the vehicle at less than 30 km/h (18.65 mph) for 5 seconds or more [E].

    CAUTION:
    When performing the confirmation driving pattern, obey all speed limits and traffic laws.

  10. Accelerate the vehicle from 30 to 60 km/h (18.65 to 38 mph) over a period of approximately 10 to 20 seconds.

    HINT:
    Refer to the values of mass air flow and engine speed in Typical Enabling Conditions before accelerating the vehicle from 30 to 60 km/h (18.65 to 38 mph).

  11. Drive the vehicle at 60 km/h (38 mph) or more for 5 seconds or more [F].

    CAUTION:
    When performing the confirmation driving pattern, obey all speed limits and traffic laws.

  12. Drive the vehicle at less than 30 km/h (18.65 mph) for 5 seconds or more [G].
  13. Accelerate the vehicle from 30 to 60 km/h (18.65 to 38 mph) over a period of approximately 10 to 20 seconds.

    HINT:
    Refer to the values of mass air flow and engine speed in Typical Enabling Conditions before accelerating the vehicle from 30 to 60 km/h (18.65 to 38 mph).

  14. Drive the vehicle at 60 km/h (38 mph) or more for 5 seconds or more [H].

    CAUTION:
    When performing the confirmation driving pattern, obey all speed limits and traffic laws.

  15. Repeat steps [G] through [H] above at least 2 times [I].
  16. Idle the engine for 1 minute or more [J].

    HINT:
    The A/C switch and all accessory switches should be off and the shift lever should be in P or N (neutral).

  17. Enter the following menus: Powertrain / Engine and ECT / Trouble Codes [K].
  18. Read pending DTCs.

    HINT:
    1. If a pending DTC is output, the system is malfunctioning.
    2. If a pending DTC is not output, perform the following procedure.

  19. Enter the following menus: Powertrain / Engine and ECT / Utility / All Readiness.
  20. Input the DTC: P219A.
  21. Check the DTC judgment result.

    Techstream Display
    Description
    NORMAL
    1. DTC judgment completed
    2. System normal
    ABNORMAL
    1. DTC judgment completed
    2. System abnormal
    INCOMPLETE
    1. DTC judgment not completed
    2. Perform driving pattern after confirming DTC enabling conditions
    N/A
    1. Unable to perform DTC judgment
    2. Number of DTCs which do not fulfill DTC preconditions has reached ECU memory limit

    HINT:
    1. If the judgment result shows NORMAL, the system is normal.
    2. If the judgment result shows ABNORMAL, the system has a malfunction.
    3. If the judgment result shows INCOMPLETE or N/A, perform the following procedure.

  22. If no pending DTC is output, perform a universal trip and check for permanent DTCs (Click here).

    HINT:
    1. If a permanent DTC is output, the system is malfunctioning.
    2. If no permanent DTC is output, the system is normal.


WIRING DIAGRAM

Refer to Fuel Injector Circuit .

INSPECTION PROCEDURE

HINT:
  1. Sensor 1 refers to the sensor closest to the engine assembly.
  2. Sensor 2 refers to the sensor farthest away from the engine assembly.
  3. Read freeze frame data using the Techstream. Freeze frame data records the engine condition when malfunctions are detected. When troubleshooting, freeze frame data can help determine if the vehicle was moving or stationary, if the engine was warmed up or not, if the air fuel ratio was lean or rich, and other data from the time the malfunction occurred.
  4. Refer to A/F Sensor Determination (worst value) #1, Engine Speed Fluctuation Avg (worst value) #1 to #4, Cylinder #1 to #4 Misfire Count, Short FT #1 and Long FT #1 in the Data List / Active Test (Click here).

1.CHECK FOR ANY OTHER DTCS OUTPUT (IN ADDITION TO DTC P219A)
  1. Connect the Techstream to the DLC3.

  1. Turn the ignition switch to ON.

  1. Turn the Techstream on.

  1. Enter the following menus: Powertrain / Engine and ECT / Trouble Codes.

  1. Read DTCs.
    Result 
    Result
    Proceed to
    Only P219A is output
    A
    P219A and other DTCs are output
    B

    HINT:
    If any DTCs other than P219A are output, troubleshoot those DTCs first.


B
GO TO DTC CHART (Click here)
A


2.READ VALUE USING TECHSTREAM (FREEZE FRAME DATA)
  1. Connect the Techstream to the DLC3.

  1. Turn the ignition switch to ON.

  1. Using the Techstream, confirm the vehicle conditions recorded in the freeze frame data which were present when the DTC was stored (Click here).

    Freeze Frame Data Items for DTC P219A
    1. Vehicle Speed
    2. Engine Speed
    3. Calculate Load
    4. Accelerator Idle Position
    5. Short FT #1
    6. Long FT #1
    7. Cylinder #1 Misfire Count to Cylinder #4 Misfire Count
    8. A/F Sensor Determination (worst value) #1
    9. Engine Speed Fluctuation Avg (worst value) #1 to #4

    HINT:
    When the sum of Short FT and Long FT is positive, the engine is running lean, and when the sum is negative, the engine is running rich.


    DTC stored during idling
    It is possible to conclude that the problem was detected due to a "lean imbalance" (detected using crankshaft speed variation).
    DTC stored while vehicle being driven
    It is possible to conclude that the problem was detected due to a "rich imbalance" (detected using the air fuel ratio sensor).


NEXT


3.READ VALUE USING TECHSTREAM (MONITOR RESULT)
  1. Connect the Techstream to the DLC3.

  1. Turn the ignition switch to ON.

  1. Turn the Techstream on.

  1. Drive the vehicle in accordance with the driving pattern described in Confirmation Driving Pattern.

    HINT:
    1. If any misfire count ("Cylinder #1 Misfire Count" to "Cylinder #4 Misfire Count) increases while idling or driving the vehicle, proceed to step 6.
    2. Perform inspections while focusing on the cylinder whose misfire count has increased.

  1. Enter the following menus: Powertrain / Engine and ECT / Monitor / Current Monitor / Fuel System / Details / A/F SENSOR DETERMINATION B1 and ENGINE SPEED FLUCTUATION AVERAGE B1.

  1. Check the Test Result (A/F SENSOR DETERMINATION B1 and ENGINE SPEED FLUCTUATION AVERAGE B1).

    Result 
    Result
    Proceed to
    A/F SENSOR DETERMINATION is Fail
    A
    A/F SENSOR DETERMINATION and ENGINE SPEED FLUCTUATION AVERAGE are Fail
    B
    ENGINE SPEED FLUCTUATION AVERAGE is Fail
    B*

    HINT:
    1. When the results of A/F SENSOR DETERMINATION and ENGINE SPEED FLUCTUATION AVERAGE are both Pass, drive the vehicle in accordance with the driving pattern described in Confirmation Driving Pattern again.
      If both results are still Pass, proceed to step 4.
    2. *: Perform inspections while focusing on the cylinder whose engine speed fluctuation value ("Engine Speed Fluctuation Avg (worst value) #1" to "Engine Speed Fluctuation Avg (worst value) #4") was the largest.


B
Go to step 6
A


4.PERFORM ACTIVE TEST USING TECHSTREAM (CONTROL THE INJECTION VOLUME)
  1. Connect the Techstream to the DLC3.

  1. Start the engine.

  1. Turn the Techstream on.

  1. Warm up the engine.

    HINT:
    The A/C switch and all accessory switches should be off and the shift lever should be in P or N (neutral).

  1. Enter the following menus: Powertrain / Engine and ECT / Active Test / Control the Injection Volume / Data List / Cylinder #1 to #4 Misfire Count.

    HINT:
    When the "Control the Injection Volume" Active Test is selected (injection volume is 0%), if a misfire count increases, proceed to step 6 (Check Intake System).

  1. Perform the Control the Injection Volume operation with the engine idling.

  1. Check the misfire counts ("Cylinder #1 Misfire Count" to "Cylinder #4 Misfire Count") while decreasing the injection volume in 5% increments.

    NOTICE:
    Do not decrease the injection volume by more than 20%.

    Result:
    The cylinder whose misfire count has not increased can be assumed to be running rich. Therefore, perform inspections while focusing on that cylinder.


NEXT


5.CHECK FOR EXHAUST GAS LEAK
  1. Check for exhaust gas leaks.

    OK:
    No gas leaks.

    HINT:
    Perform "Inspection After Repair" after repairing or replacing the exhaust system (Click here).


NG
REPAIR OR REPLACE EXHAUST SYSTEM
OK


6.CHECK INTAKE SYSTEM
  1. Check the intake system for vacuum leakage (Click here).

    OK:
    No leakage in intake system.

    HINT:
    Perform "Inspection After Repair" after repairing or replacing the intake system (Click here).


NG
REPAIR OR REPLACE INTAKE SYSTEM
OK


7.INSPECT SPARK PLUG
  1. Inspect the spark plug of the cylinder causing the imbalance .

    HINT:
    Perform "Inspection After Repair" after replacing the spark plug (Click here).


NG
REPLACE SPARK PLUG (Click here)
OK


8.CHECK FOR SPARKS AND IGNITION
  1. Perform a spark test .

    HINT:
    If the result of the spark test is normal, proceed to the next step.


NEXT


9.CHECK CYLINDER COMPRESSION PRESSURE
  1. Measure the cylinder compression pressure of the misfiring cylinder .

    HINT:
    Perform "Inspection After Repair" after replacing the engine assembly (Click here).


NG
CHECK ENGINE TO DETERMINE CAUSE OF LOW COMPRESSION
OK


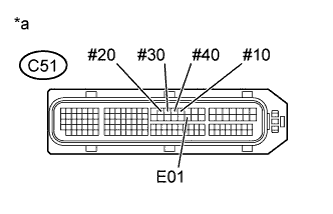
10.INSPECT TERMINAL VOLTAGE (FUEL INJECTOR CIRCUIT)
A246774E06
  1. Disconnect the ECM connector.

  1. Turn the ignition switch to ON.

  1. Measure the voltage according to the value(s) in the table below.

    Standard Voltage:
    Tester Connection
    Switch Condition
    Specified Condition
    C51-20 (#10) - C51-51 (E01)
    Ignition switch ON
    11 to 14 V
    C51-17 (#20) - C51-51 (E01)
    Ignition switch ON
    11 to 14 V
    C51-18 (#30) - C51-51 (E01)
    Ignition switch ON
    11 to 14 V
    C51-19 (#40) - C51-51 (E01)
    Ignition switch ON
    11 to 14 V

    Text in Illustration 
    *a
    Front view of wire harness connector
    (to ECM)


NG
GO TO FUEL INJECTOR CIRCUIT (Click here)
OK


11.CHECK FUEL INJECTOR ASSEMBLY OF CYLINDER CAUSING IMBALANCE
  1. Check the fuel injector injection [whether fuel volume is high or low, and whether injection pattern is poor] (Click here).

    HINT:
    Perform "Inspection After Repair" after replacing the fuel injector assembly (Click here).


NG
REPLACE FUEL INJECTOR ASSEMBLY (Click here)
OK


12.CHECK FOR CAUSE OF FAILURE
  1. If the cause of the problem has not been found even after performing the troubleshooting procedure, perform the inspection below.

  1. Check the intake valve for deposits.

    HINT:
    As the DTC may have been stored due to deposits on the intake valve, remove the cylinder head and check the intake valve.


NEXT


13.CONFIRM WHETHER MALFUNCTION HAS BEEN SUCCESSFULLY REPAIRED
  1. Connect the Techstream to the DLC3.

  1. Turn the ignition switch to ON.

  1. Turn the Techstream on.

  1. Clear the DTCs.

  1. Turn the ignition switch off and wait for at least 30 seconds.

  1. Turn the ignition switch to ON.

  1. Turn the Techstream on.

  1. Drive the vehicle in accordance with the driving pattern described in Confirmation Driving Pattern.

  1. Enter the following menus: Powertrain / Engine and ECT / Trouble Codes.

  1. Check for DTCs.

    Result:
    P219A is not output.


NEXT

END